satellite 作为yum repo的简单演示
客户购买了 redhat rhel 订阅,想在国内使用,但是 rhel 订阅在os上激活,是需要连接国外服务器的,由于众所周知的原因,国内访问有时候不稳定,甚至国外服务器本身有的时候就慢,那么这种情况下,客户就需要一个订阅的代理服务器。红帽的satellite产品,就是这样一个订阅注册代理服务器。
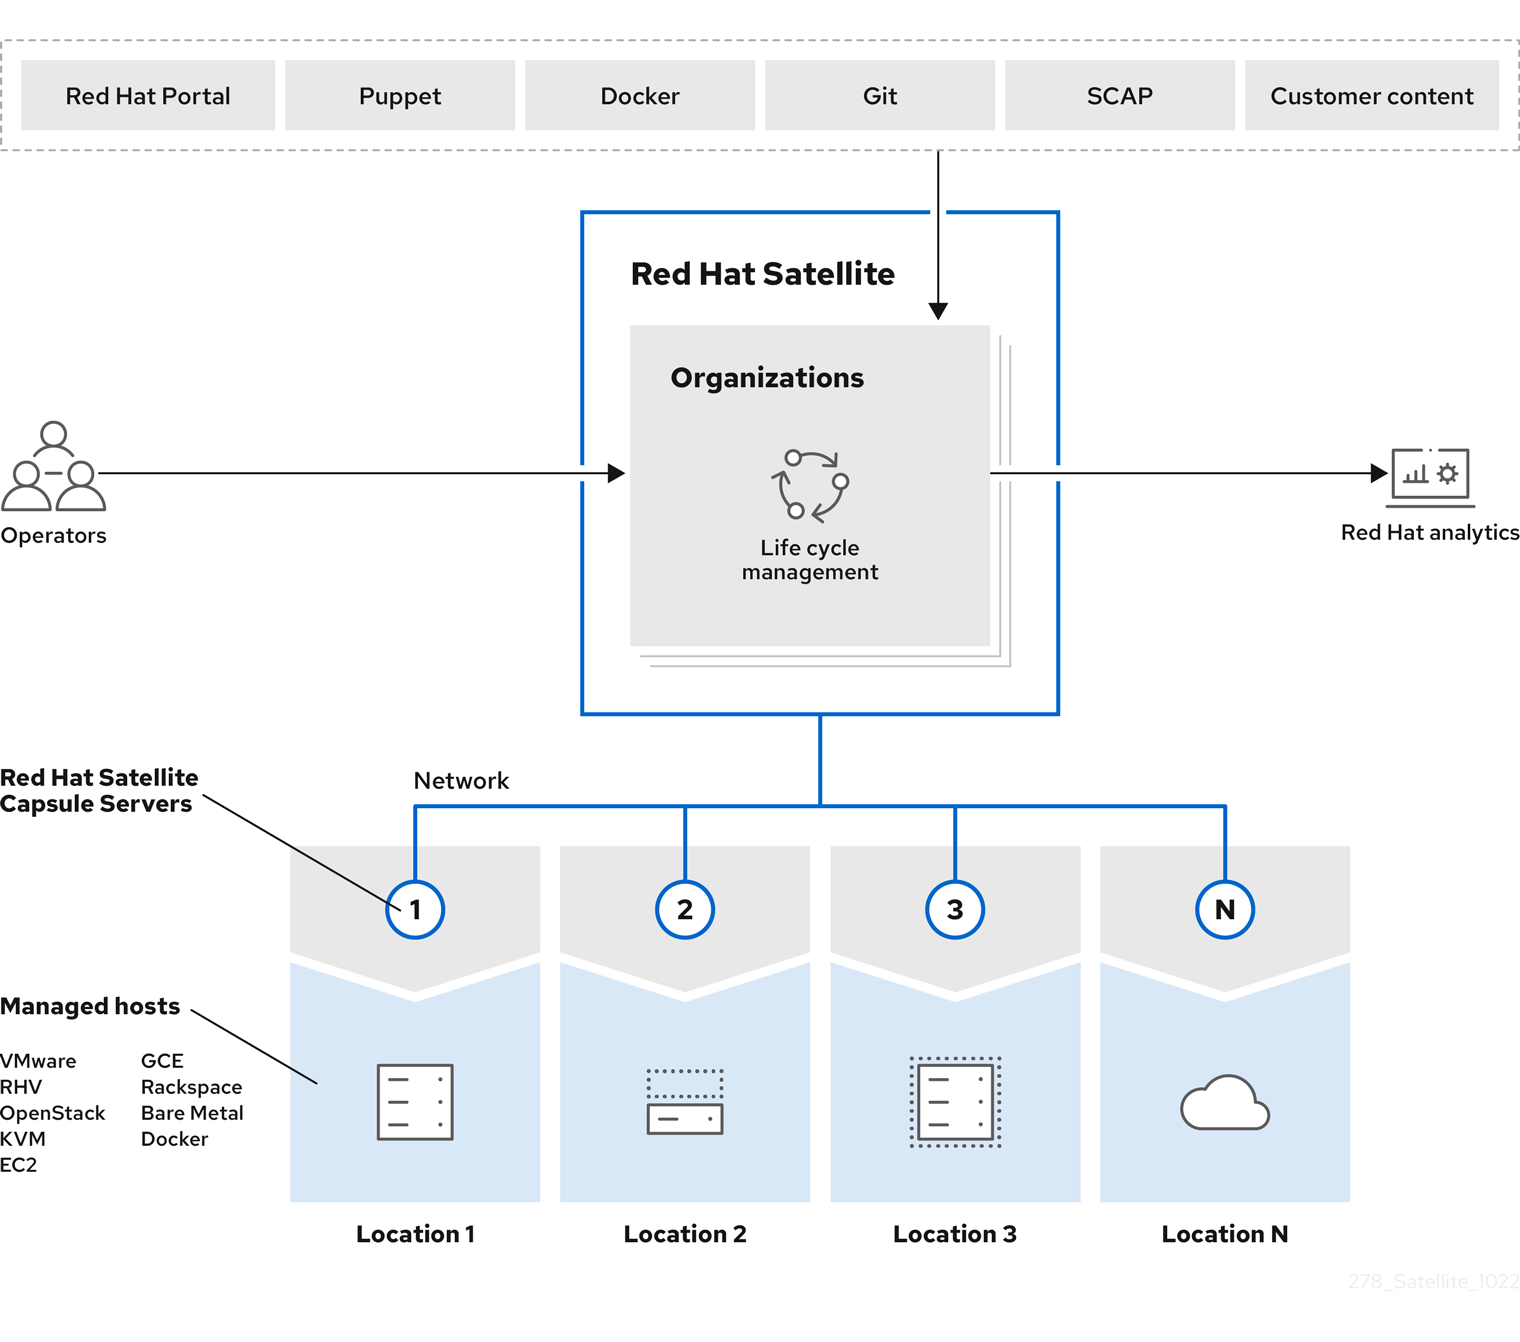
当然,satellite产品内涵很丰富,订阅注册代理只是一个其中一个很小的功能。satellite产品的标准使用场景是,用户有一个内网环境,里面有一个主机能联网,这个主机安装satellite,并向satellite导入订阅证书,启动yum repo镜像服务,iPXE, dhcp, dns服务等,这些服务在一起,就能让内网的其他主机具备了上电以后,自动安装rhel的能力,rhel装好以后,satellite还提供持续更新的功能。
所以satellite是一个带安装源的OS全生命周期管理维护产品,官方文档在这里:
- https://access.redhat.com/documentation/en-us/red_hat_satellite/6.13
本文,就演示一个最简单的场景,安装satellite,并且内网rhel在satellite上激活订阅,并使用satellite作为yum repo源。
实验架构图,请注意,本次实验展示的satellite的功能和场景很简单,其他satellite的功能,比如内容视图,satellite集群,离线操作等等很多功能,依然等待大家去探索。

- satellite 作为yum repo的简单演示
- 安装 satellite server
- 下载订阅信息
- 导入订阅信息
- 配置 yum repo 镜像
- 配置 active key
- 注册主机
- 增加订阅数量
- 超用会发生什么
- 激活 Simple Content Access (SCA)
- 使用 API 来注销主机
- 网络防火墙端口
- 端口转发
- 中国区加速
- 安装 insight 插件
- 重装os
- 监控 subscription / 订阅
- end
- next
安装 satellite server
satellite的完整产品架构里面,有server,还有独立的capsule,我们是极简部署,而且server里面也有内置的capsule,所以我们这次就部署一个server就好了。
服务器用的是16C 32G,500G HDD的VM,实际项目里面,硬盘要大点。
另外,server要有域名,而且要配置好反向解析。
# satellite server
# 172.21.6.171
# dns resolve and reverse to panlab-satellite-server.infra.wzhlab.top

# satellite client host
# 172.21.6.172

# on satellite server
ssh root@172.21.6.171

# https://access.redhat.com/documentation/en-us/red_hat_satellite/6.13/html-single/installing_satellite_server_in_a_connected_network_environment/index

systemctl disable --now firewalld.service

hostnamectl set-hostname panlab-satellite-server.infra.wzhlab.top

ping -c1 localhost
# PING localhost(localhost (::1)) 56 data bytes
# 64 bytes from localhost (::1): icmp_seq=1 ttl=64 time=0.043 ms

ping -c1 `hostname -f`
# PING panlab-satellite-server.wzhlab.top (172.21.6.171) 56(84) bytes of data.
# 64 bytes from bogon (172.21.6.171): icmp_seq=1 ttl=64 time=0.047 ms

# active subscrition on this rhel.
subscription-manager register --auto-attach --username xxxxxxxxx --password xxxxxxxxxx

# add repo for satellite
subscription-manager repos --enable=rhel-8-for-x86_64-baseos-rpms \
  --enable=rhel-8-for-x86_64-appstream-rpms \
  --enable=satellite-6.13-for-rhel-8-x86_64-rpms \
  --enable=satellite-maintenance-6.13-for-rhel-8-x86_64-rpms
# Repository 'rhel-8-for-x86_64-baseos-rpms' is enabled for this system.
# Repository 'rhel-8-for-x86_64-appstream-rpms' is enabled for this system.
# Repository 'satellite-6.13-for-rhel-8-x86_64-rpms' is enabled for this system.
# Repository 'satellite-maintenance-6.13-for-rhel-8-x86_64-rpms' is enabled for this system.

dnf module enable satellite:el8

dnf update -y

dnf install satellite chrony sos -y

systemctl enable --now chronyd

# begin install satellite
satellite-installer --scenario satellite \
--foreman-initial-organization "My_Organization" \
--foreman-initial-location "My_Location" \
--foreman-initial-admin-username admin \
--foreman-initial-admin-password redhat
# ......
# 2023-05-16 22:41:17 [NOTICE] [configure] System configuration has finished.
#   Success!
#   * Satellite is running at https://panlab-satellite-server.infra.wzhlab.top
#       Initial credentials are admin / redhat

#   * To install an additional Capsule on separate machine continue by running:

#       capsule-certs-generate --foreman-proxy-fqdn "$CAPSULE" --certs-tar "/root/$CAPSULE-certs.tar"
#   * Capsule is running at https://panlab-satellite-server.infra.wzhlab.top:9090

#   The full log is at /var/log/foreman-installer/satellite.log
# Package versions are being locked.
安装很容易,但是时间有点长,十几分钟,官方建议套在 tmux 里面运行安装程序。安装完成了,浏览器直接访问 url 就可以了。
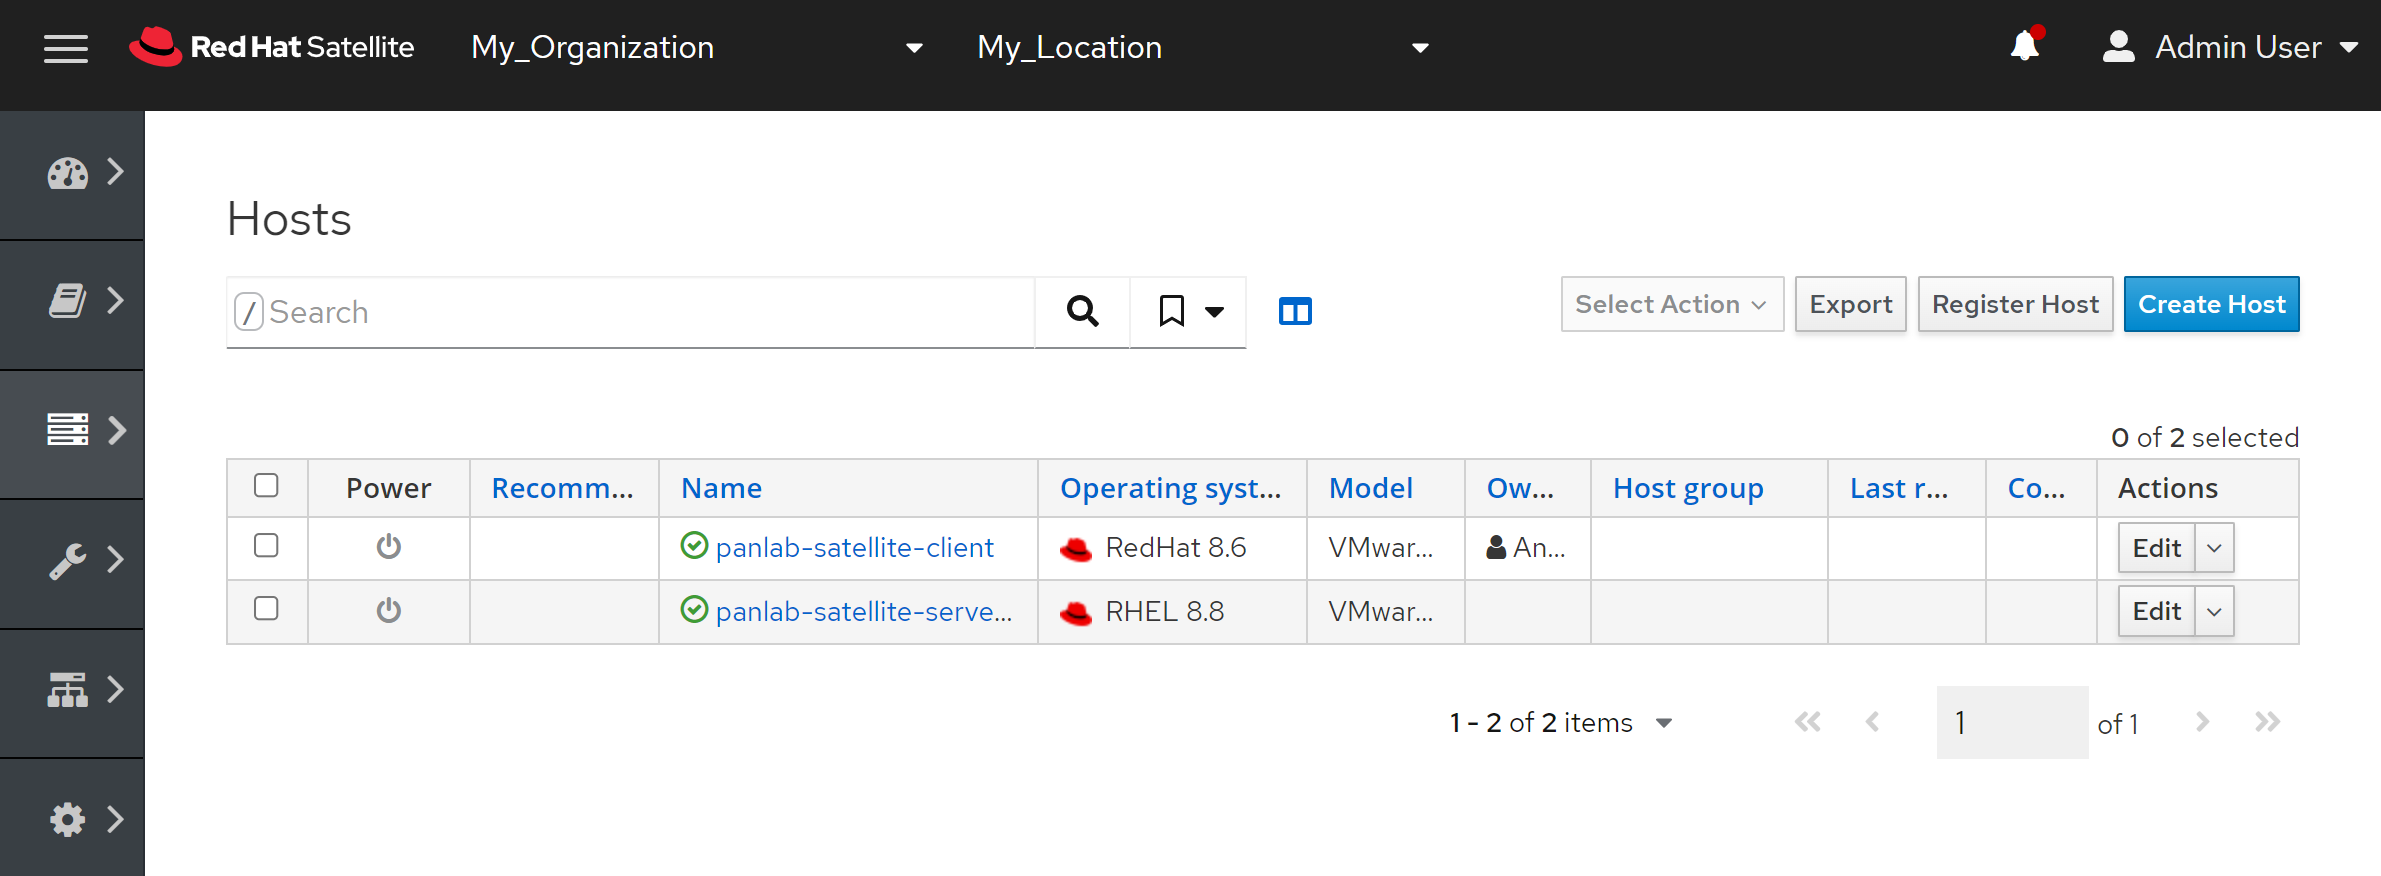
我们可以在系统里面,看到satellite server作为一个host已经存在了。

下载订阅信息
我们的业务场景,是内网主机都注册到satellite上来,这必然需要把红帽官网上的订阅信息导入到satellite里面去,我们来一步一步做一下。
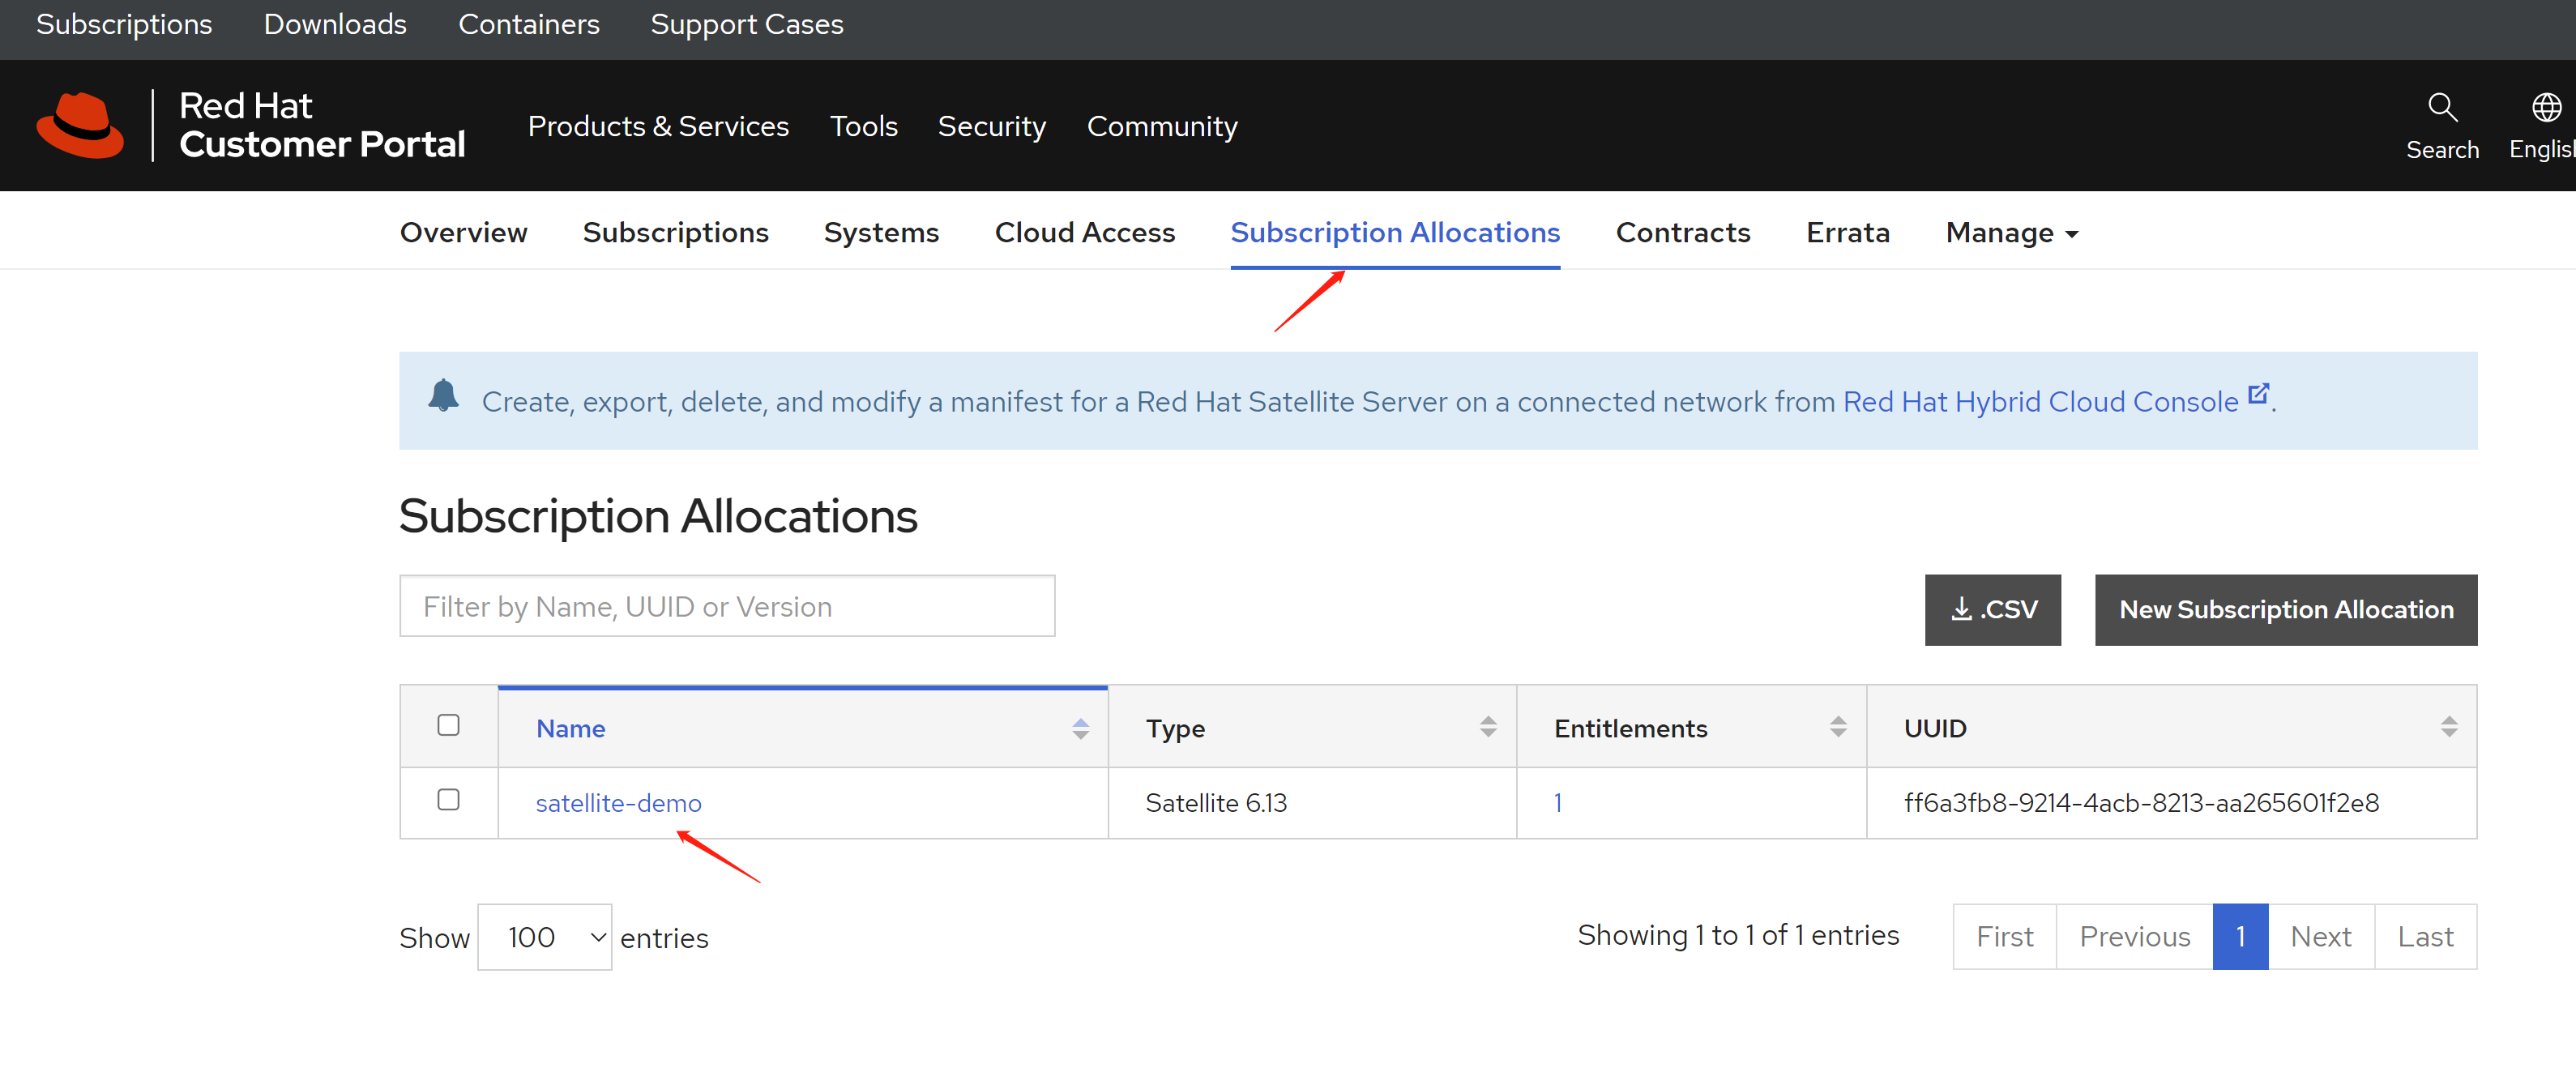
首先,我们要去红帽官网,创建一个订阅分配,如果我们有100个订阅,都要用到satellite上,那么就分配100个来。我们做实验,就分配1个,后面好实验超用,还有添加数量的场景。
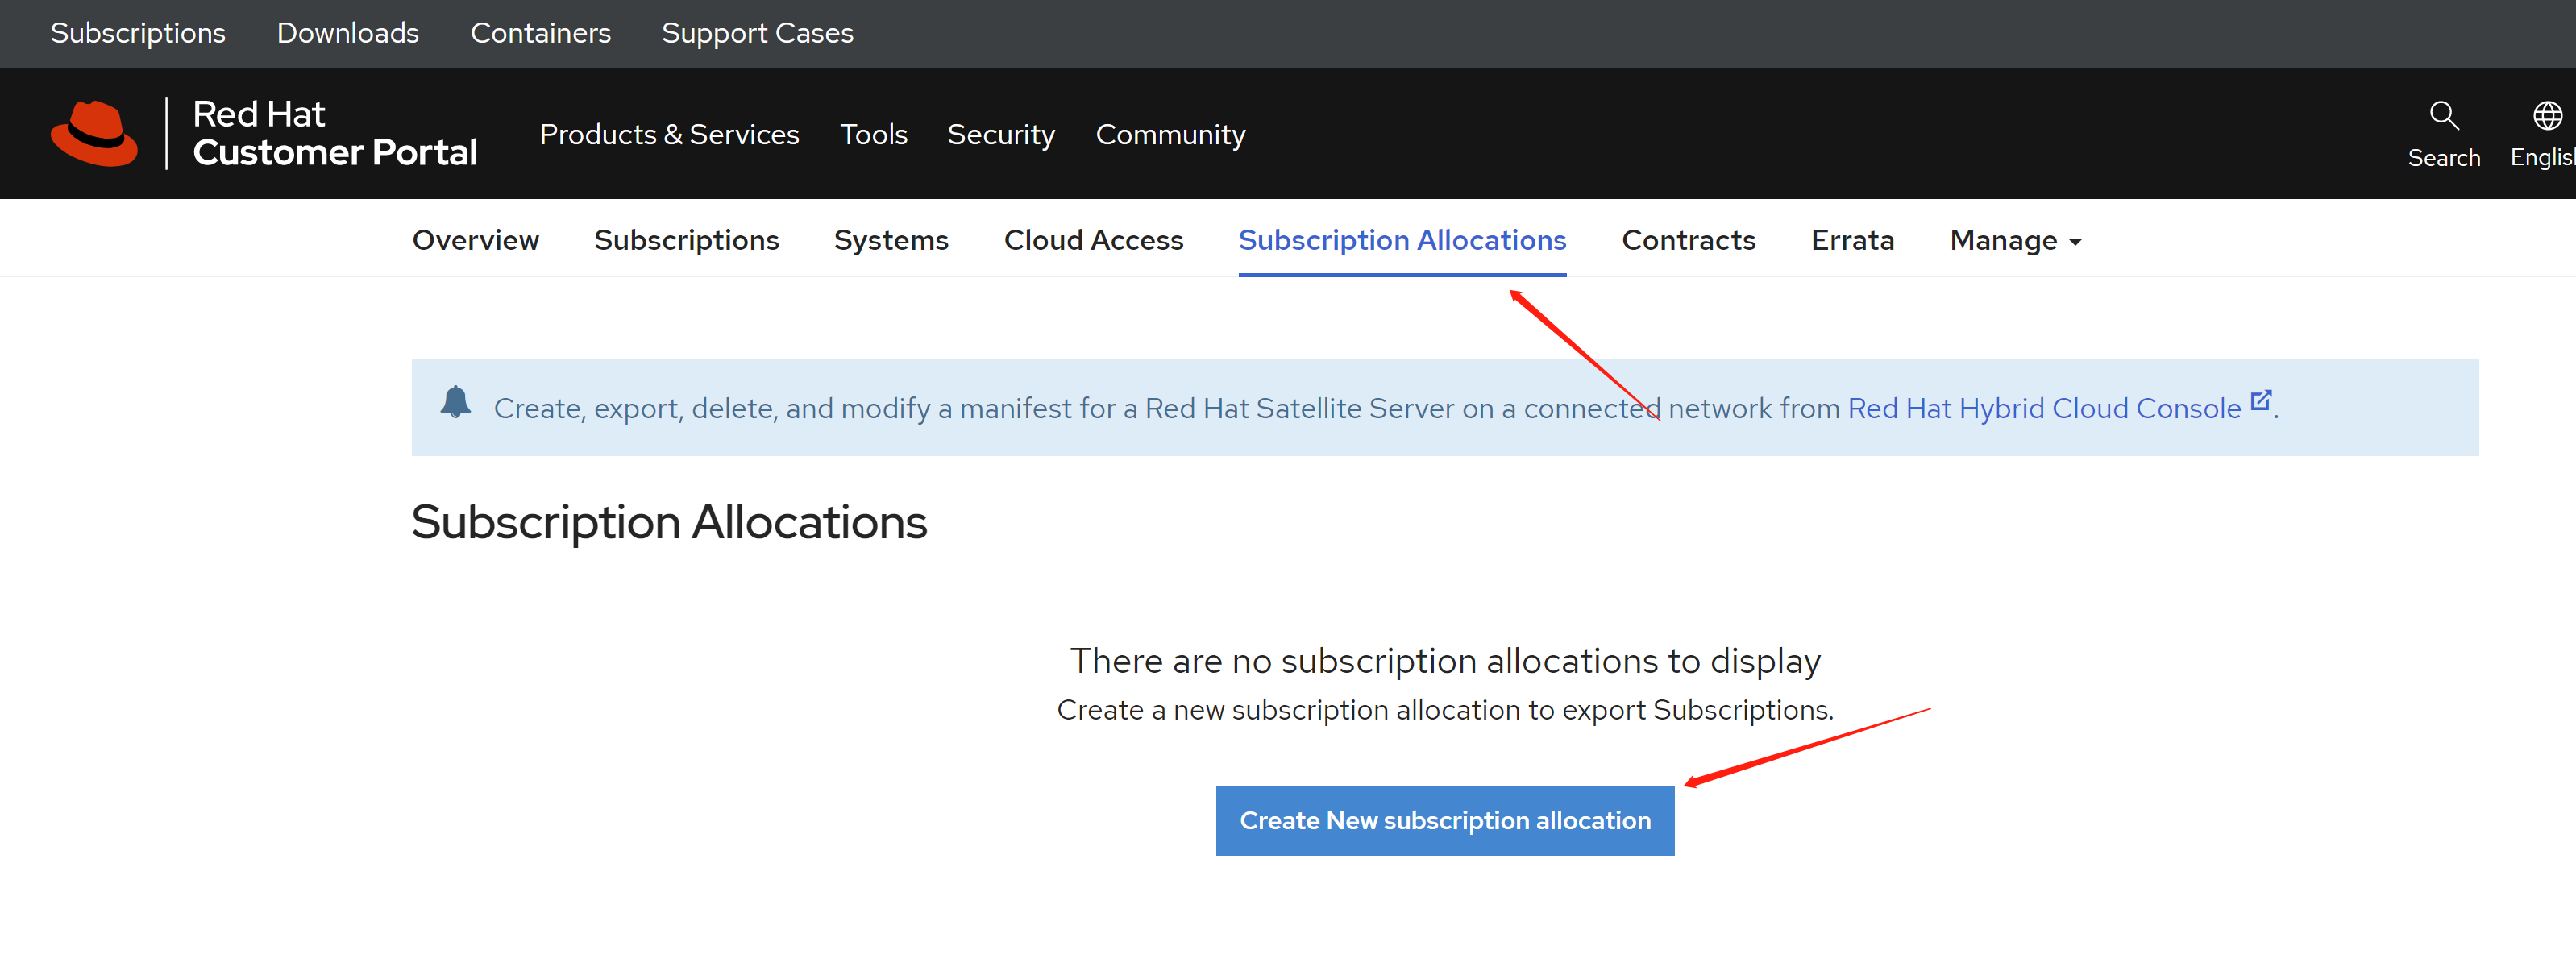
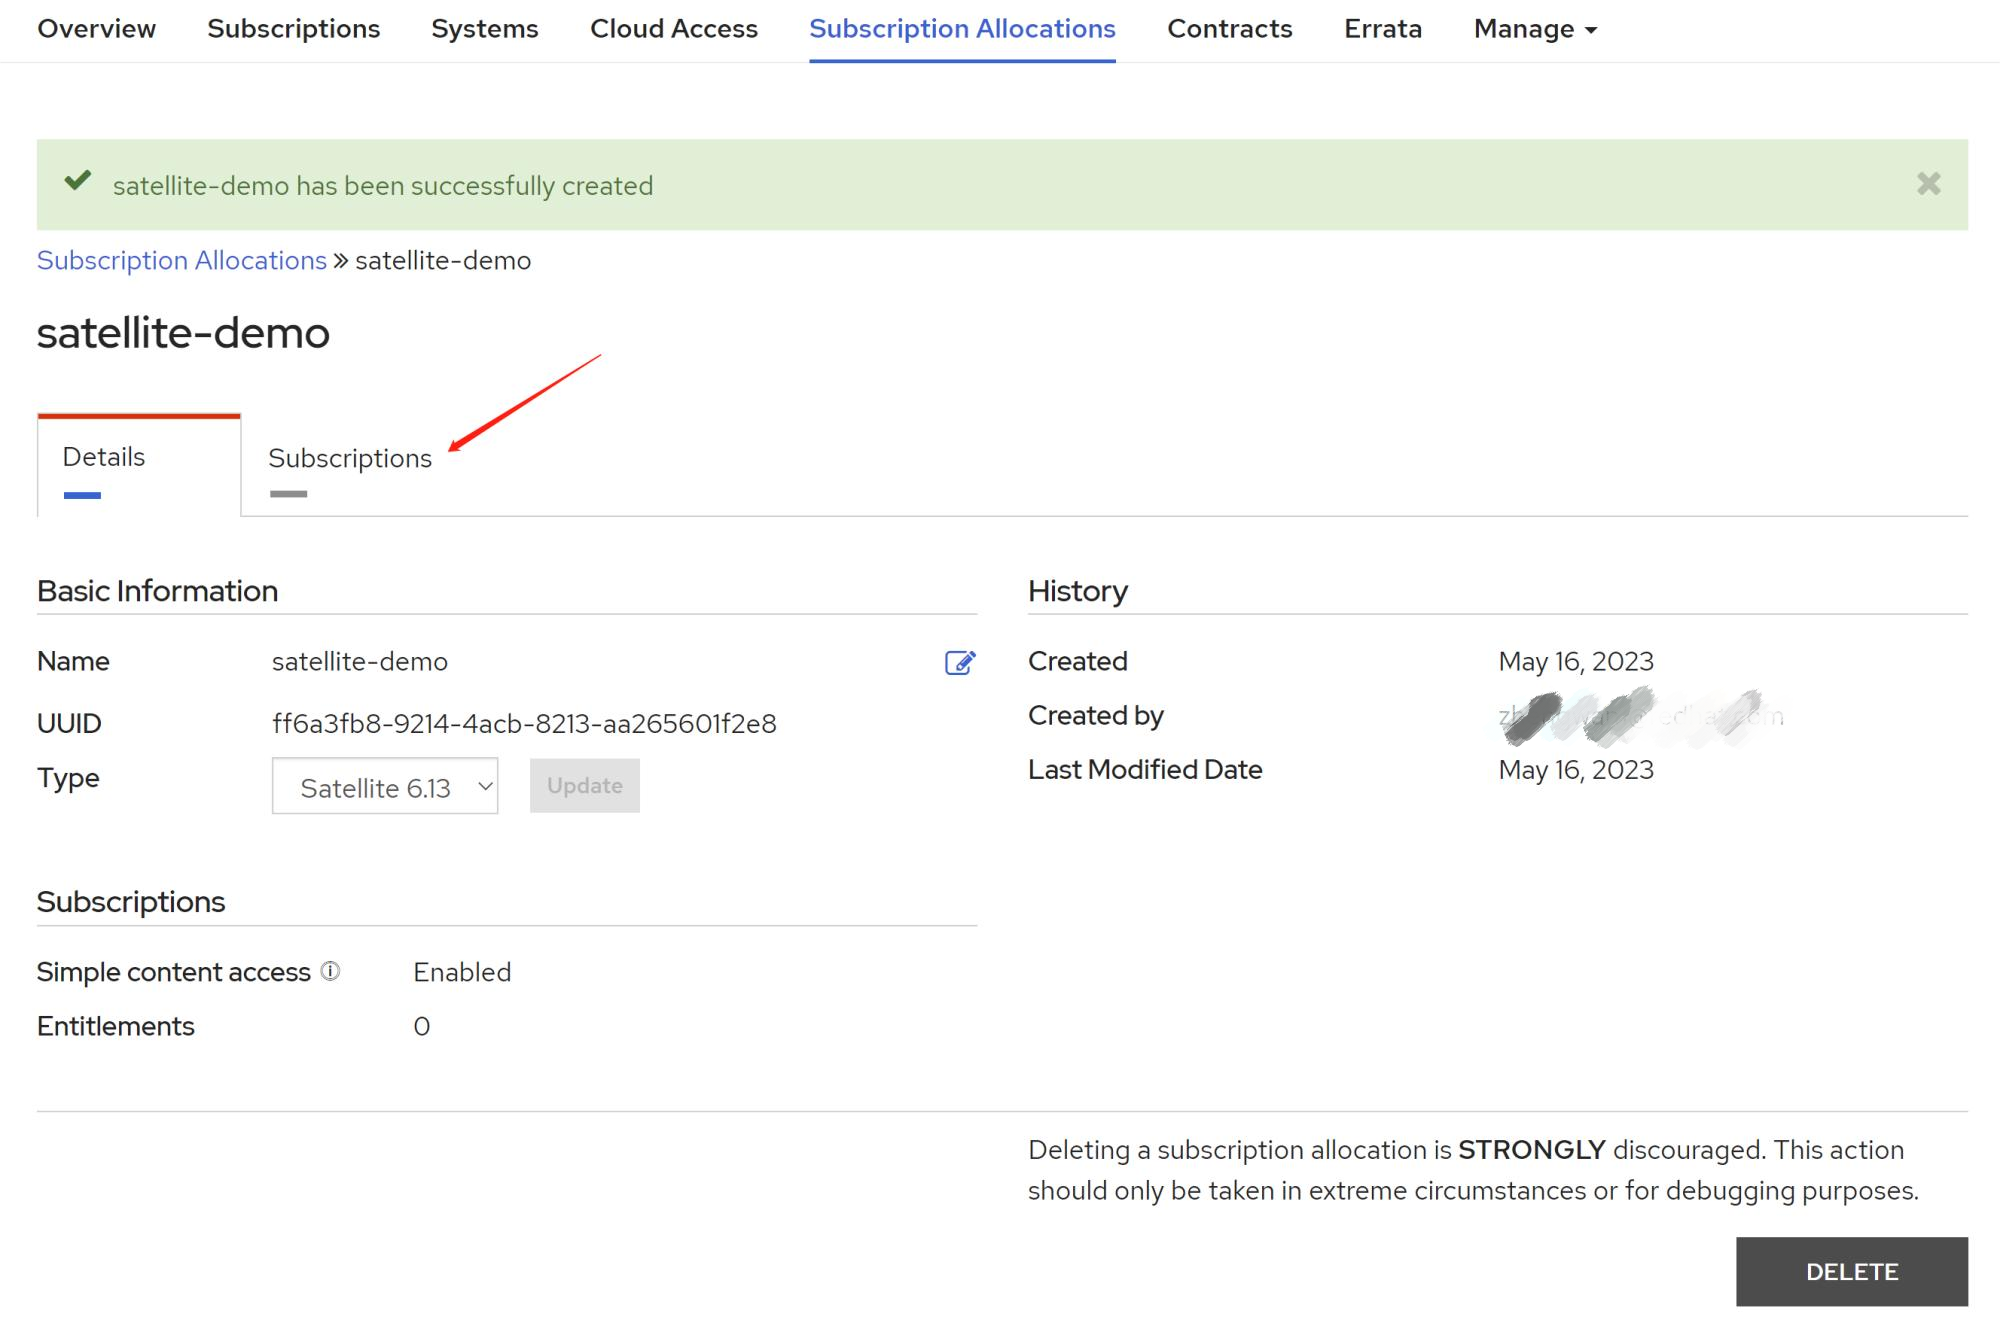
我们创建的订阅分配,类型和我们装的satellite版本要保持一致。

切换到订阅tab:
添加订阅,会打开一个页面,让你搜索你有的订阅,并挑选一个出来:

我们选好了订阅以后,设定数量,根据需要的数量来,一般情况,把你所以的订阅都加进来。我们做实验,就设置 1. 然后下载。

导入订阅信息
我们已经有了订阅信息文件,那么我们回到satellite管理界面里面,导入它。
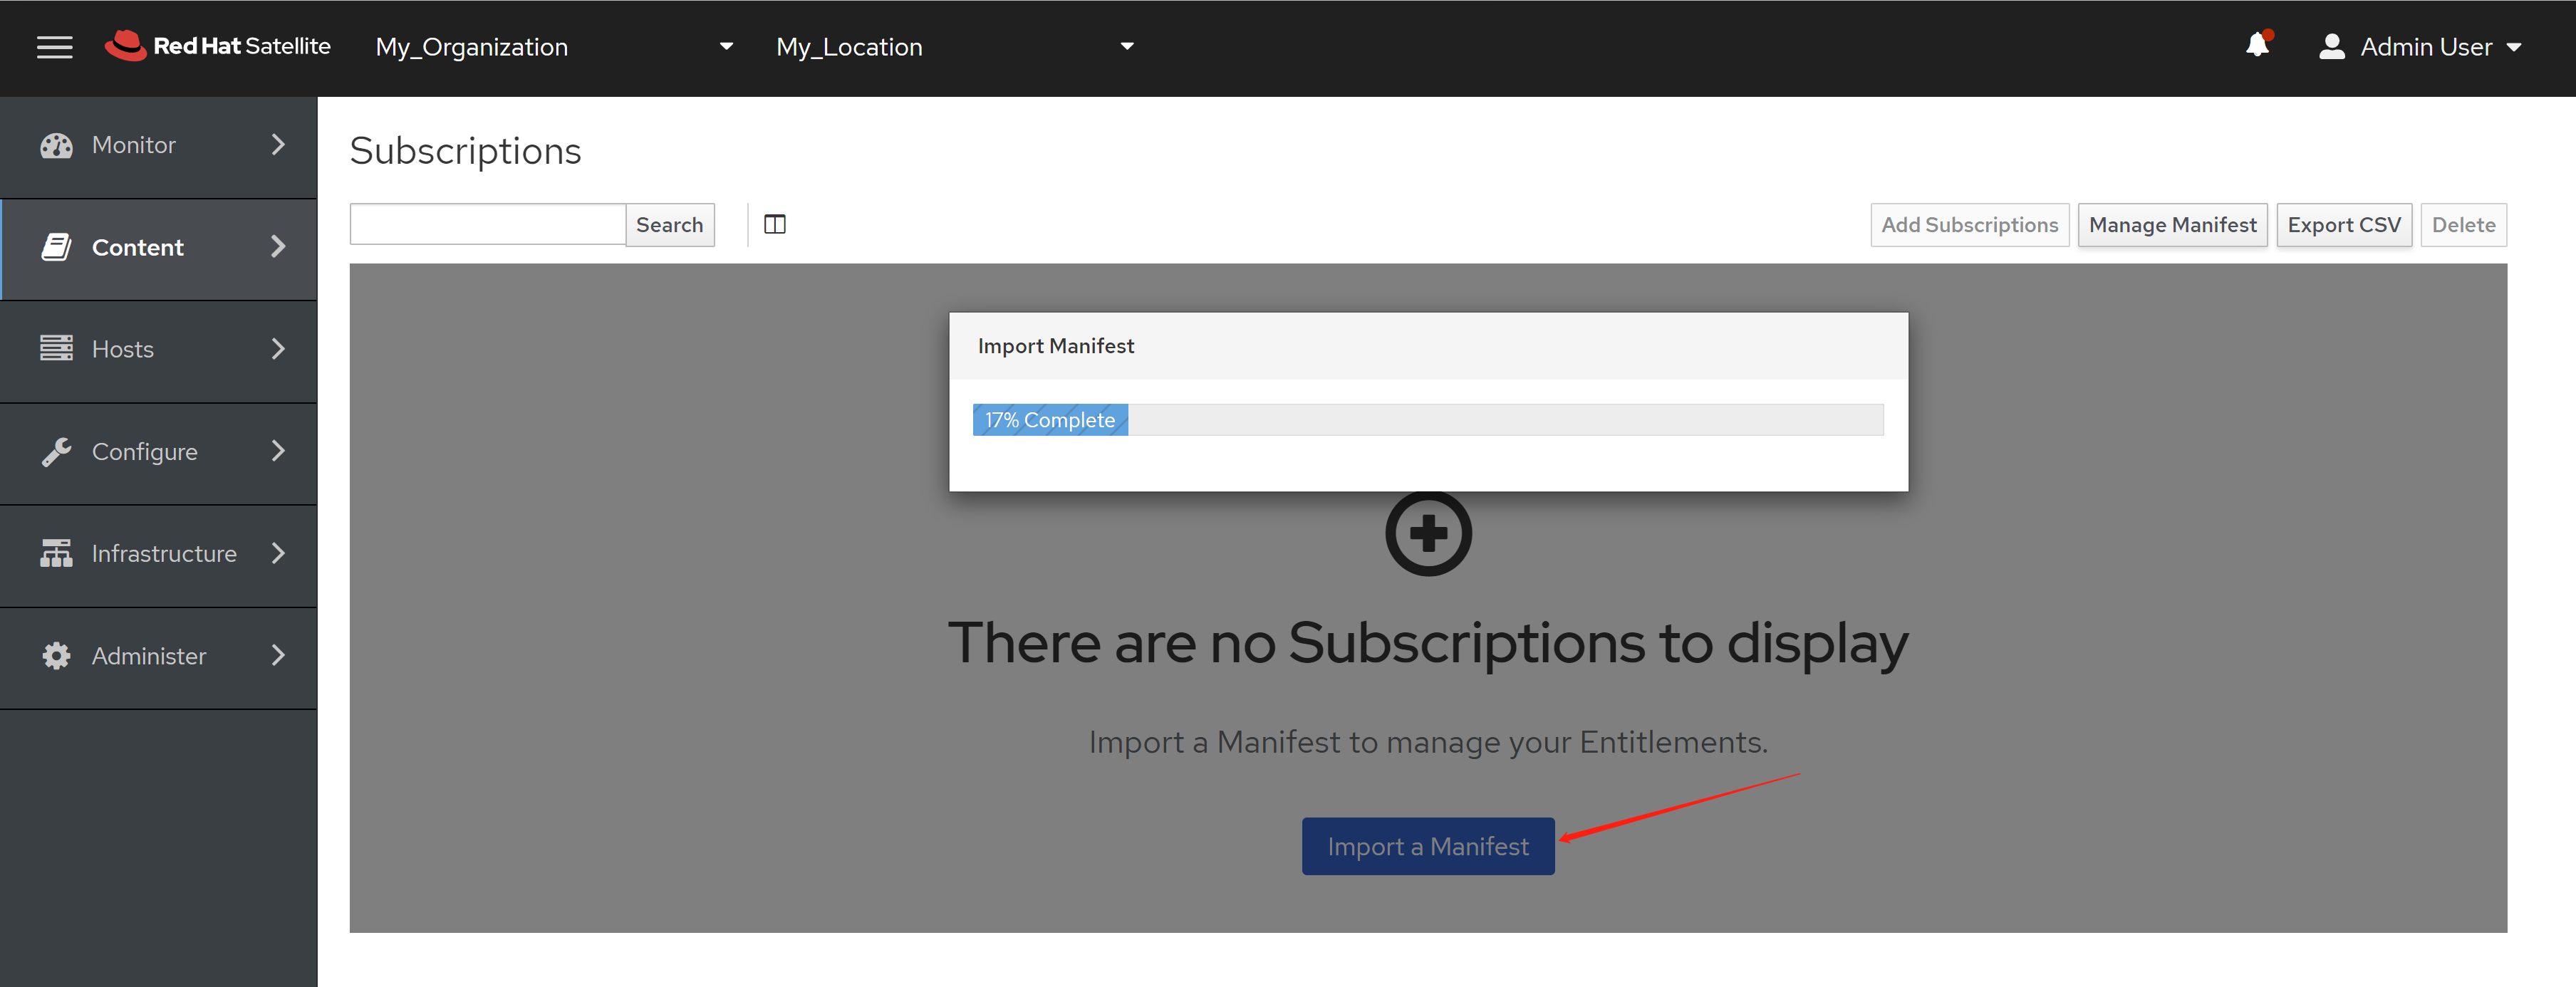
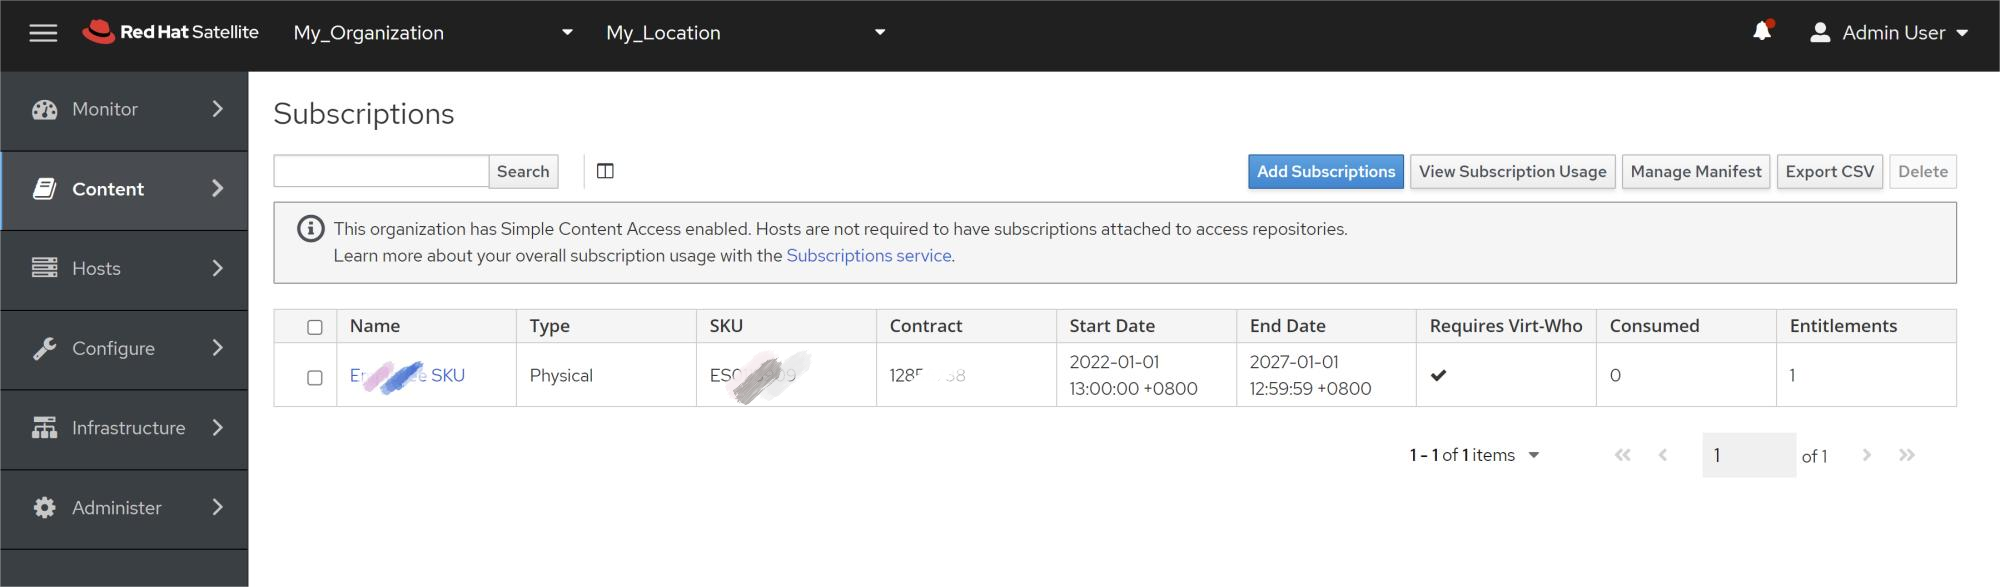
完成以后,我们就能看到订阅信息了。
配置 yum repo 镜像
我们实验的目的,就是配置一个yum repo 镜像源出来,但是默认satellite使用的是on demand 的方式来下载 rpm,我们希望让他一气呵成,主动提前的下载好,那么需要做一个配置。

激活主动下载配置
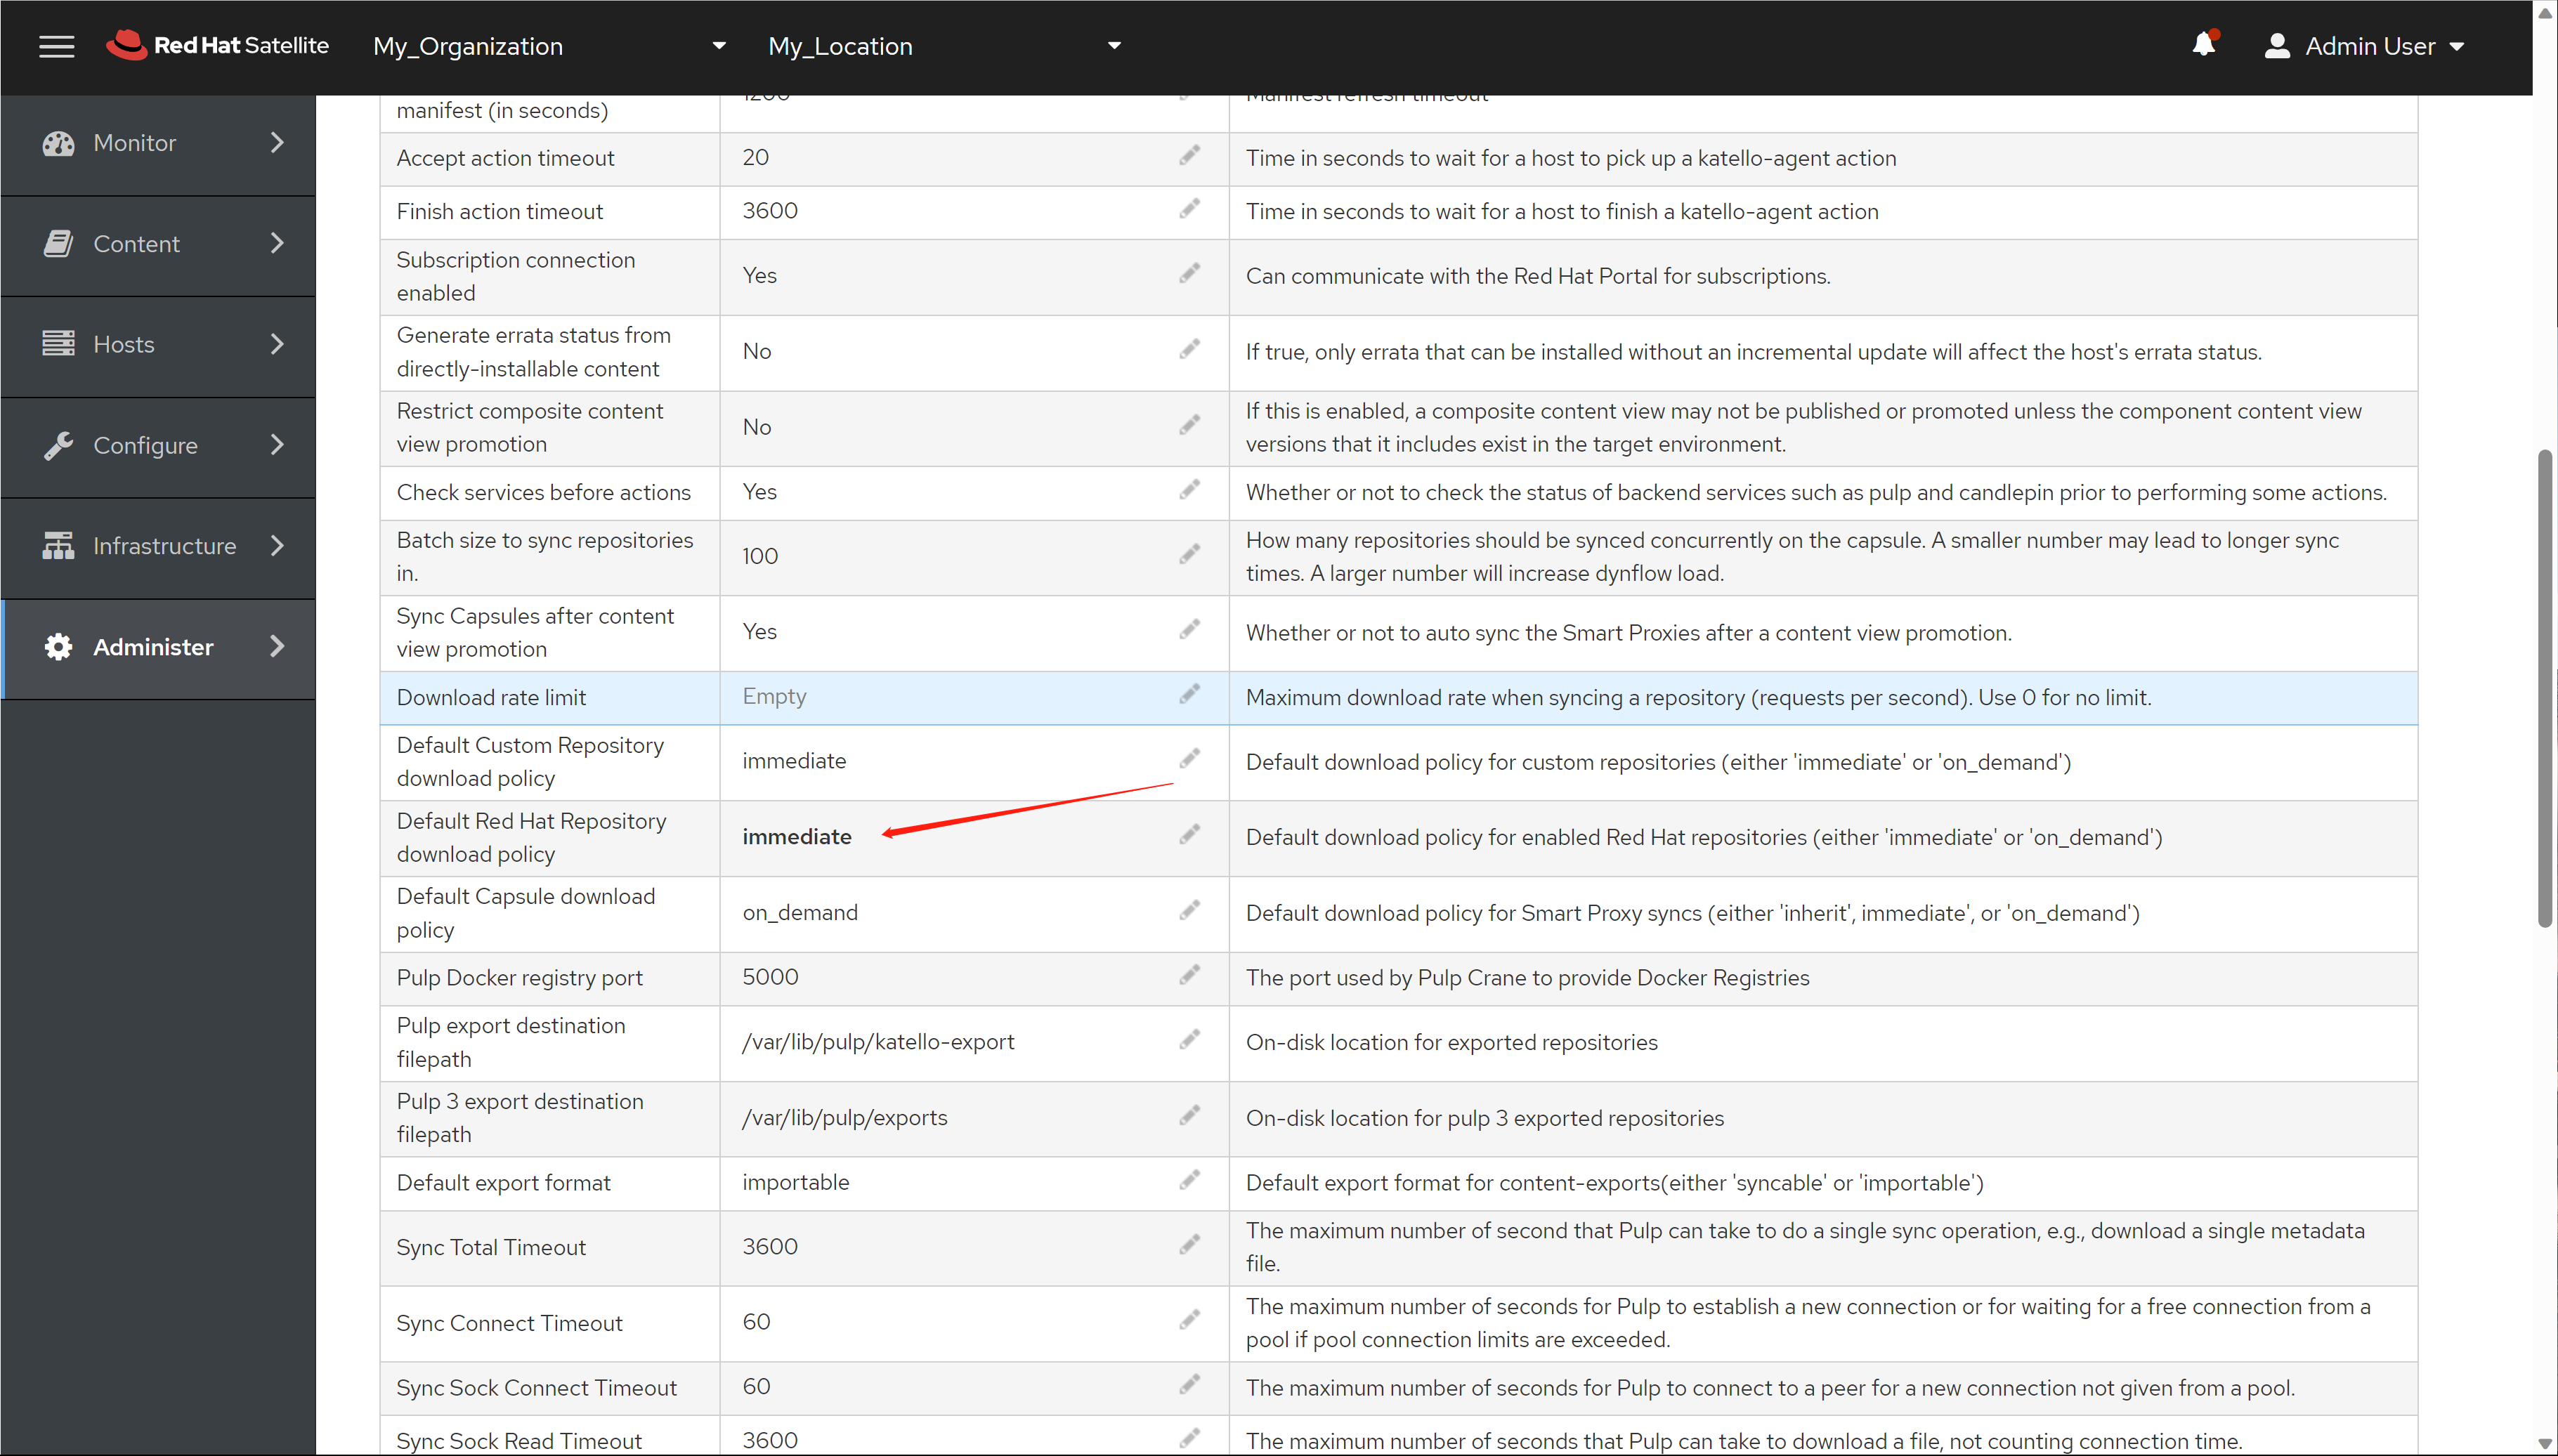
做了主动下载配置以后,我们就来添加 yum 源。

我们先搜索 appstream 。
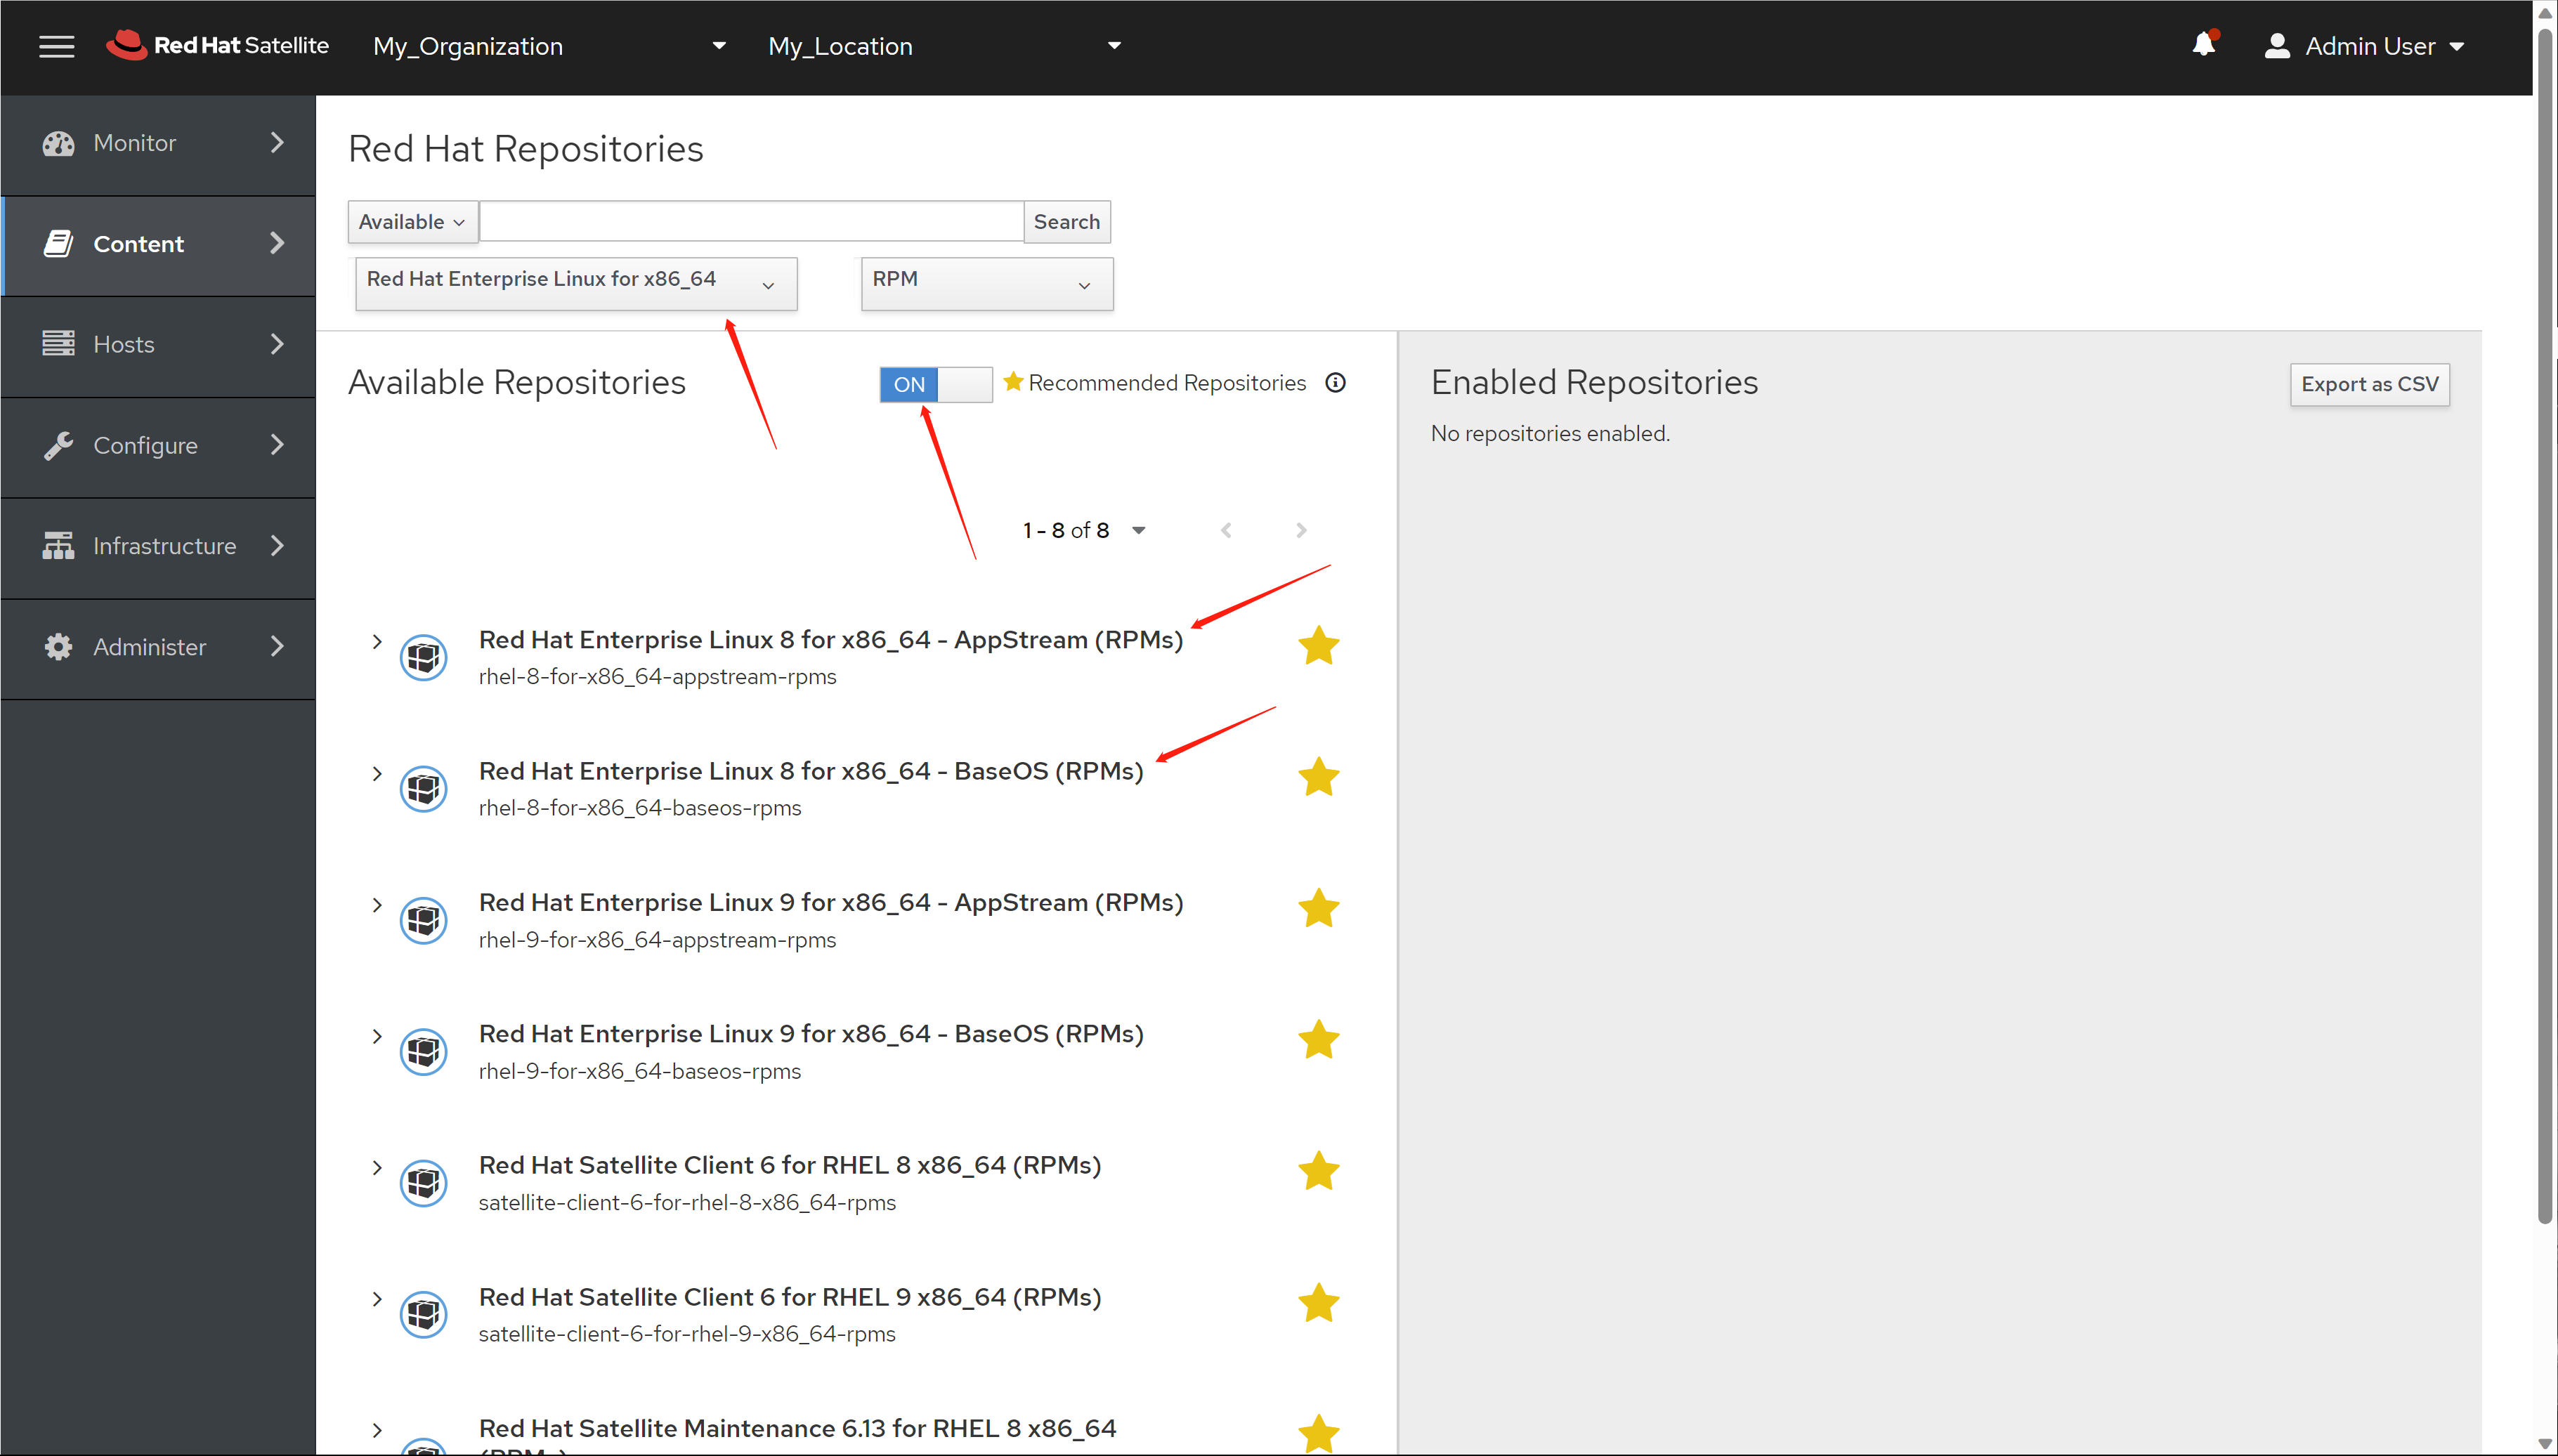
然后我们选择小版本
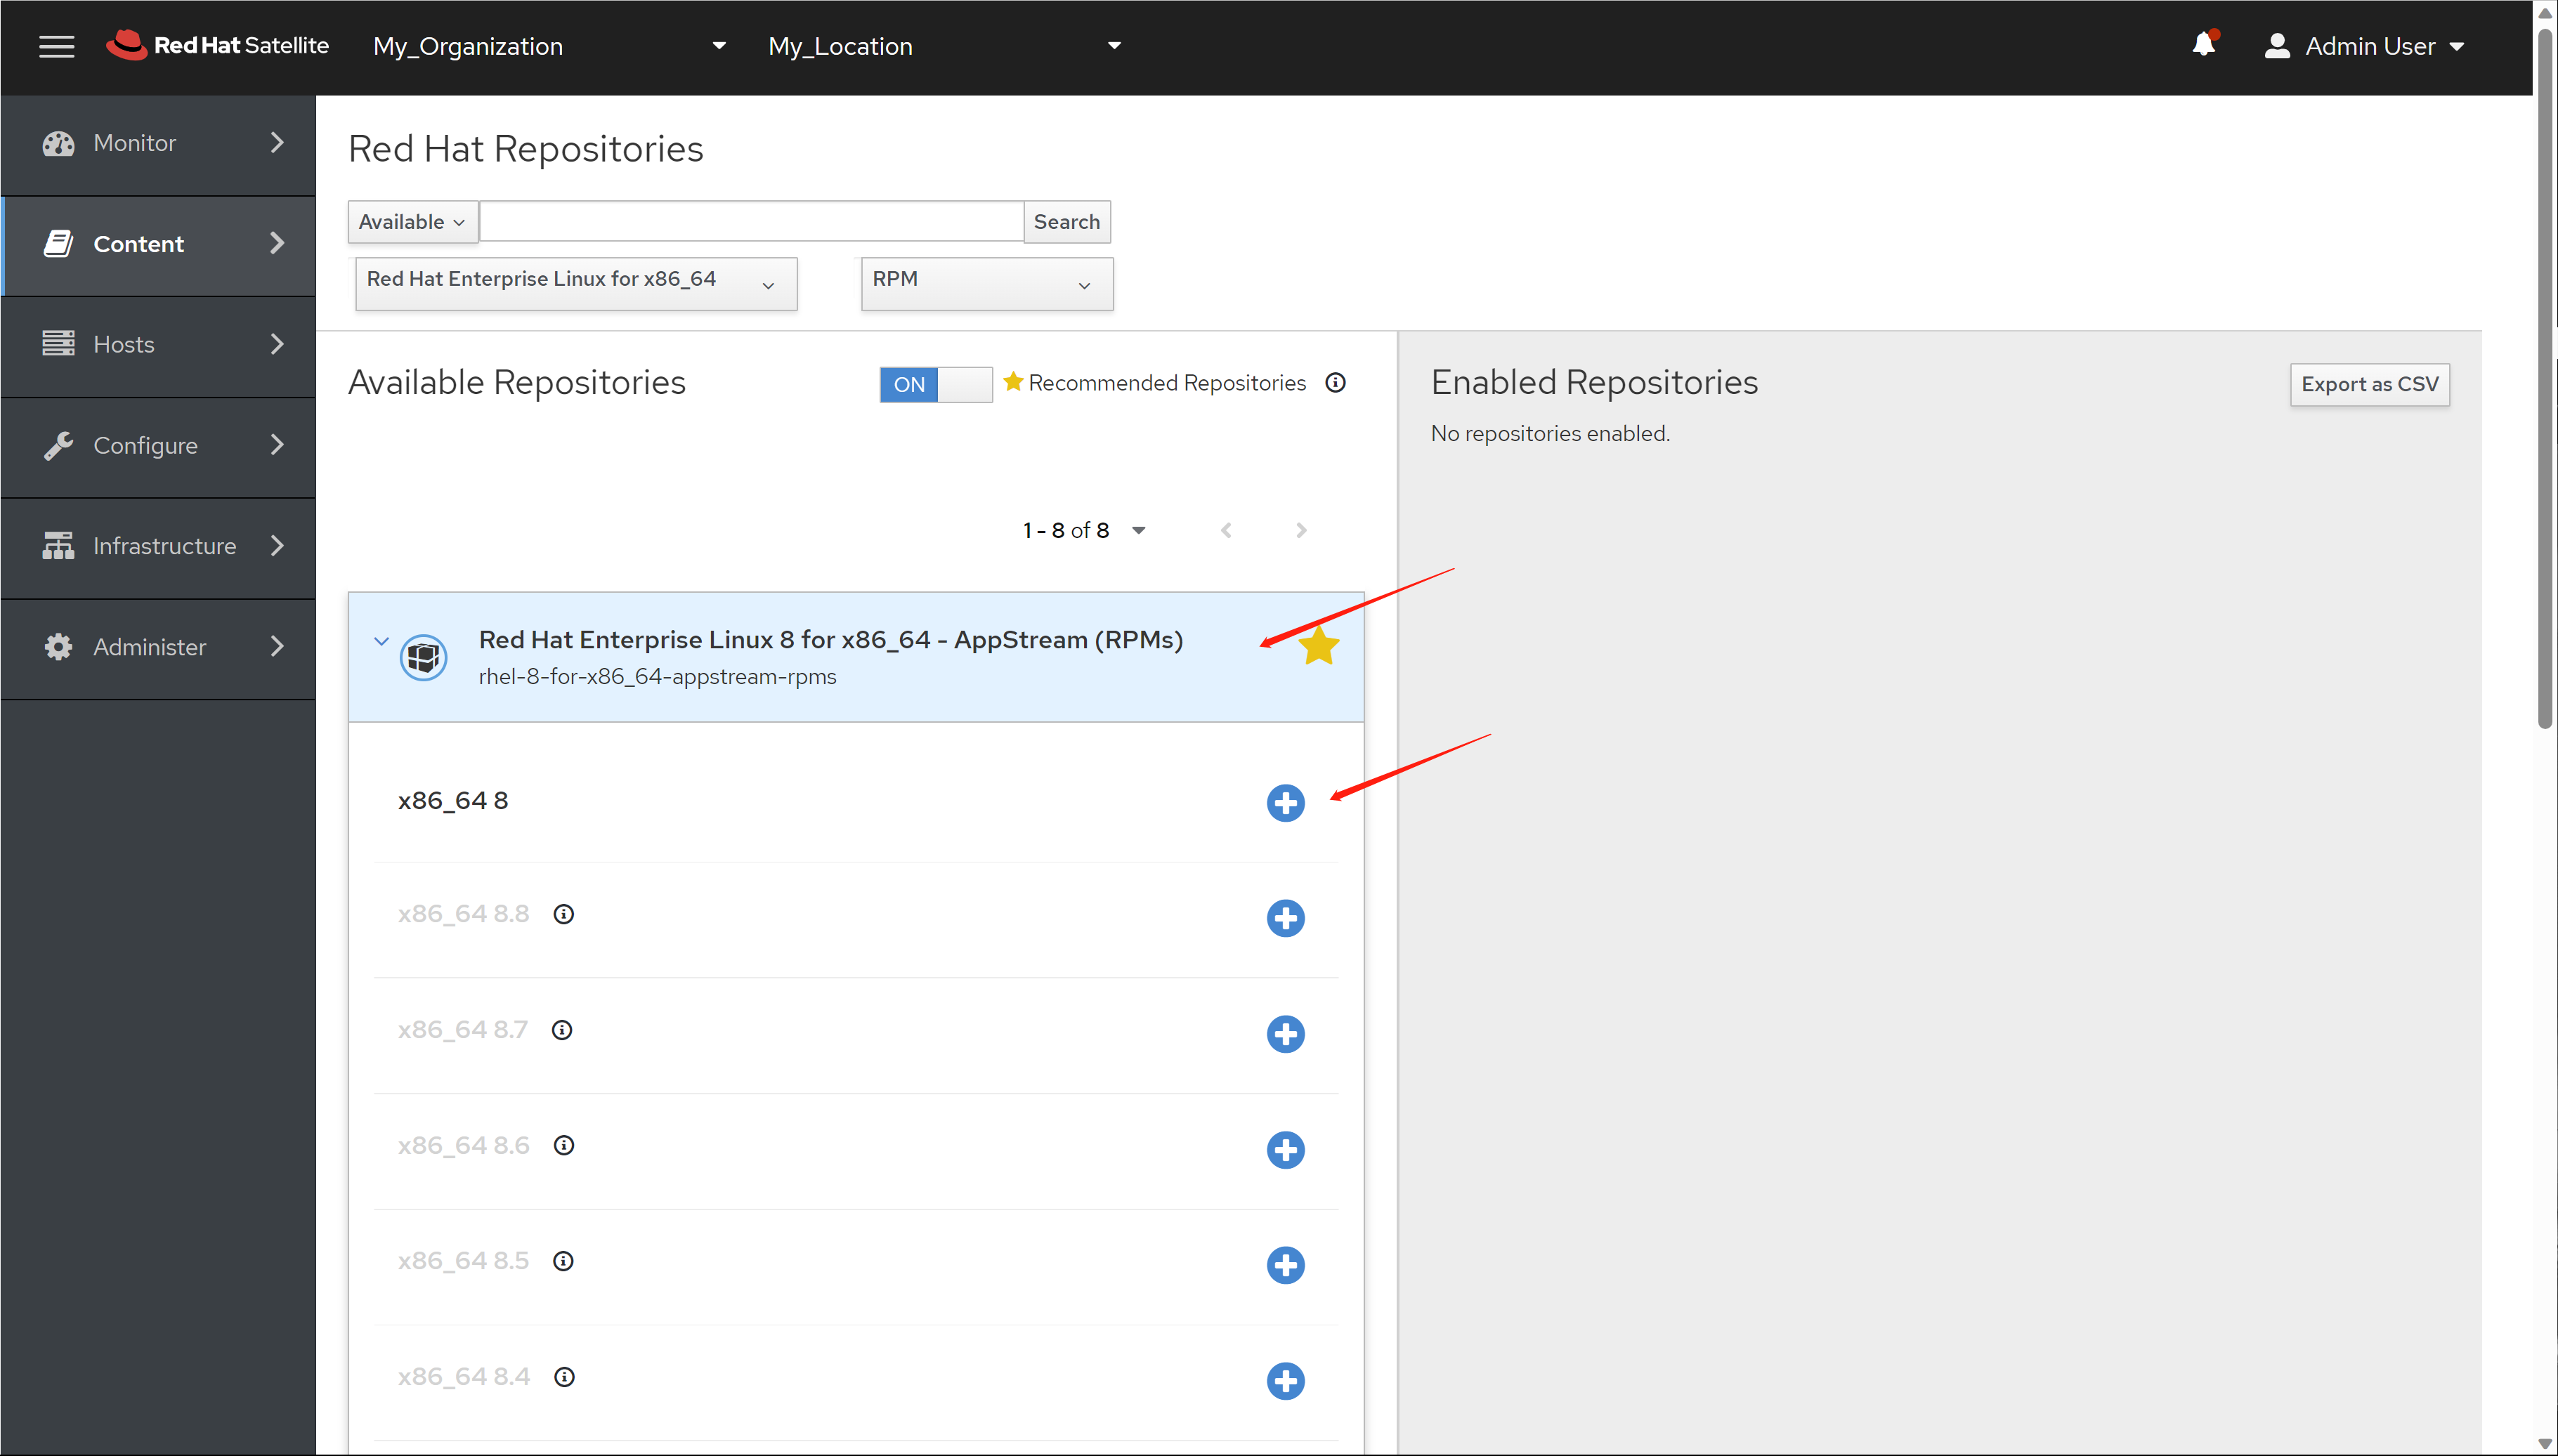
为了做实验,凸显效果,我们只选择8.6这个非最新版本。

我们再搜索 baseos ,并选择 8.6 版本
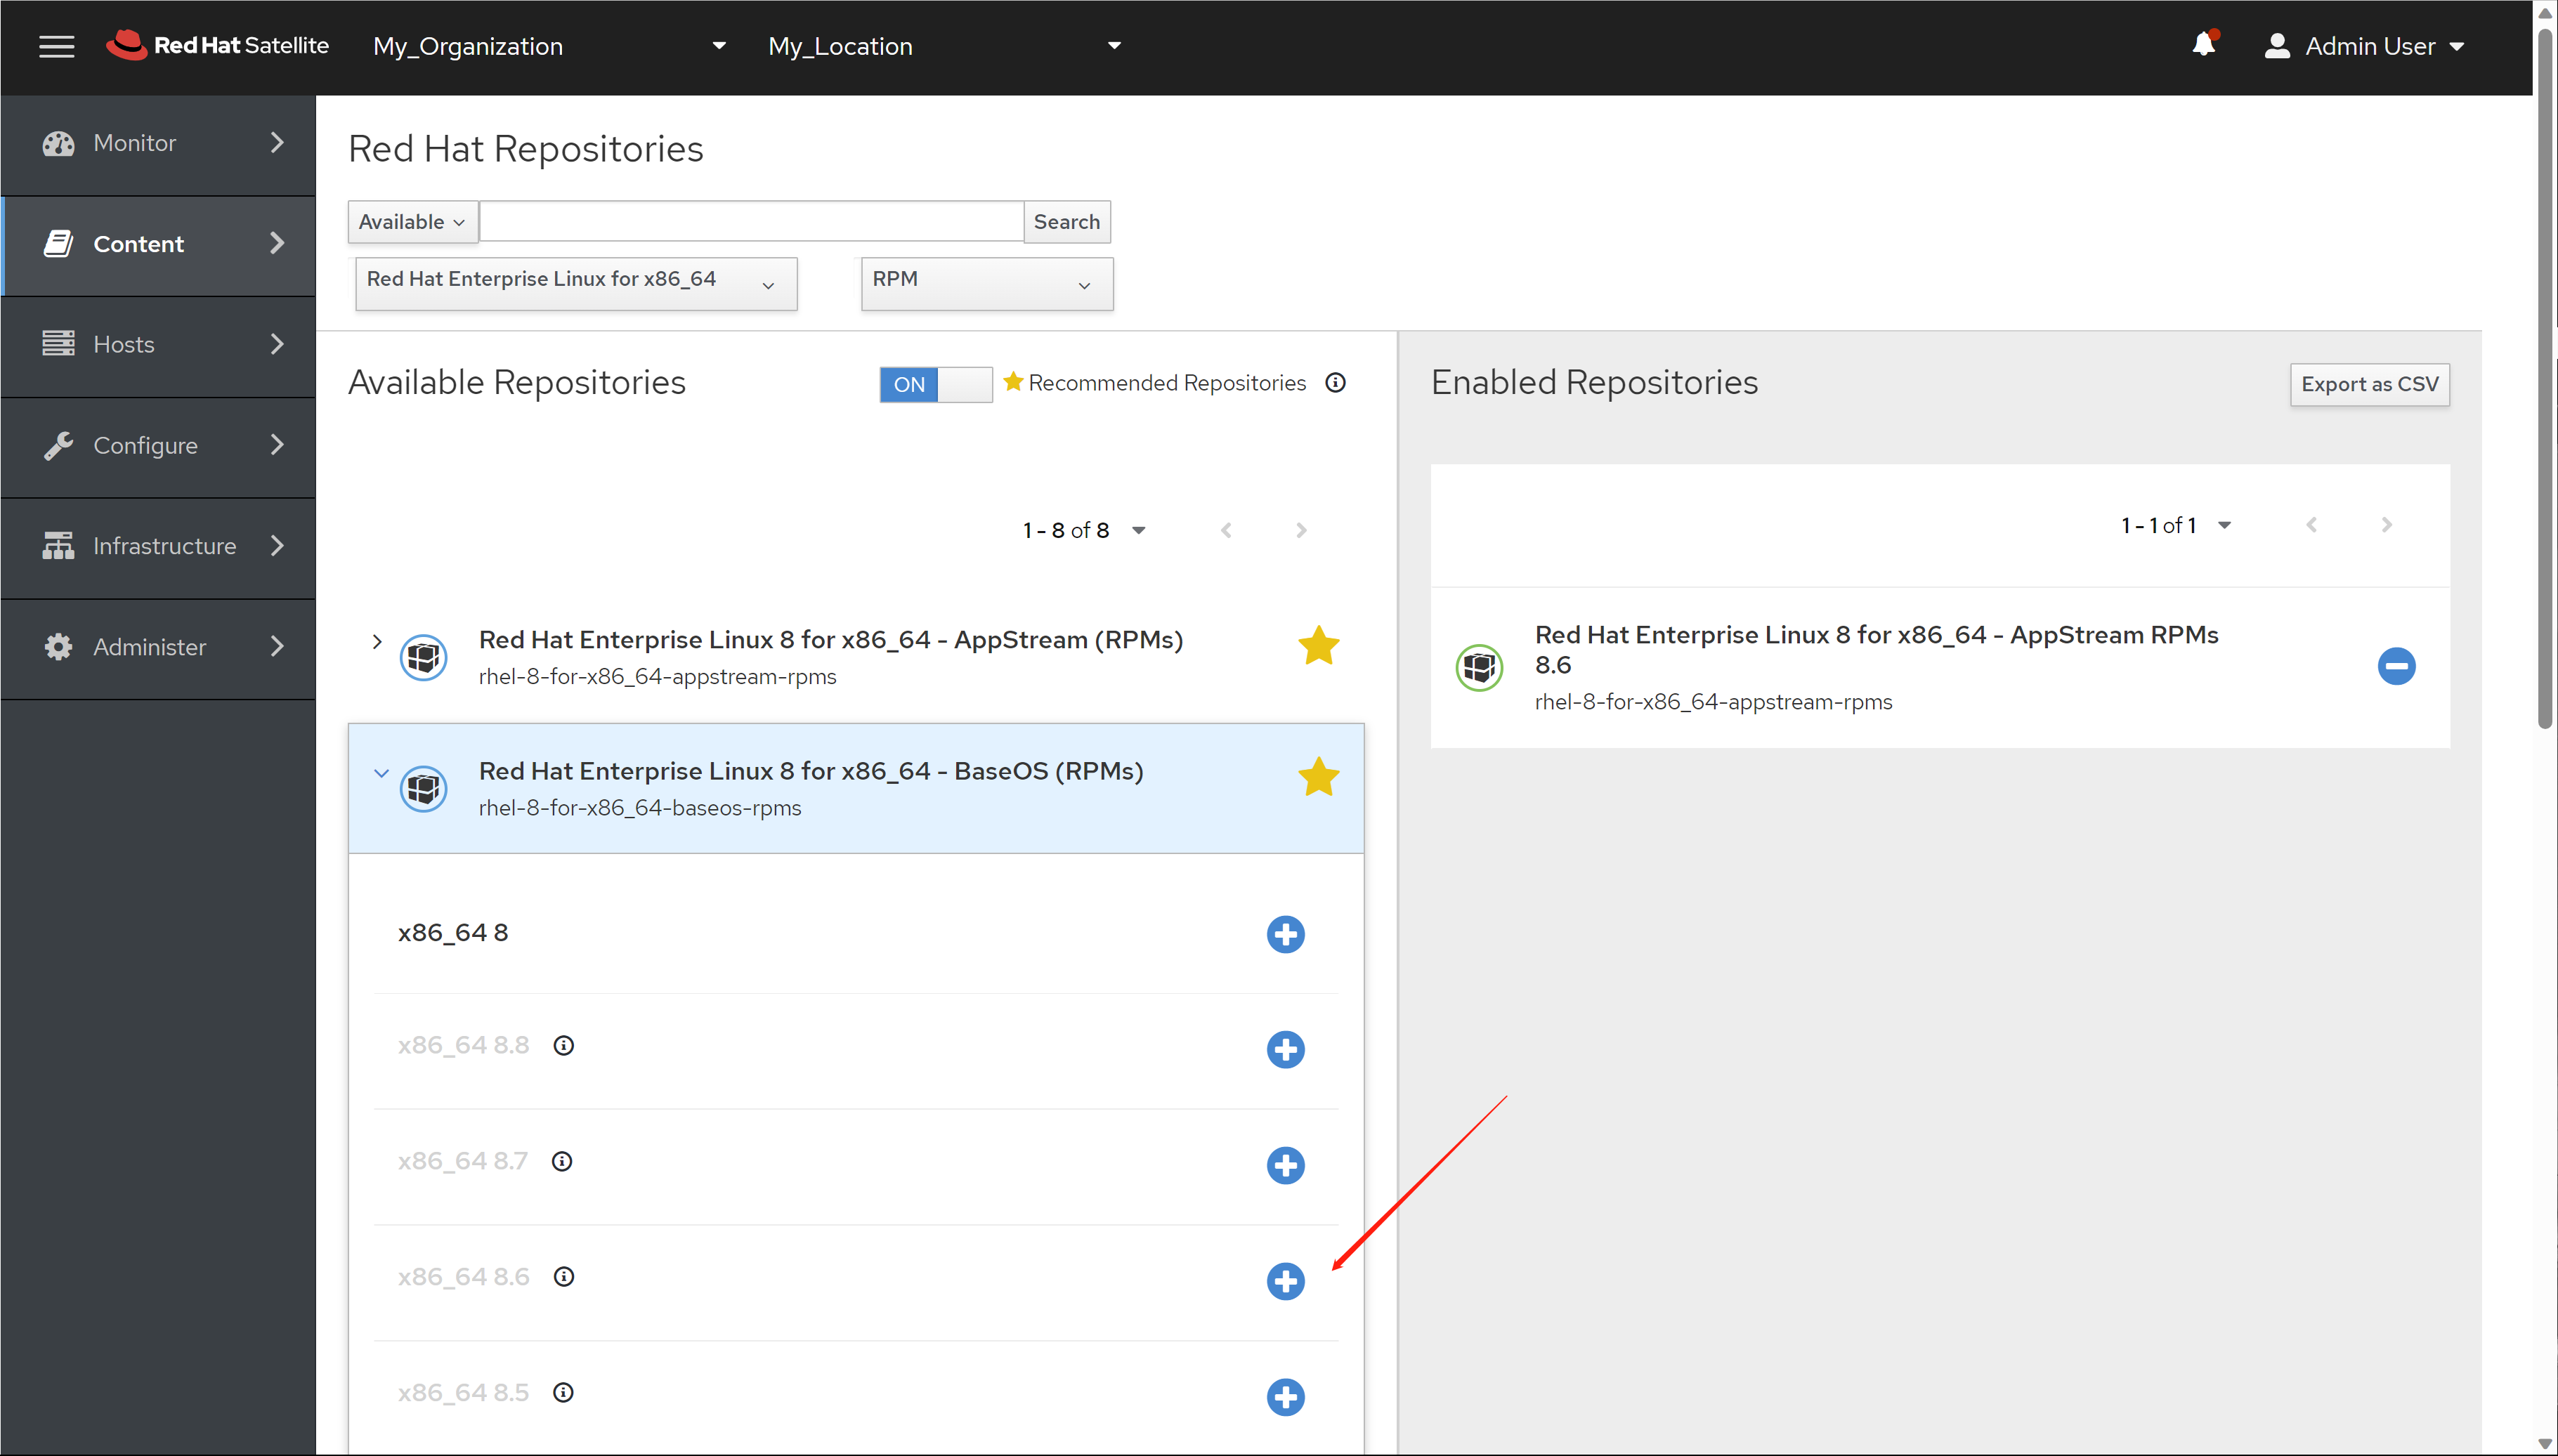
选择好了yum 源以后,我们开始手动同步。
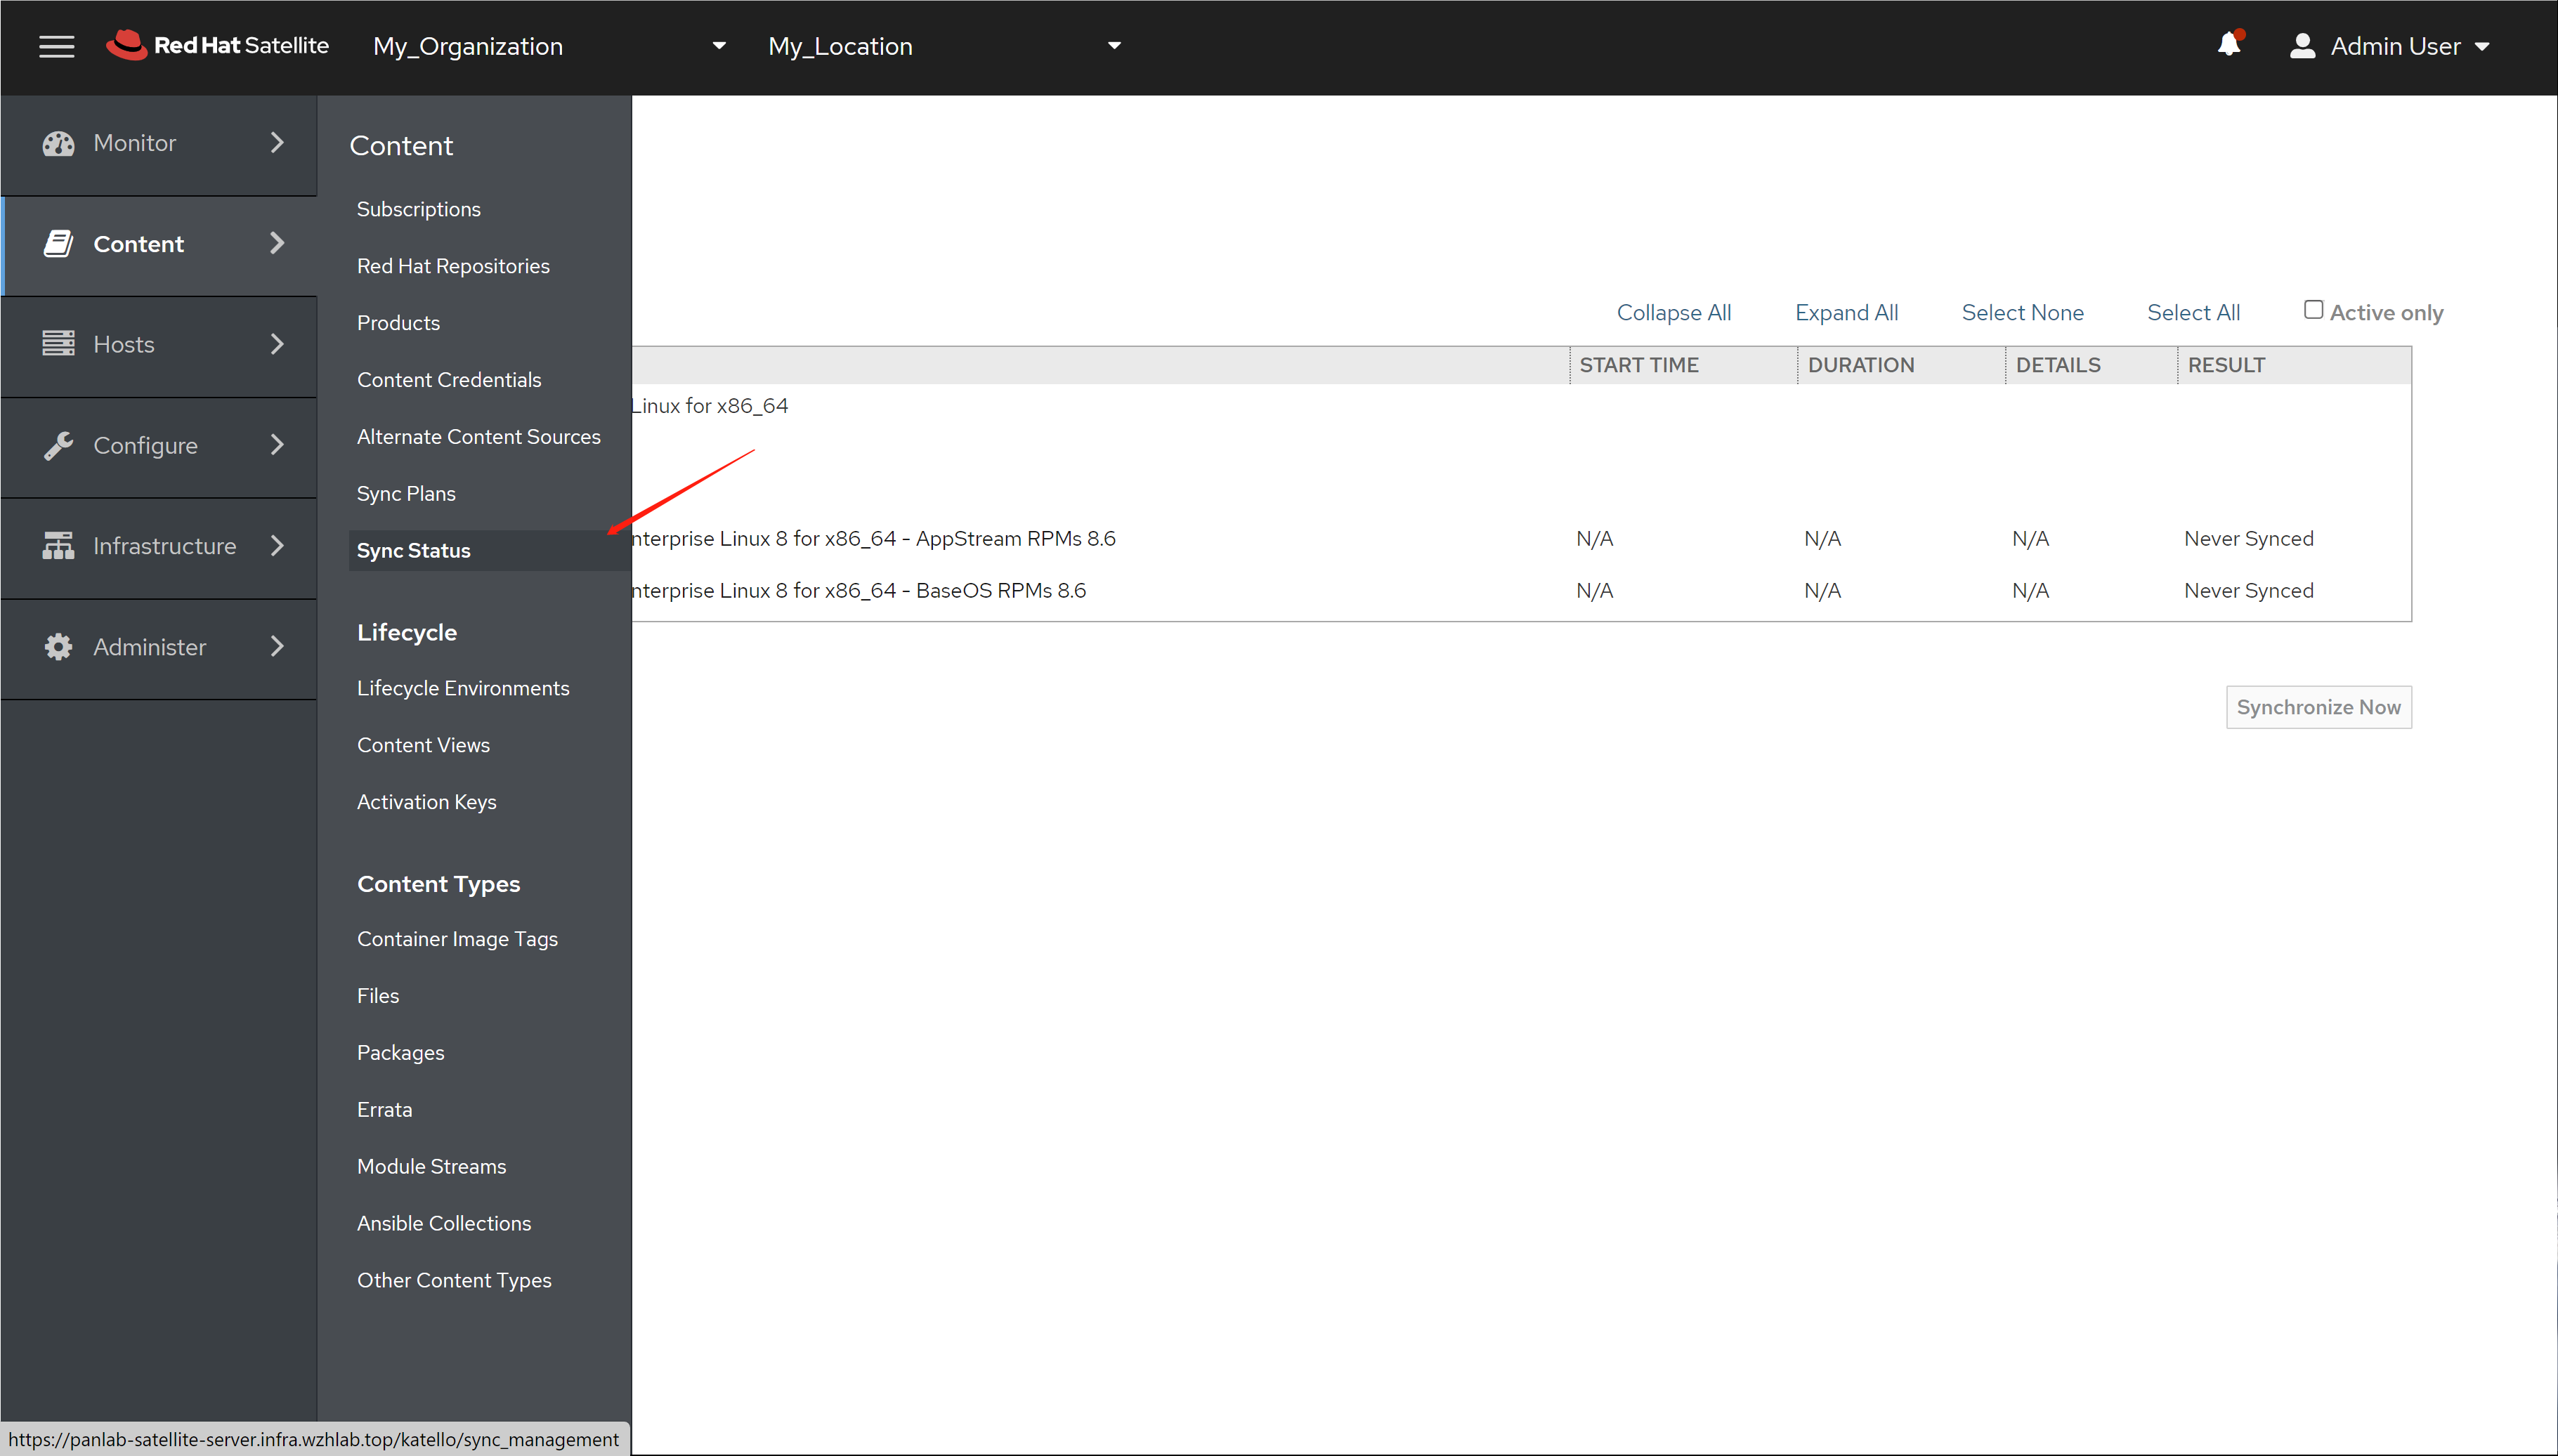
选择要同步的repo, 开始
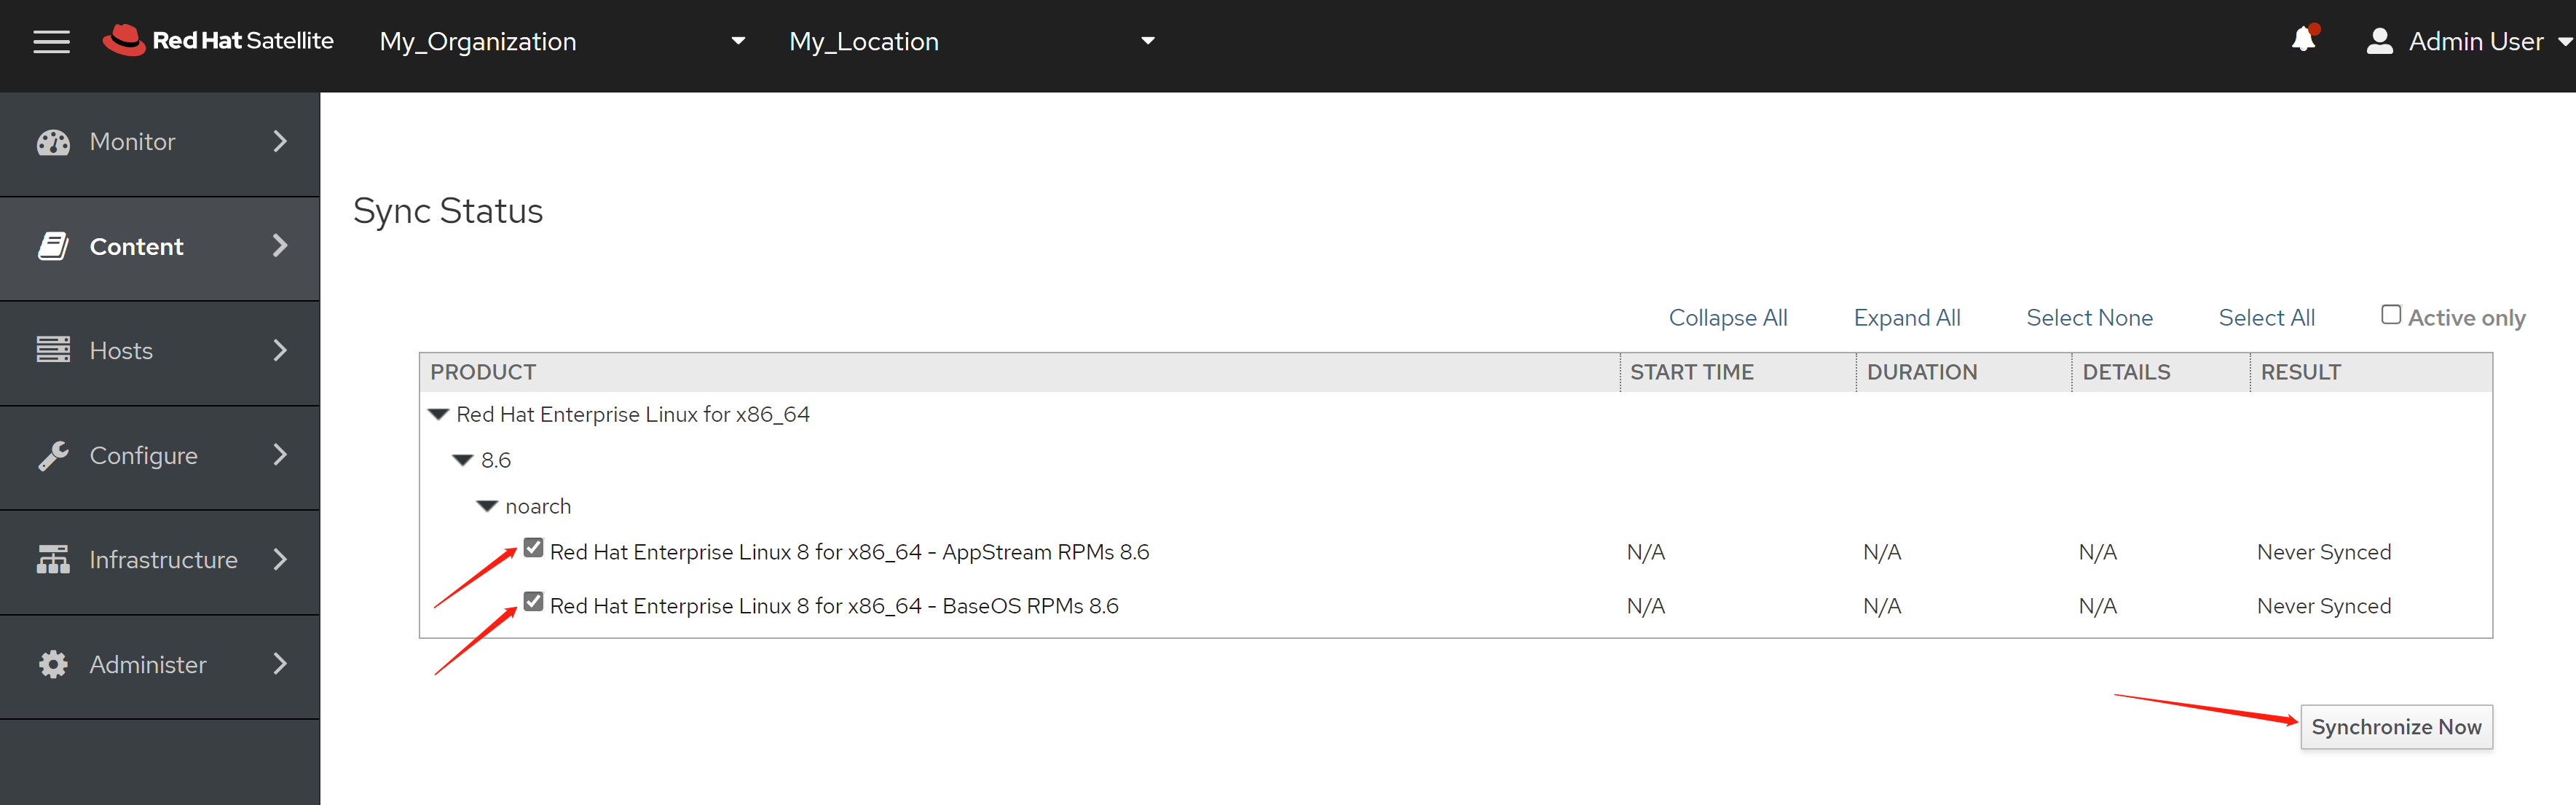
经过漫长的时间,下载完成。
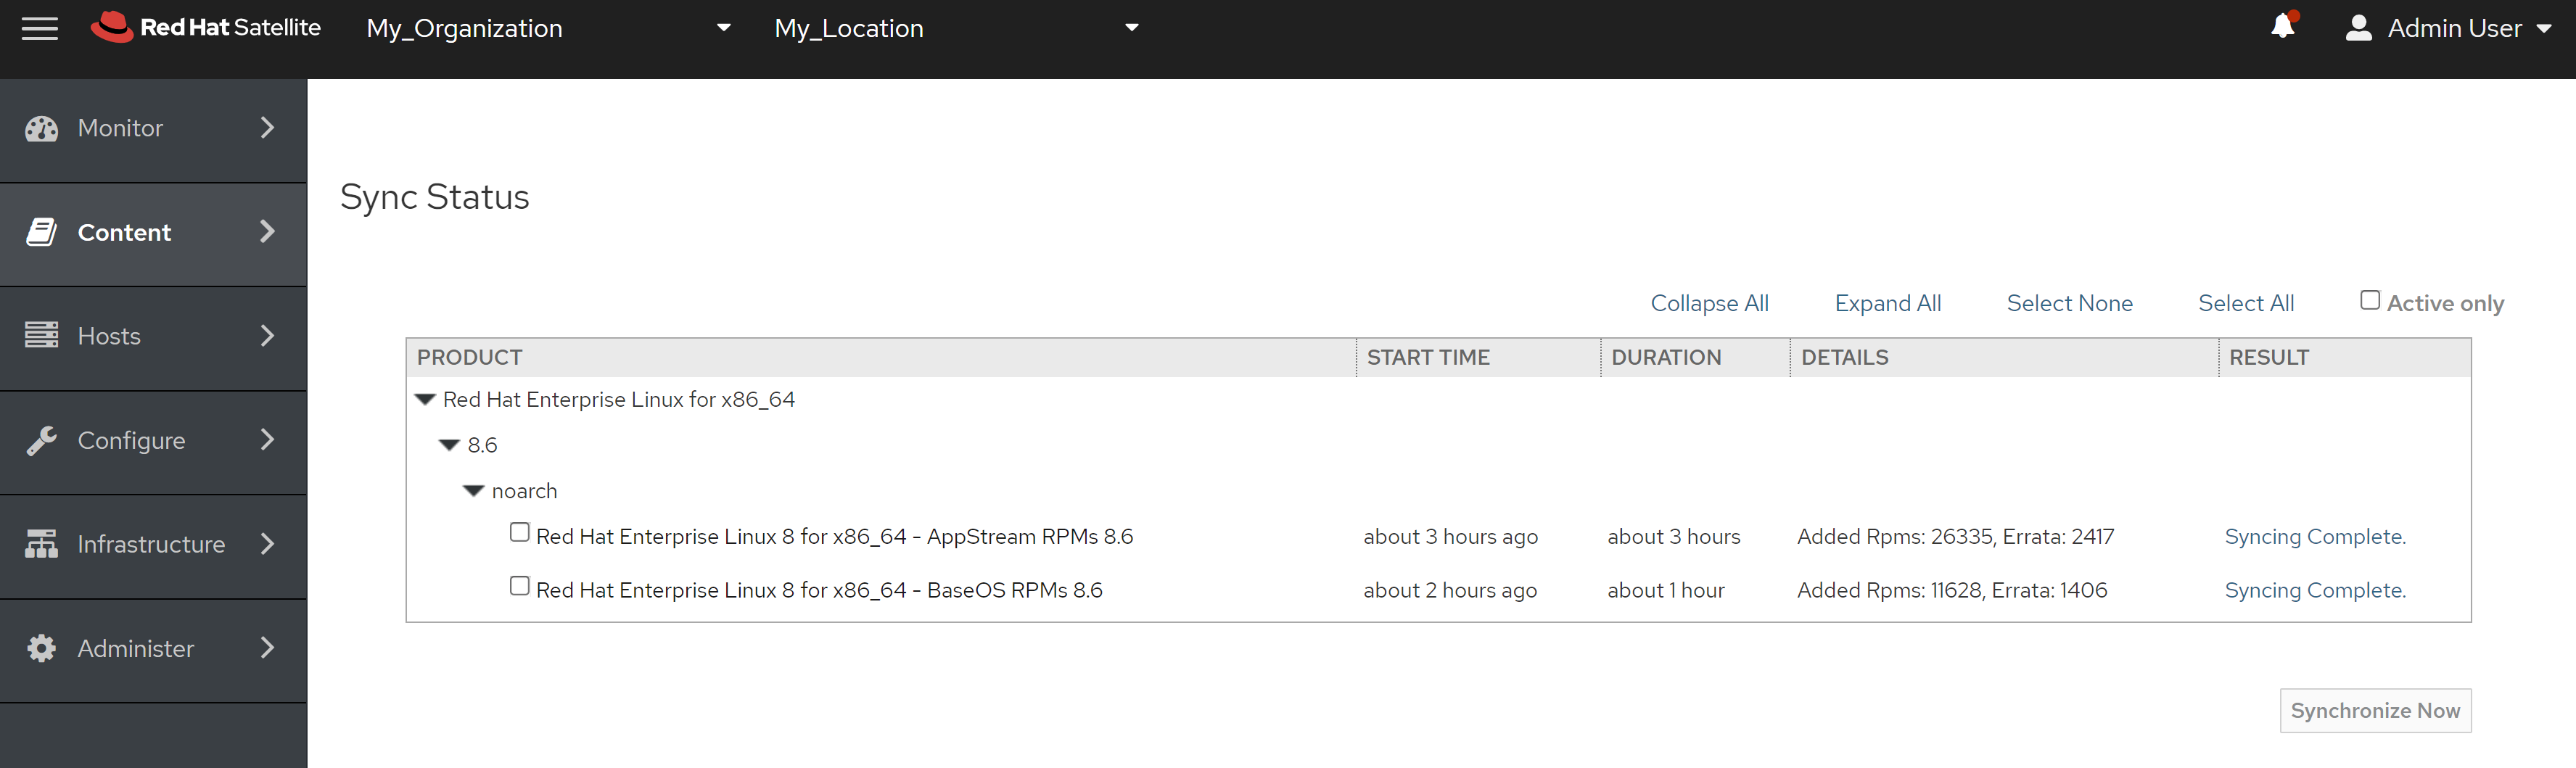
satellite服务器端的基本服务,就配置完了,我们看看系统情况。
satellite-maintain service list
# Running Service List
# ================================================================================
# List applicable services:
# dynflow-sidekiq@.service                   indirect
# foreman-proxy.service                      enabled
# foreman.service                            enabled
# httpd.service                              enabled
# postgresql.service                         enabled
# pulpcore-api.service                       enabled
# pulpcore-content.service                   enabled
# pulpcore-worker@.service                   indirect
# redis.service                              enabled
# tomcat.service                             enabled

# All services listed                                                   [OK]
# --------------------------------------------------------------------------------

df -h
# Filesystem      Size  Used Avail Use% Mounted on
# devtmpfs         16G     0   16G   0% /dev
# tmpfs            16G  148K   16G   1% /dev/shm
# tmpfs            16G  8.9M   16G   1% /run
# tmpfs            16G     0   16G   0% /sys/fs/cgroup
# /dev/sda3       499G  106G  393G  22% /
# /dev/sda2      1014M  265M  749M  27% /boot
# /dev/sda1       599M  9.6M  590M   2% /boot/efi
# tmpfs           3.2G     0  3.2G   0% /run/user/0

free -h
#               total        used        free      shared  buff/cache   available
# Mem:           31Gi        21Gi       1.7Gi       567Mi       7.9Gi       8.6Gi
# Swap:            0B          0B          0B
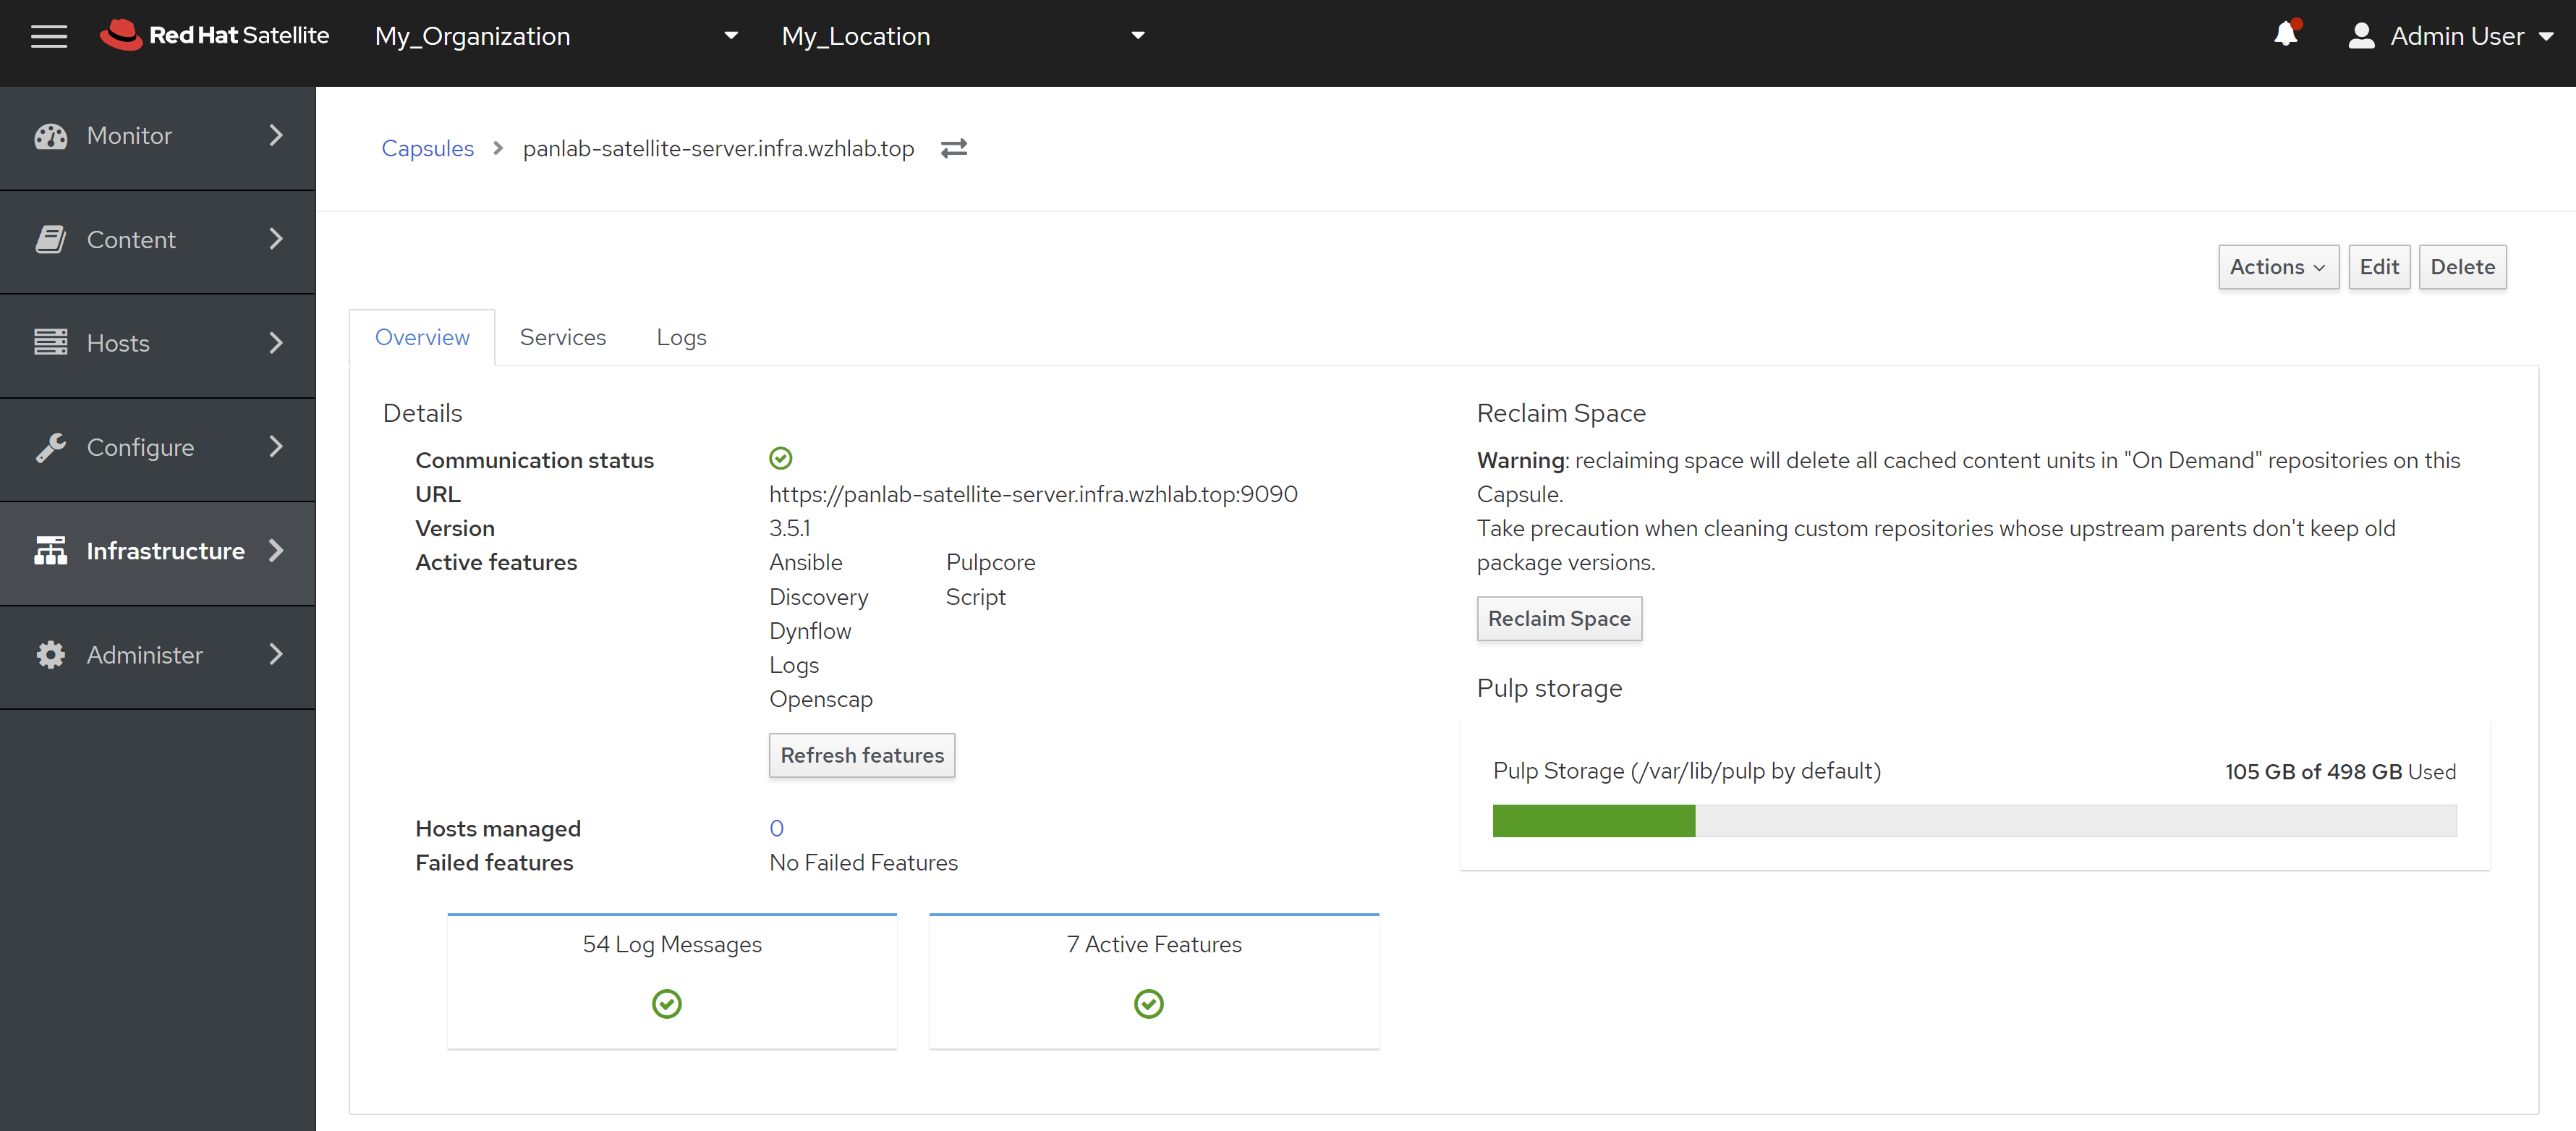
内存占用21G,硬盘占用 110G。这个数据给以后部署提供一个依据吧。。。
我们查看capsule的使用资源情况。
配置 active key
我们导入了 subscription,要给rhel使用,需要创建active key并绑定。active key可以灵活的控制激活的 rhel 数量,确保我们不超量使用订阅。

随便起一个名字
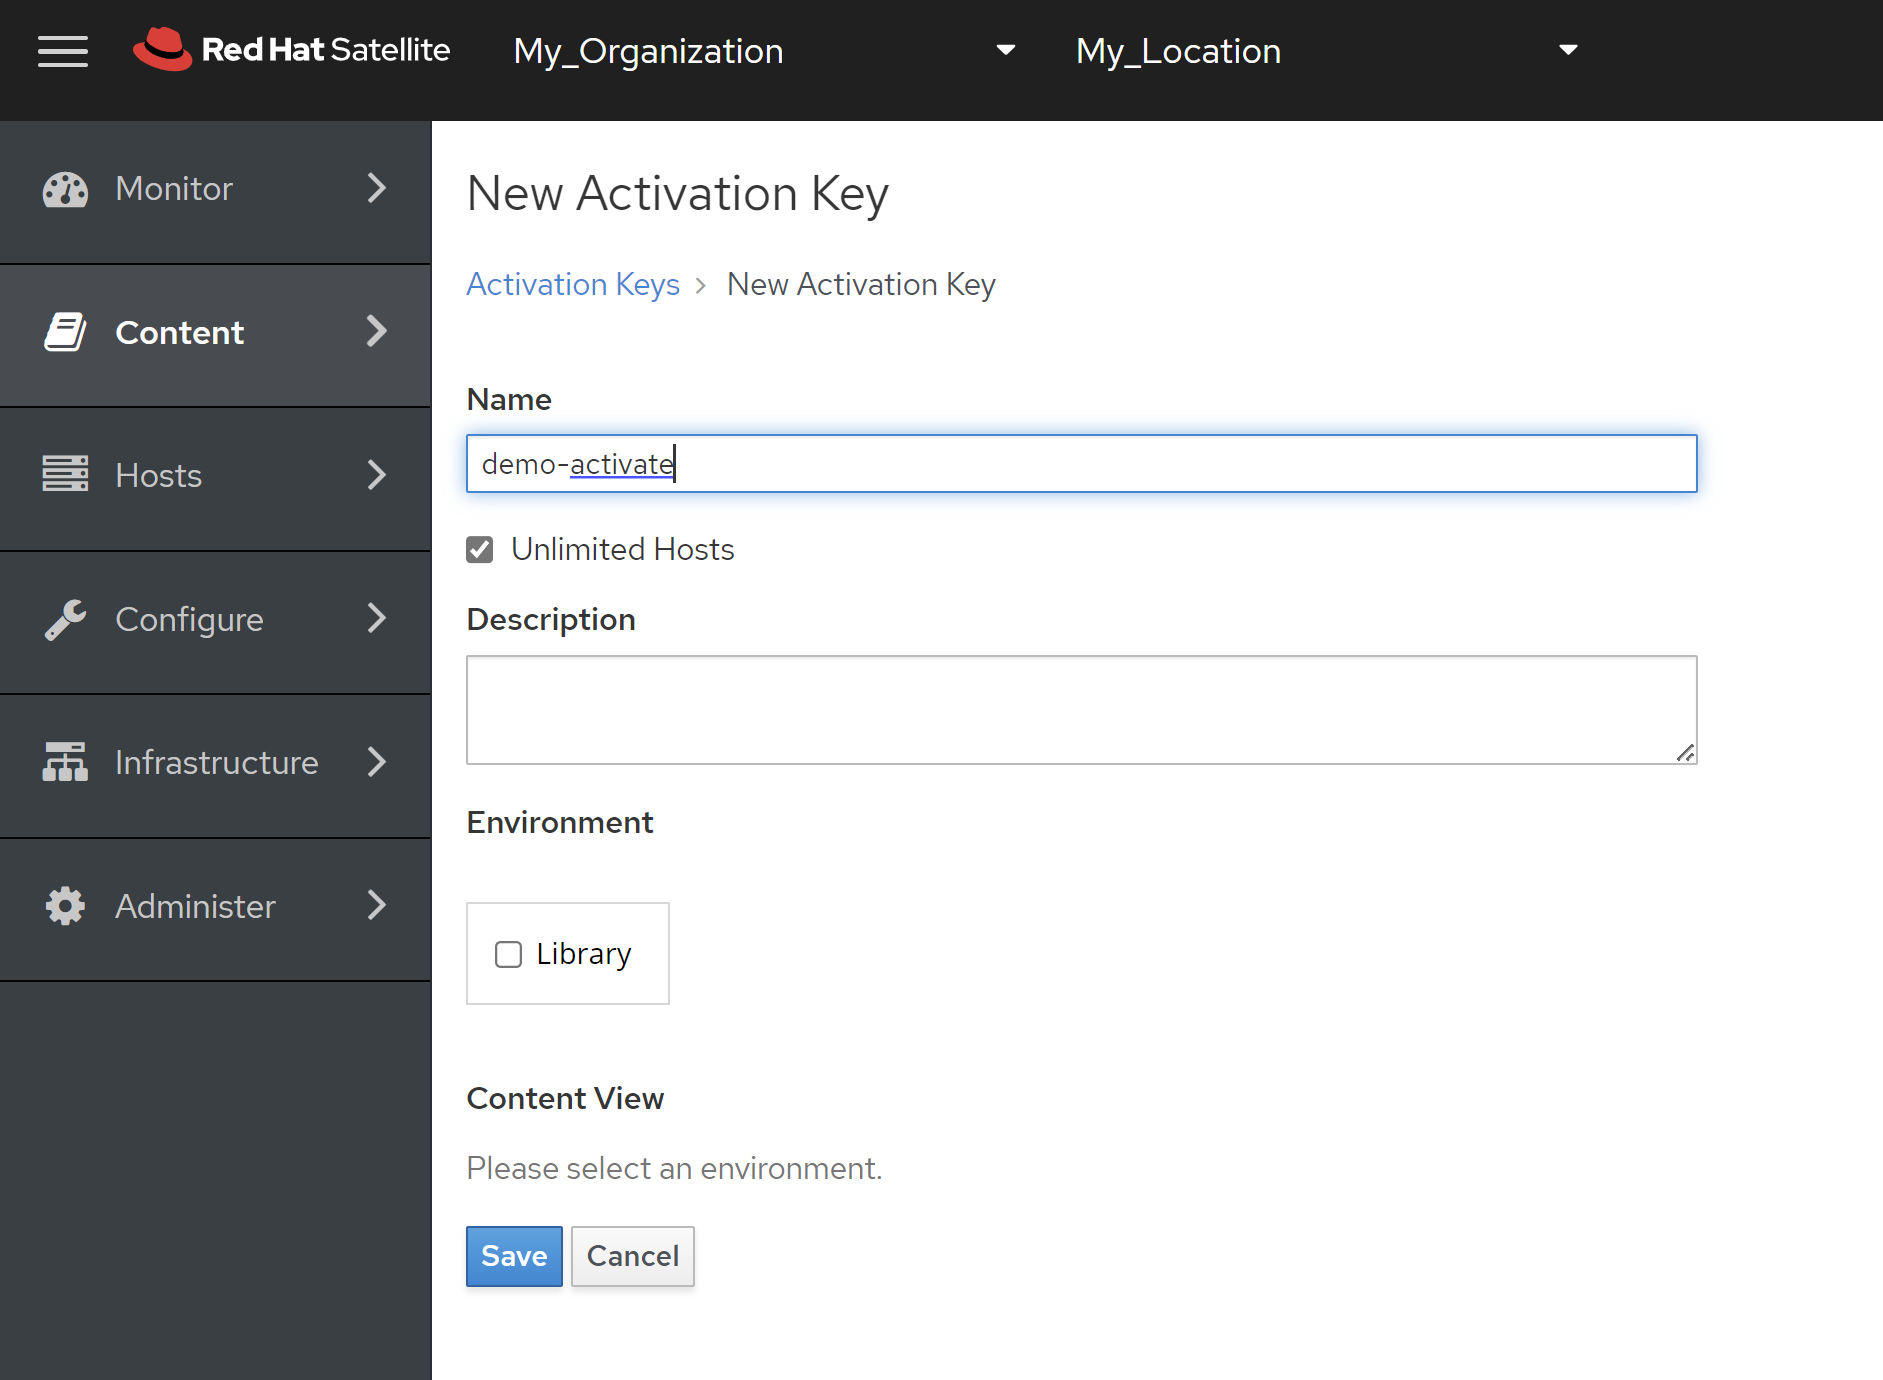
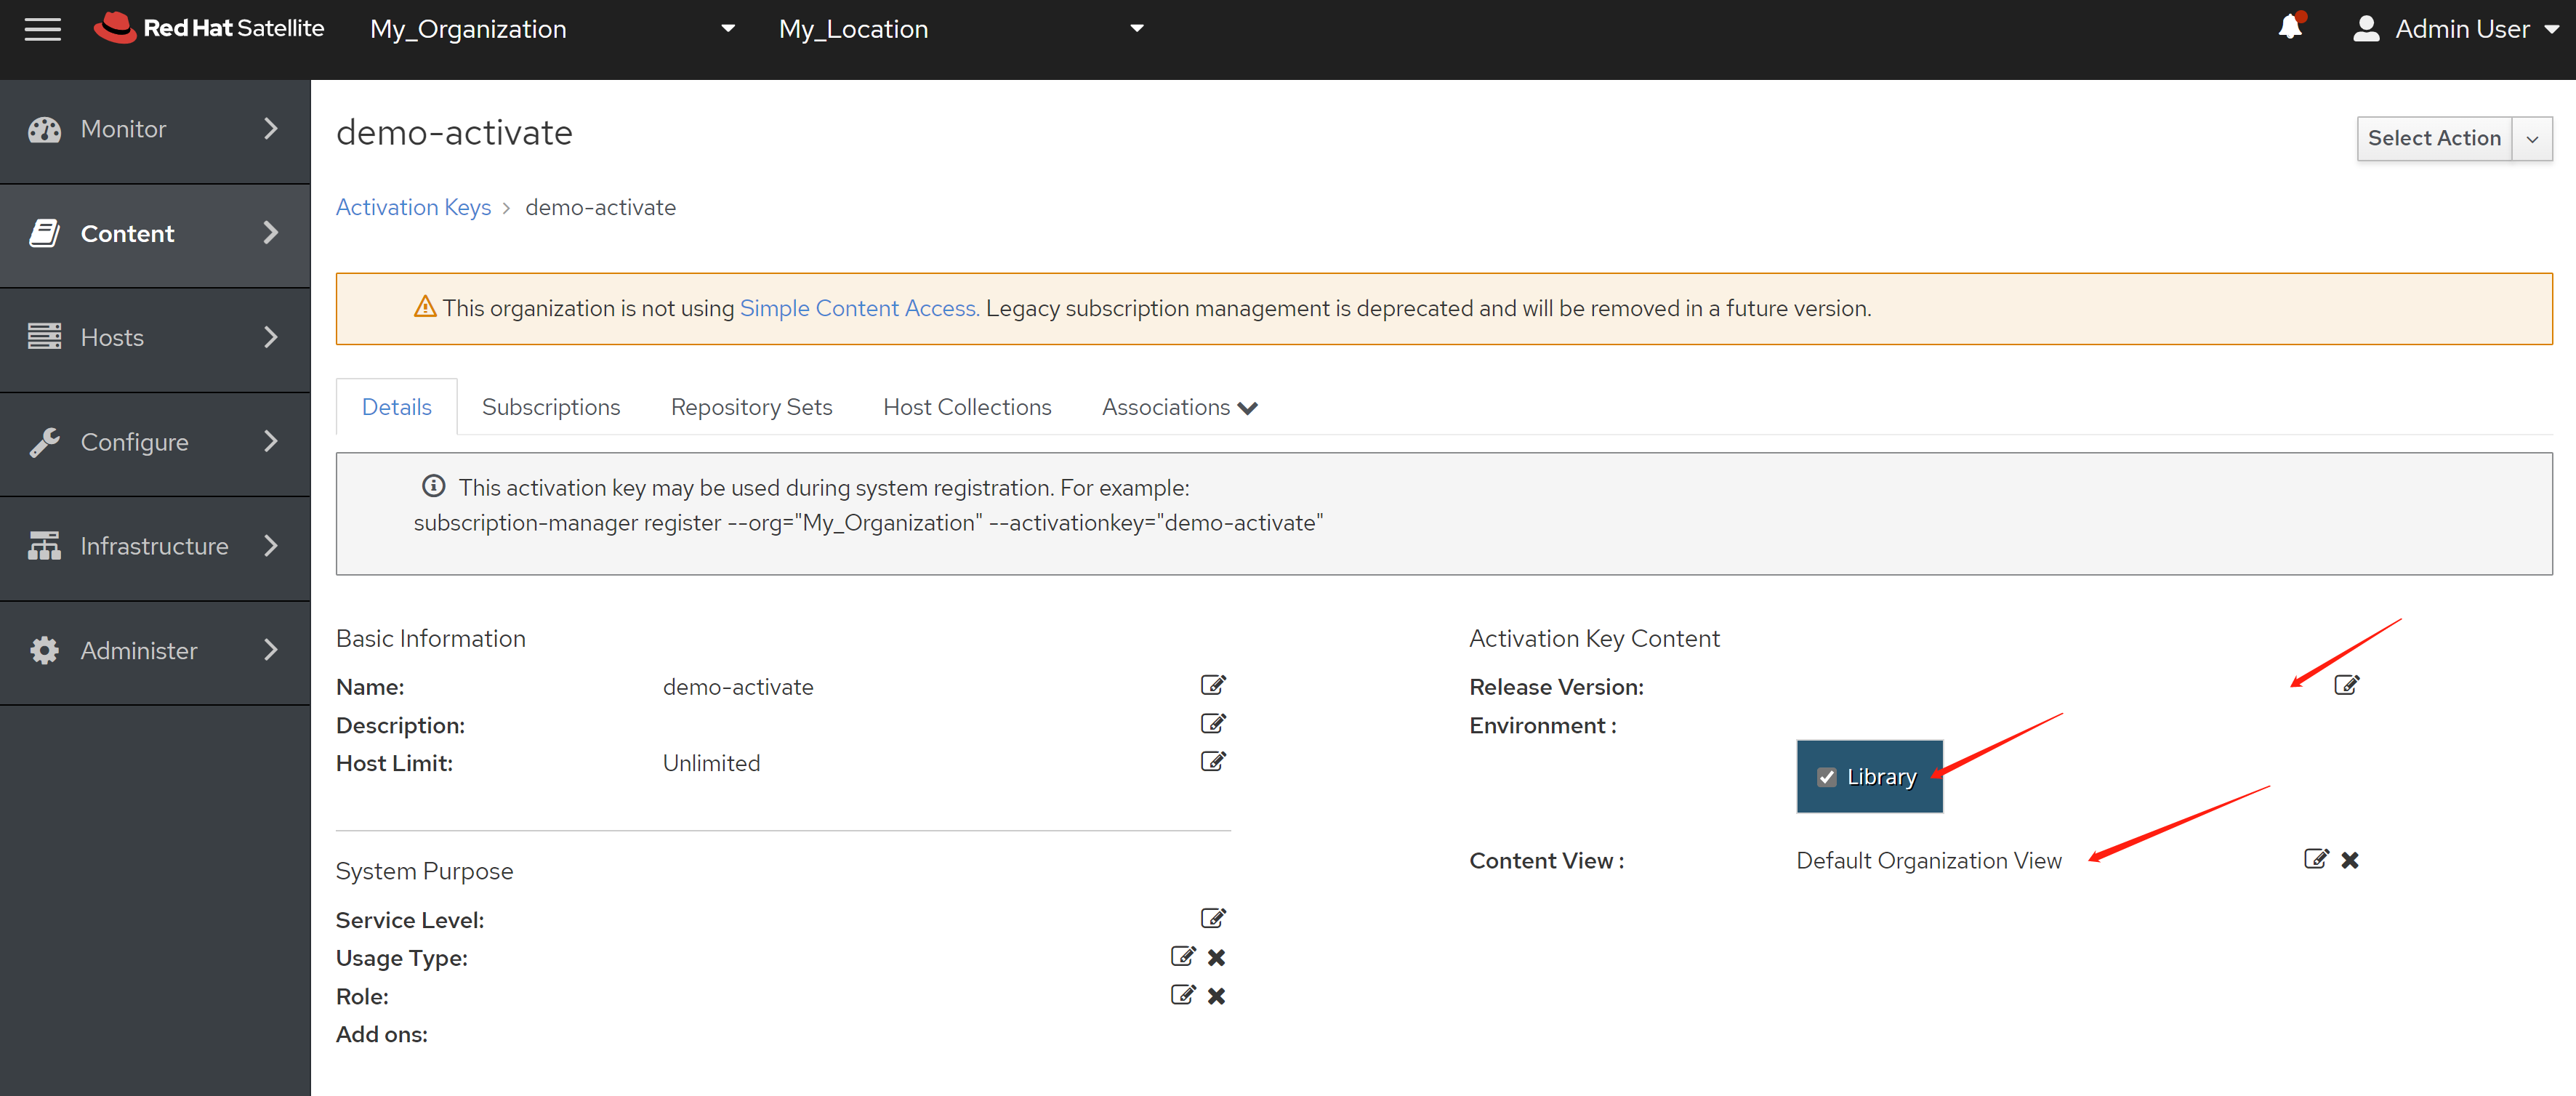
active key的详细配置里面, 我们设置 host limite 为 unlimited, 这个建议设置为具体数字, 保证不超用。我们还要选择 environment, 简单的场景,默认的就好,这个配置能让我们把主机分成不同的group来管理。 content view 也是默认的, 这个配置可以让不同的主机组,看到的rpm 版本不同 。release version 放空,这个配置可以配置主机默认的release版本。
可以看到,satellite的功能很多,是面向大规模主机部署场景设计的。
然后,我们把订阅附加到 active key里面去。

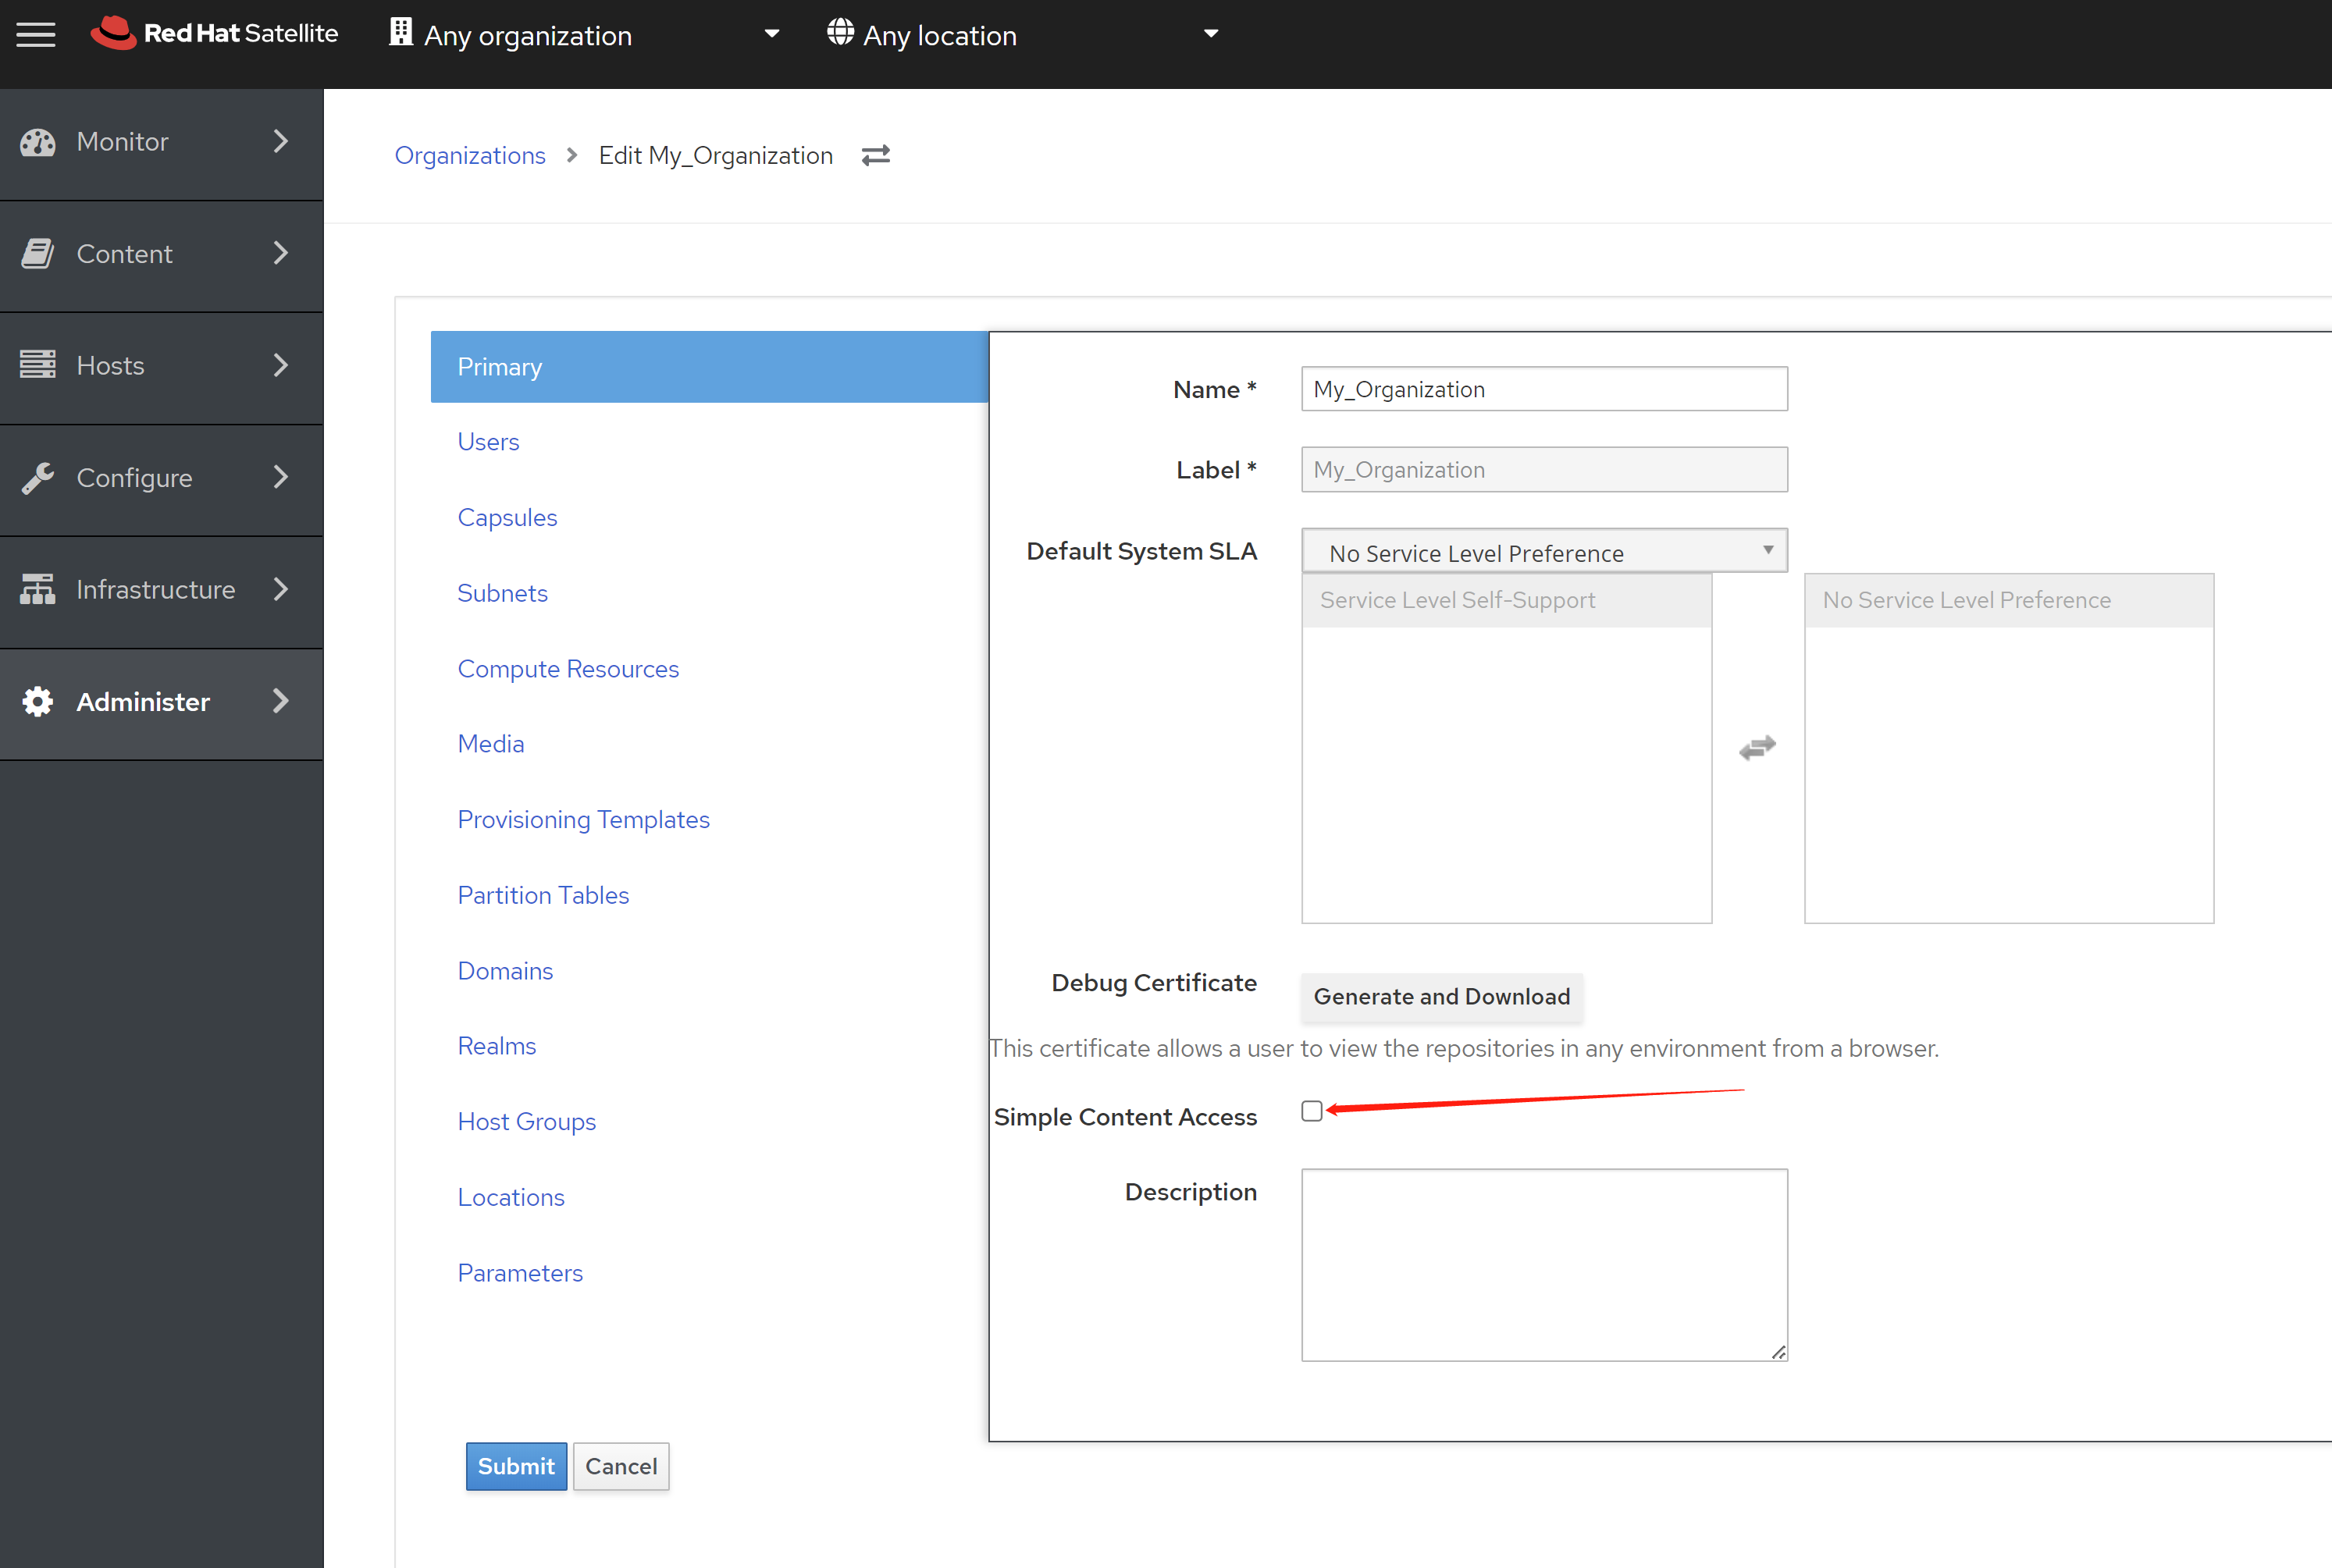
我们的orgnization启用了 simple access control, 为了对比,我们先 disable它,后面我们会打开它,来做个对比。
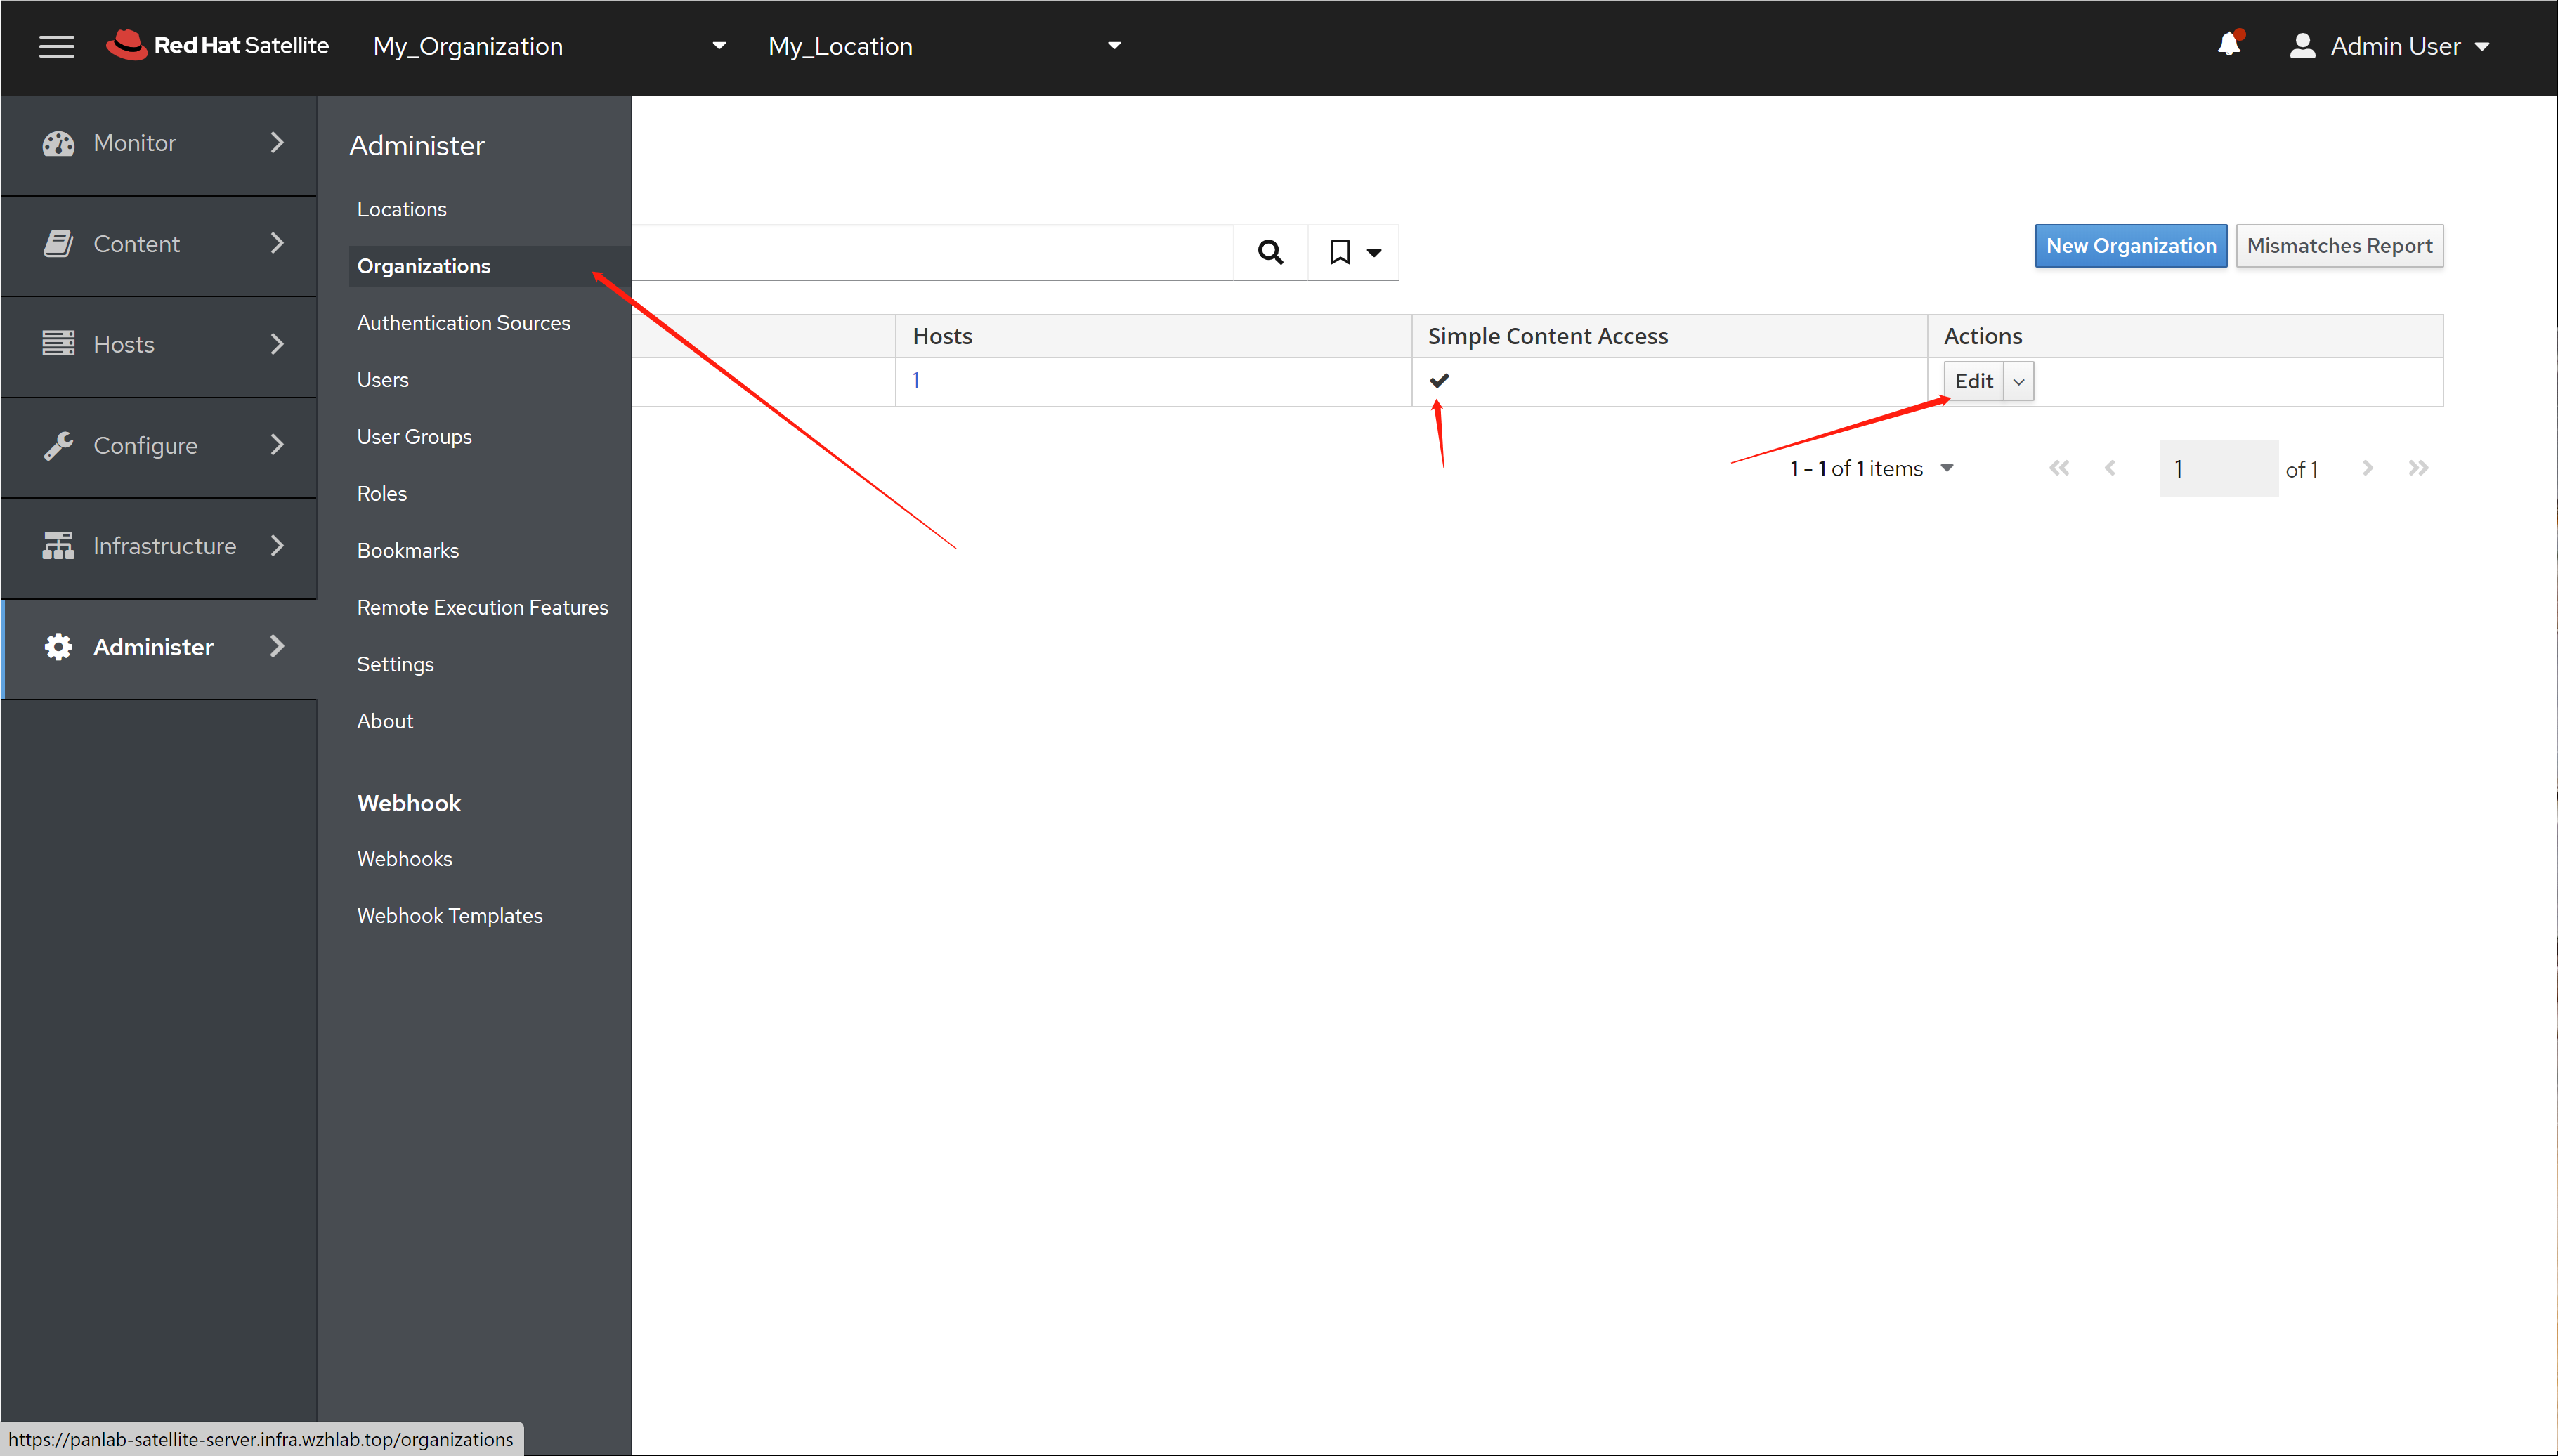
取消 SAC 的激活
注册主机
我们来创建就一个 URI, 目标rhel,curl这个 URL,会下载一个脚本,运行这个脚本,目标rhel就注册到我们的satellite server上了。

根据图例,来配置,注意,激活insecure,因为我们是自签名证书

详细配置里面,我们disable全部功能,因为我们不需要satellite来帮助我们部署服务器。我们让这个URL一直有效。
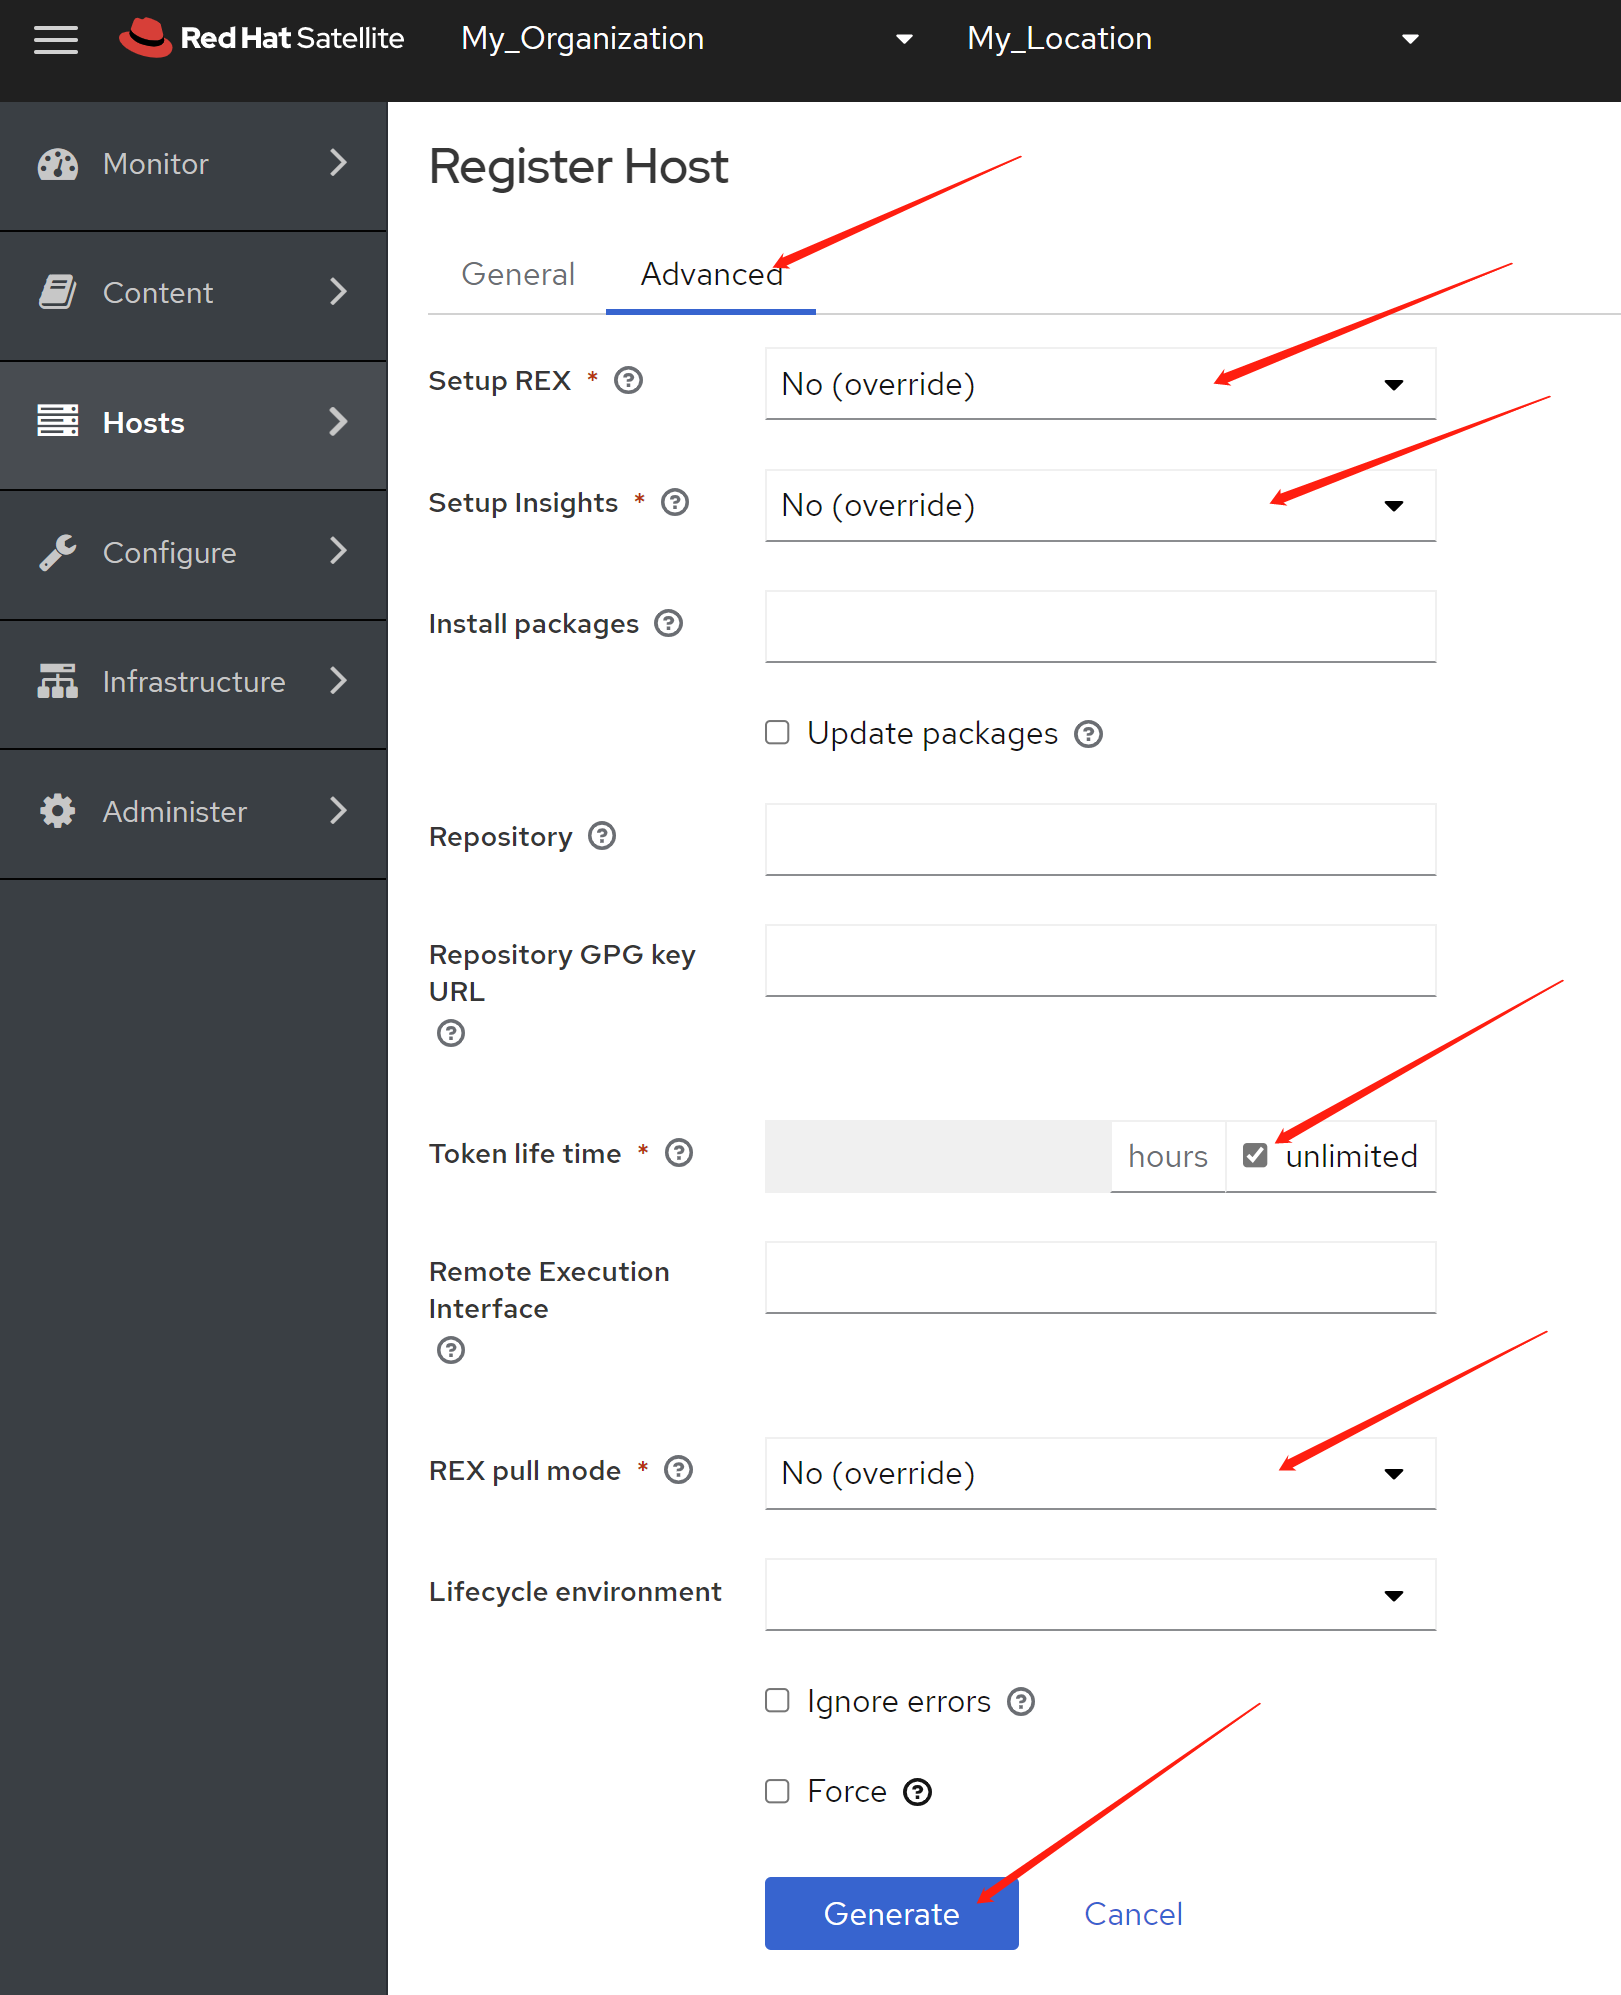
点击生成以后,就得到一个命令,复制下来,保存起来。
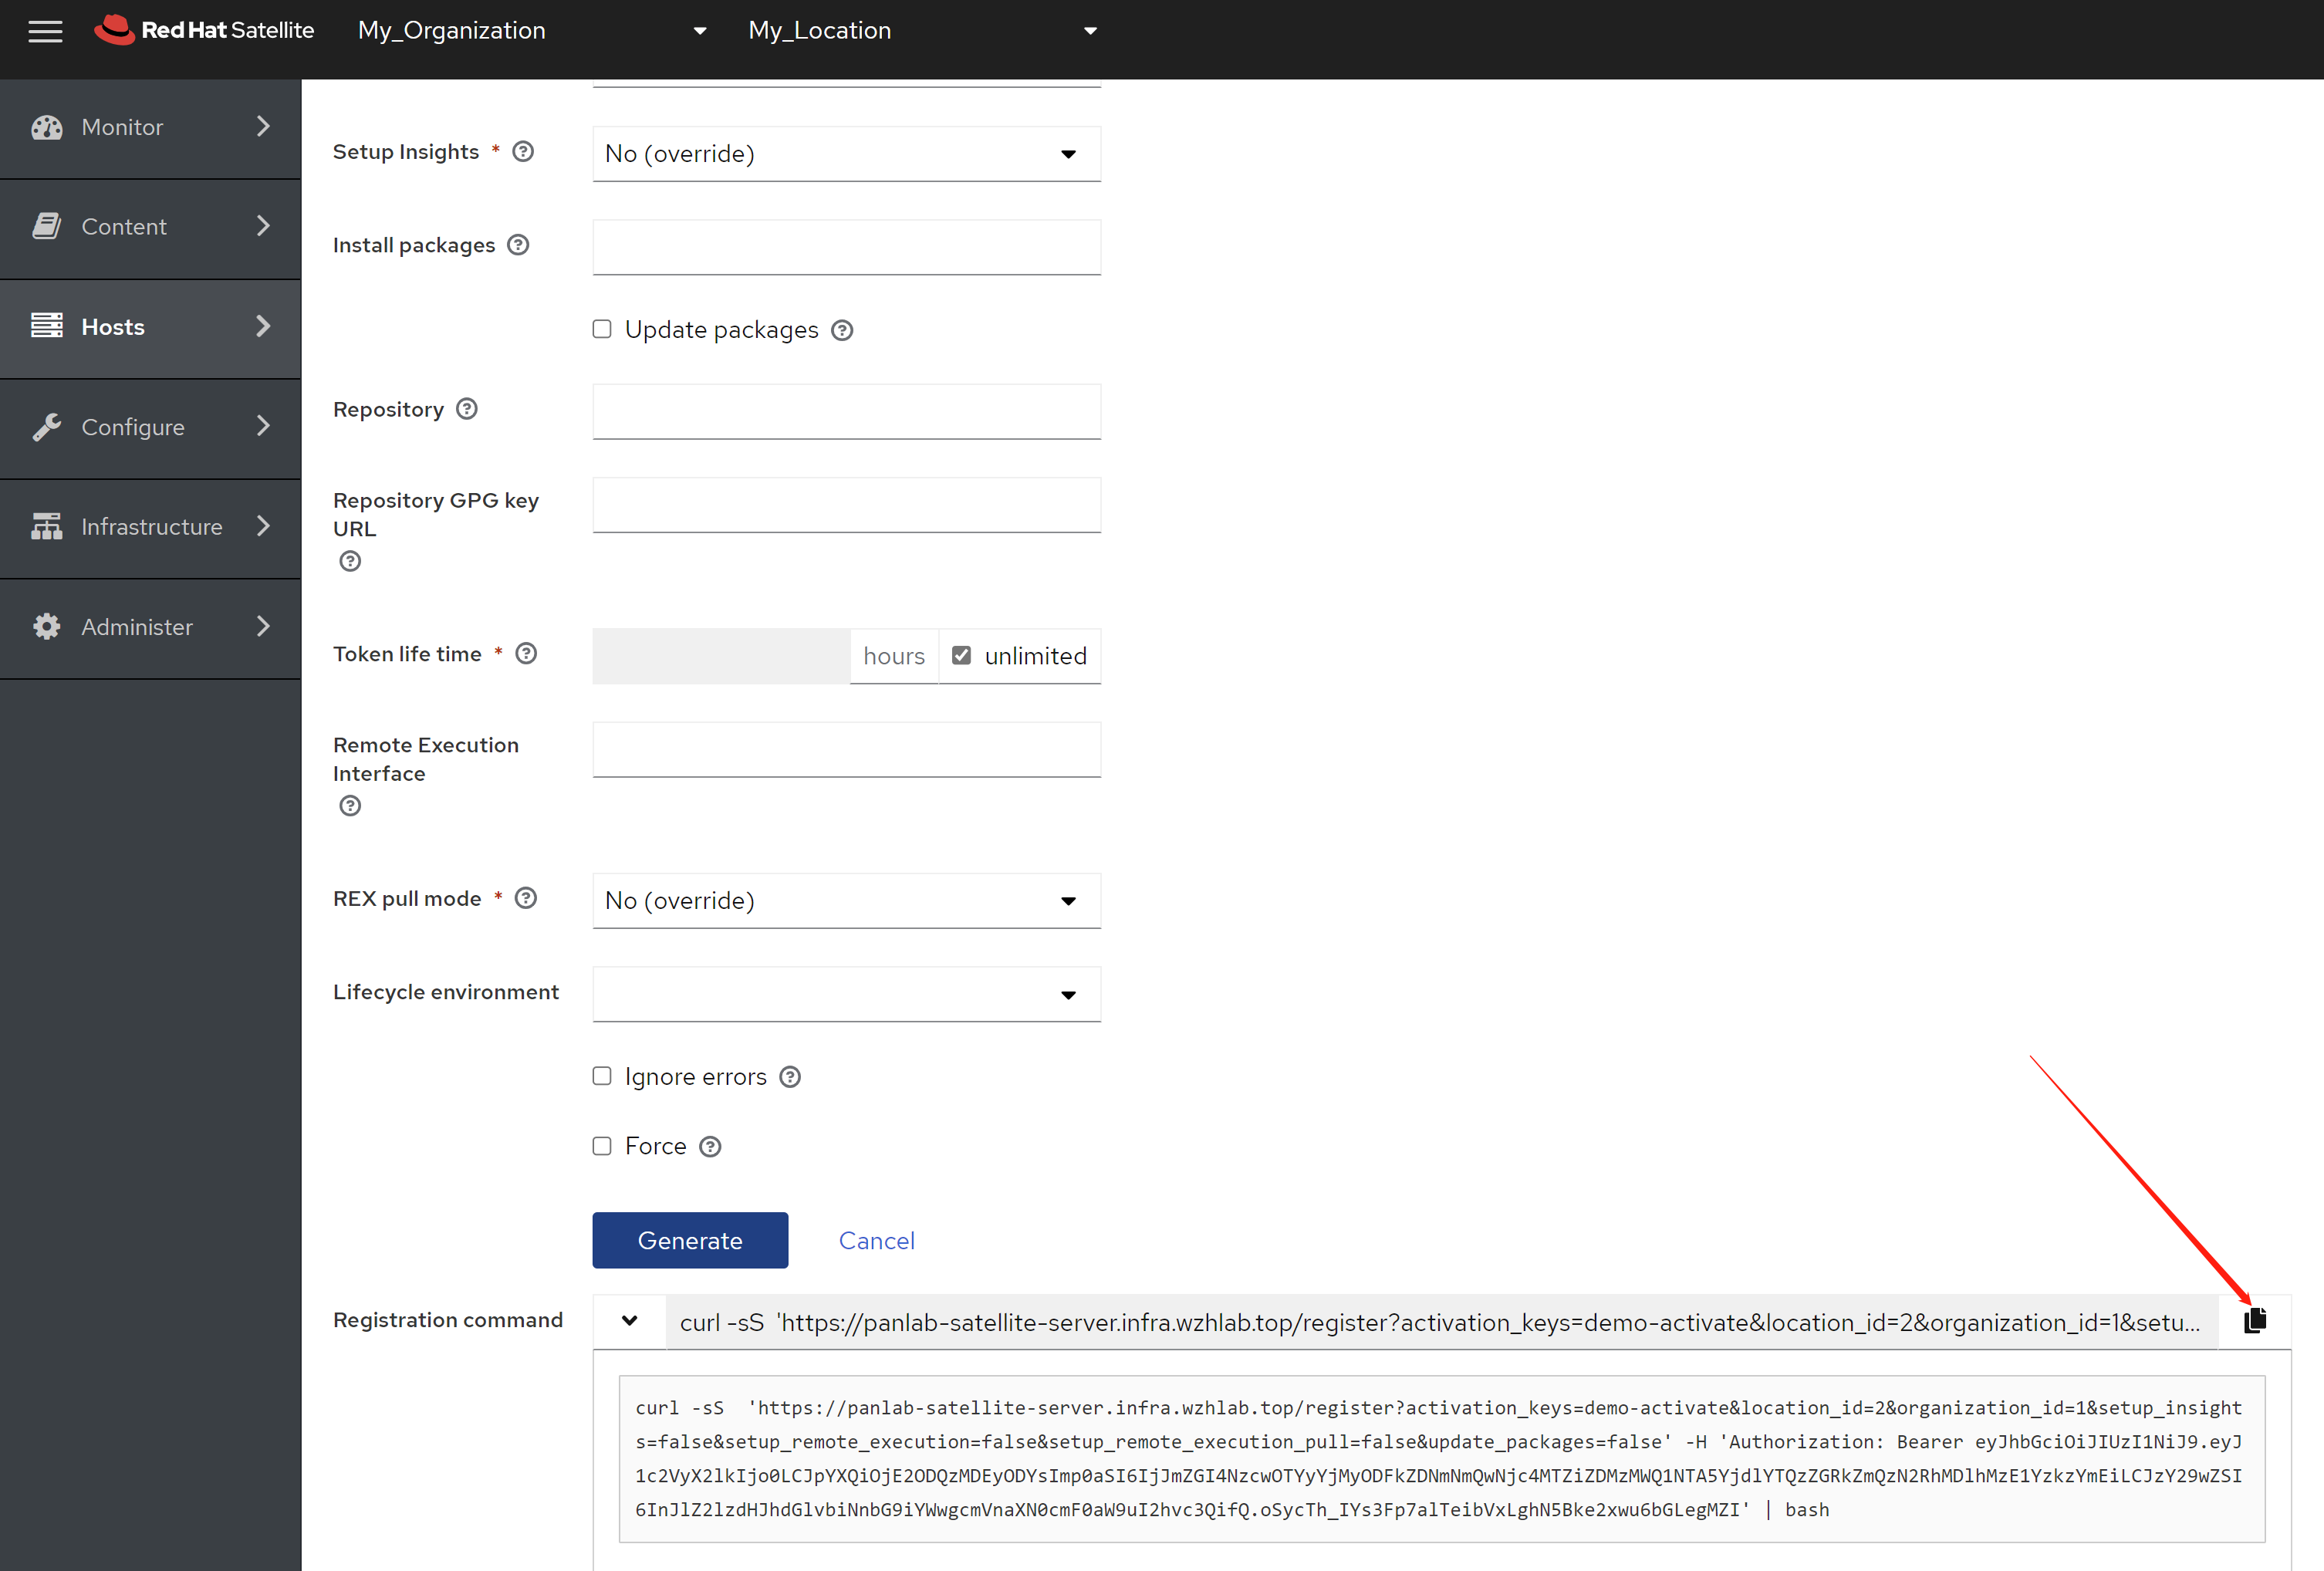
有了命令,我们就找一台rhel,来试试。
# on client host

curl -sS --insecure 'https://panlab-satellite-server.infra.wzhlab.top/register?activation_keys=demo-activate&location_id=2&organization_id=1&setup_insights=false&setup_remote_execution=false&setup_remote_execution_pull=false&update_packages=false' -H 'Authorization: Bearer eyJhbGciOiJIUzI1NiJ9.eyJ1c2VyX2lkIjo0LCJpYXQiOjE2ODQzMDU1MTYsImp0aSI6IjdiODBkNzdmMjVjYzY1MDZjODQ3OGI2Y2VjNzRkZWZjOGM2YjAyMDUxMDQ4YTcyYTJlMWE1YzRiNTgyMjE5NzAiLCJzY29wZSI6InJlZ2lzdHJhdGlvbiNnbG9iYWwgcmVnaXN0cmF0aW9uI2hvc3QifQ.EVXyW9gjWyAQIFYUxnwwdxAigrPmUo_XYWnqn-Wh1Fw' | bash

# #
# # Running registration
# #
# Updating Subscription Management repositories.
# Unable to read consumer identity

# This system is not registered with an entitlement server. You can use subscription-manager to register.

# Error: There are no enabled repositories in "/etc/yum.repos.d", "/etc/yum/repos.d", "/etc/distro.repos.d".
# The system has been registered with ID: e9d03372-d3f4-4970-bb38-3a2282458e29
# The registered system name is: panlab-satellite-client
# Installed Product Current Status:
# Product Name: Red Hat Enterprise Linux for x86_64
# Status:       Subscribed

# # Running [panlab-satellite-client] host initial configuration
# Refreshing subscription data
# All local data refreshed
# Host [panlab-satellite-client] successfully configured.
# Successfully updated the system facts.

subscription-manager status
# +-------------------------------------------+
#    System Status Details
# +-------------------------------------------+
# Overall Status: Current

# System Purpose Status: Not Specified

subscription-manager release --list
# +-------------------------------------------+
#           Available Releases
# +-------------------------------------------+
# 8.6

subscription-manager release --set=8.6

subscription-manager config
# [server]
#    hostname = panlab-satellite-server.infra.wzhlab.top
# ......
# [rhsm]
#    auto_enable_yum_plugins = [1]
#    baseurl = https://panlab-satellite-server.infra.wzhlab.top/pulp/content
# ......

dnf repolist
# Updating Subscription Management repositories.
# repo id                                                                   repo name
# rhel-8-for-x86_64-appstream-rpms                                          Red Hat Enterprise Linux 8 for x86_64 - AppStream (RPMs)
# rhel-8-for-x86_64-baseos-rpms                                             Red Hat Enterprise Linux 8 for x86_64 - BaseOS (RPMs)

dnf makecache
# Updating Subscription Management repositories.
# Red Hat Enterprise Linux 8 for x86_64 - BaseOS (RPMs)                                                                                       63 kB/s | 4.1 kB     00:00
# Red Hat Enterprise Linux 8 for x86_64 - AppStream (RPMs)                                                                                    65 kB/s | 4.5 kB     00:00
# Metadata cache created.

subscription-manager repos
# +----------------------------------------------------------+
#     Available Repositories in /etc/yum.repos.d/redhat.repo
# +----------------------------------------------------------+
# Repo ID:   rhel-8-for-x86_64-baseos-rpms
# Repo Name: Red Hat Enterprise Linux 8 for x86_64 - BaseOS (RPMs)
# Repo URL:  https://panlab-satellite-server.infra.wzhlab.top/pulp/content/My_Organization/Library/content/dist/rhel8/8.6/x86_64/baseos/os
# Enabled:   1

# Repo ID:   rhel-8-for-x86_64-appstream-rpms
# Repo Name: Red Hat Enterprise Linux 8 for x86_64 - AppStream (RPMs)
# Repo URL:  https://panlab-satellite-server.infra.wzhlab.top/pulp/content/My_Organization/Library/content/dist/rhel8/8.6/x86_64/appstream/os
# Enabled:   1
我们回到active key,可以看到已经激活的 repo

然后看到,我们没有配置host collection,所以这里也是空的。
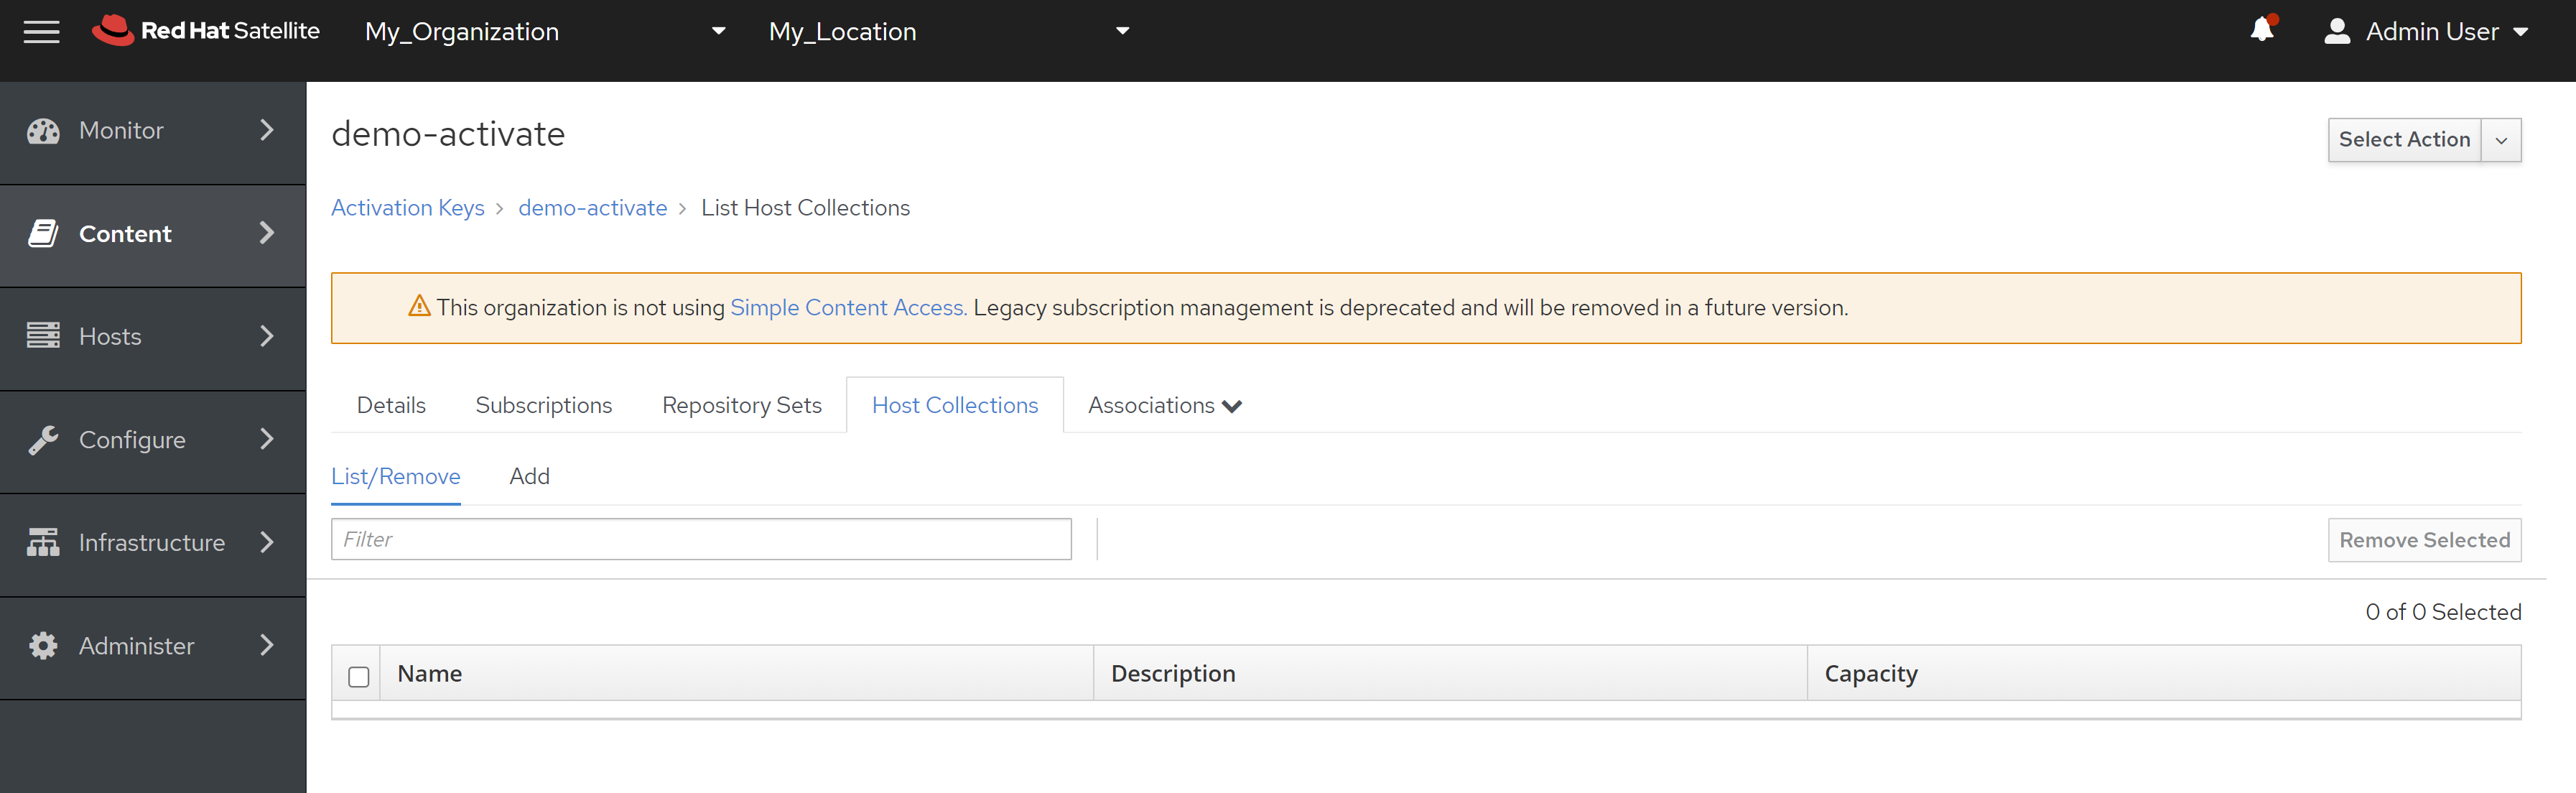
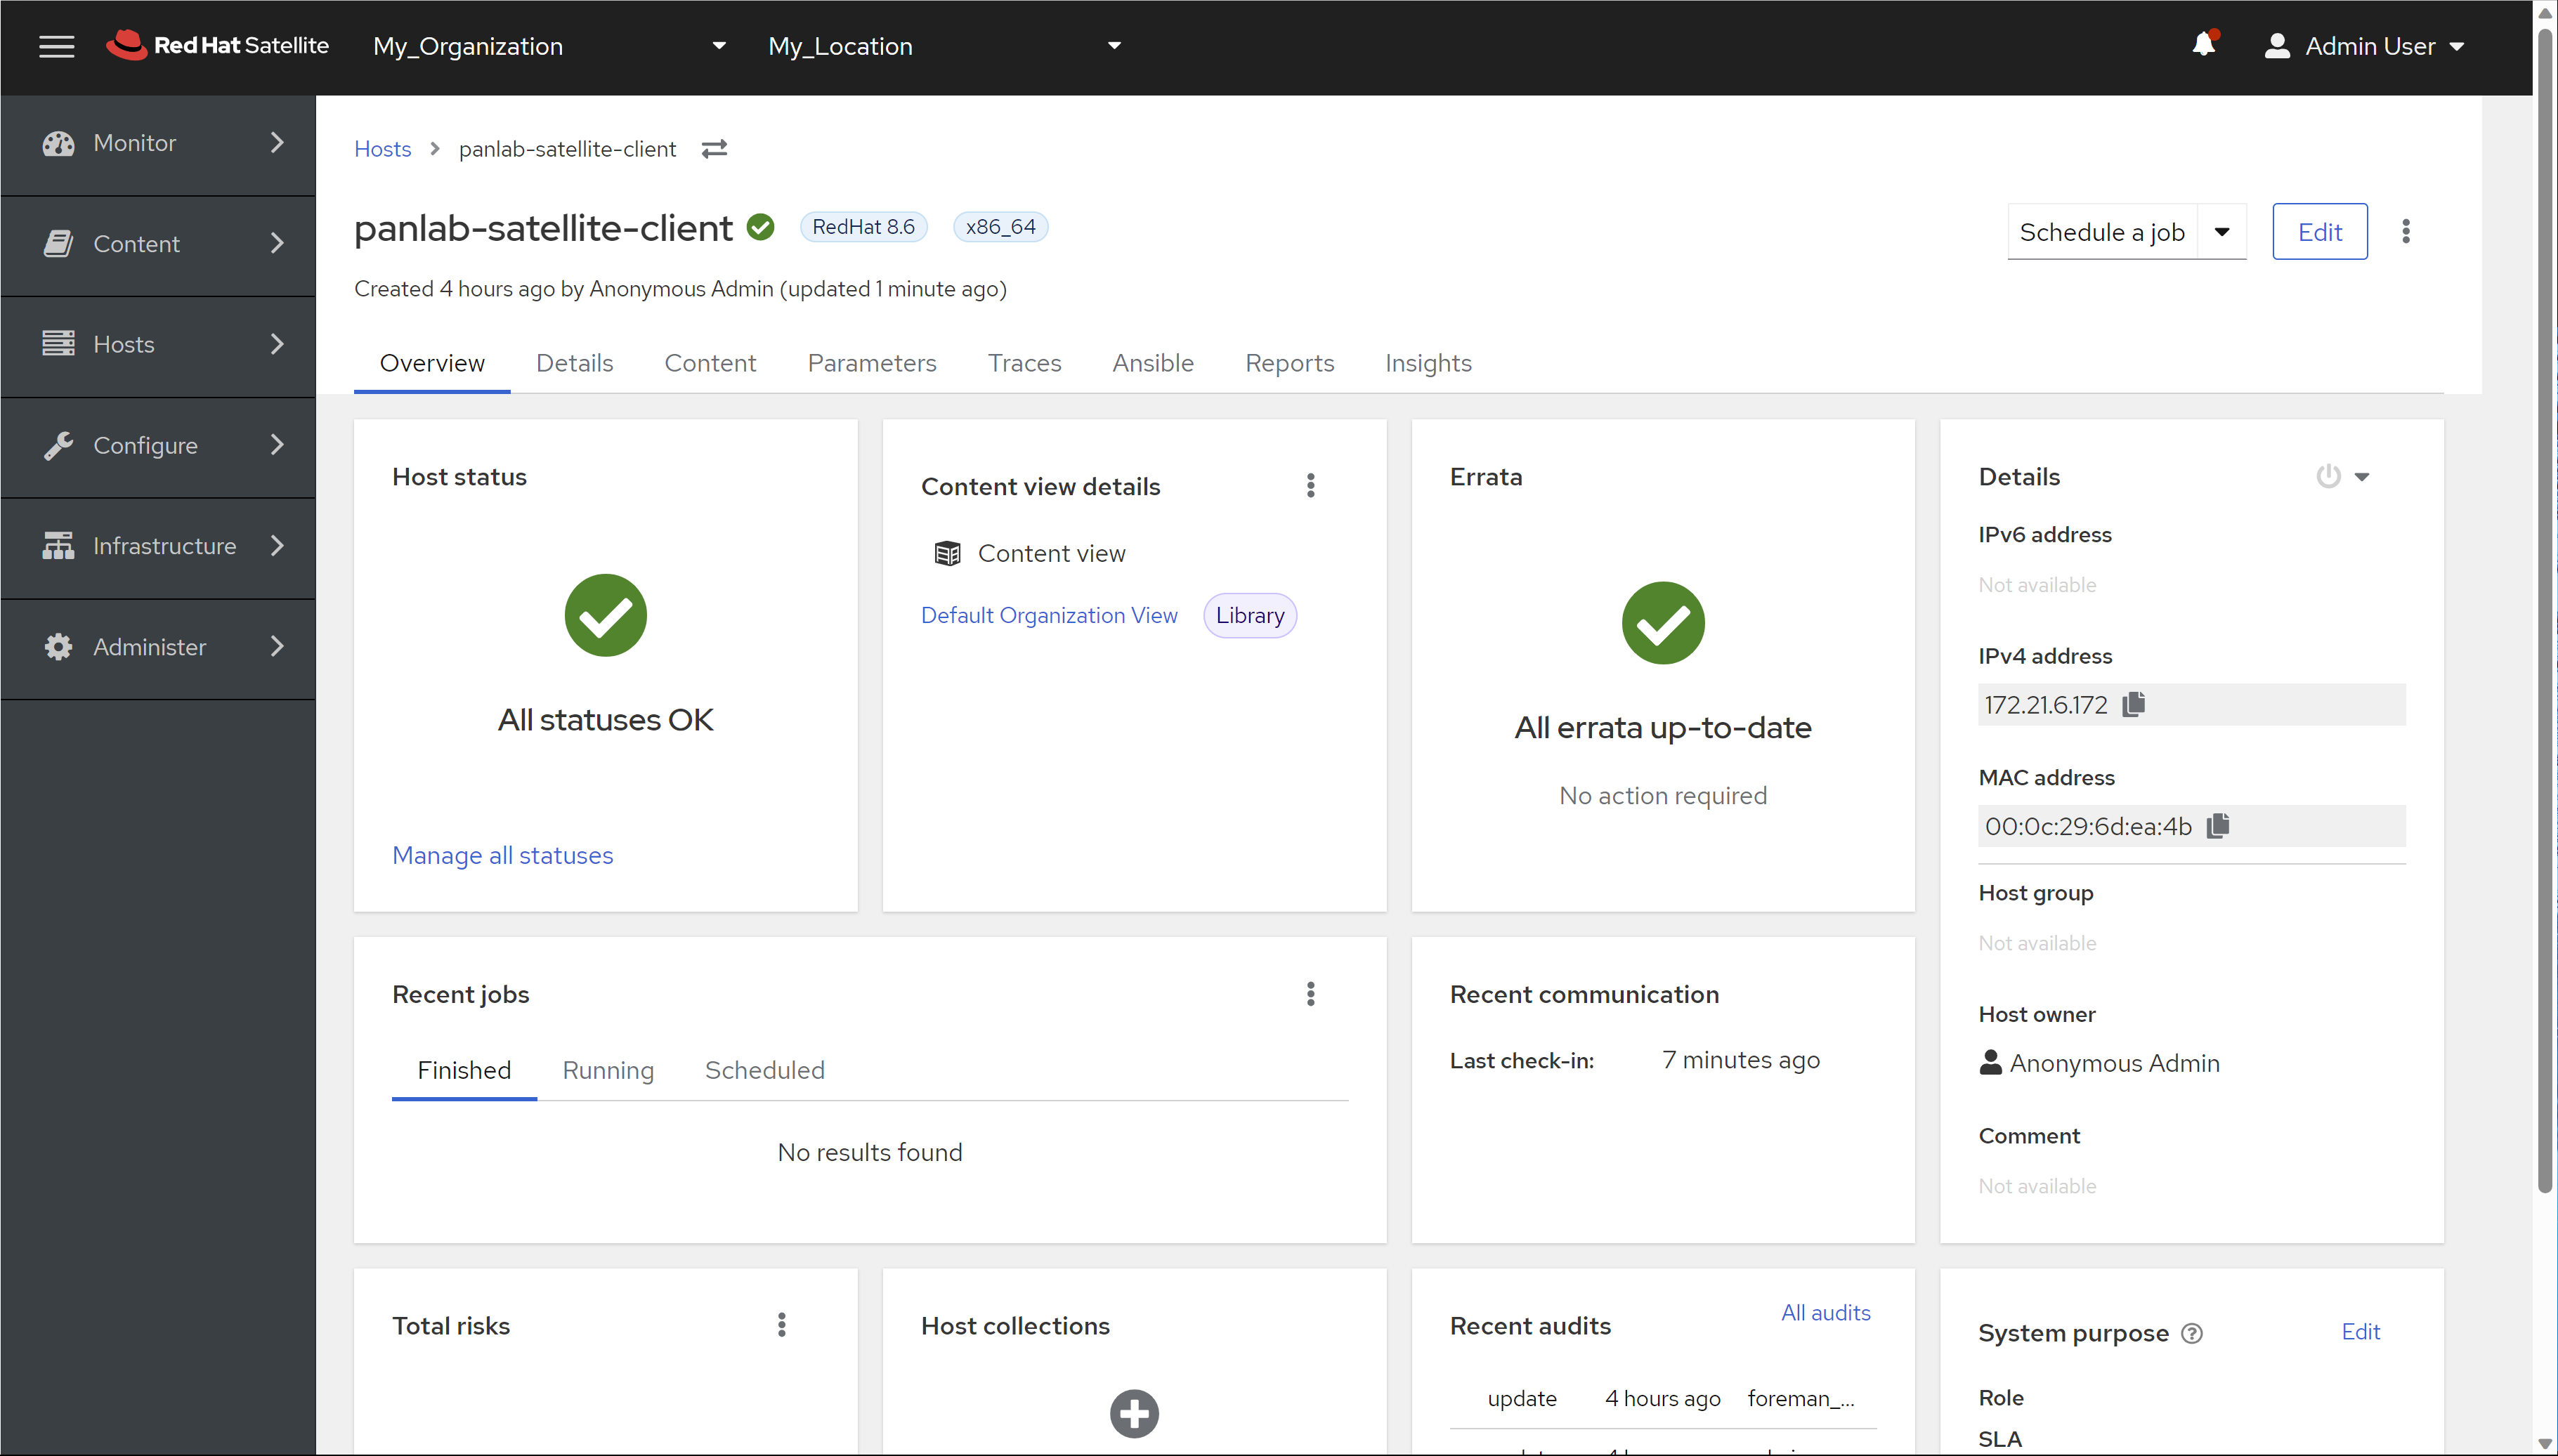
最后,我们在active key的host列表中,看到了我们刚才的主机。

点进去看看,可以看到主机的rpm的安全问题,satellite已经能够看到。

问题那么多,我们更新一下看看
# on satellite-client
dnf update -y
哈哈,问题都解决了。
我们能看到,已经使用了一个订阅

在订阅详细信息里面,也能看到一个activation key
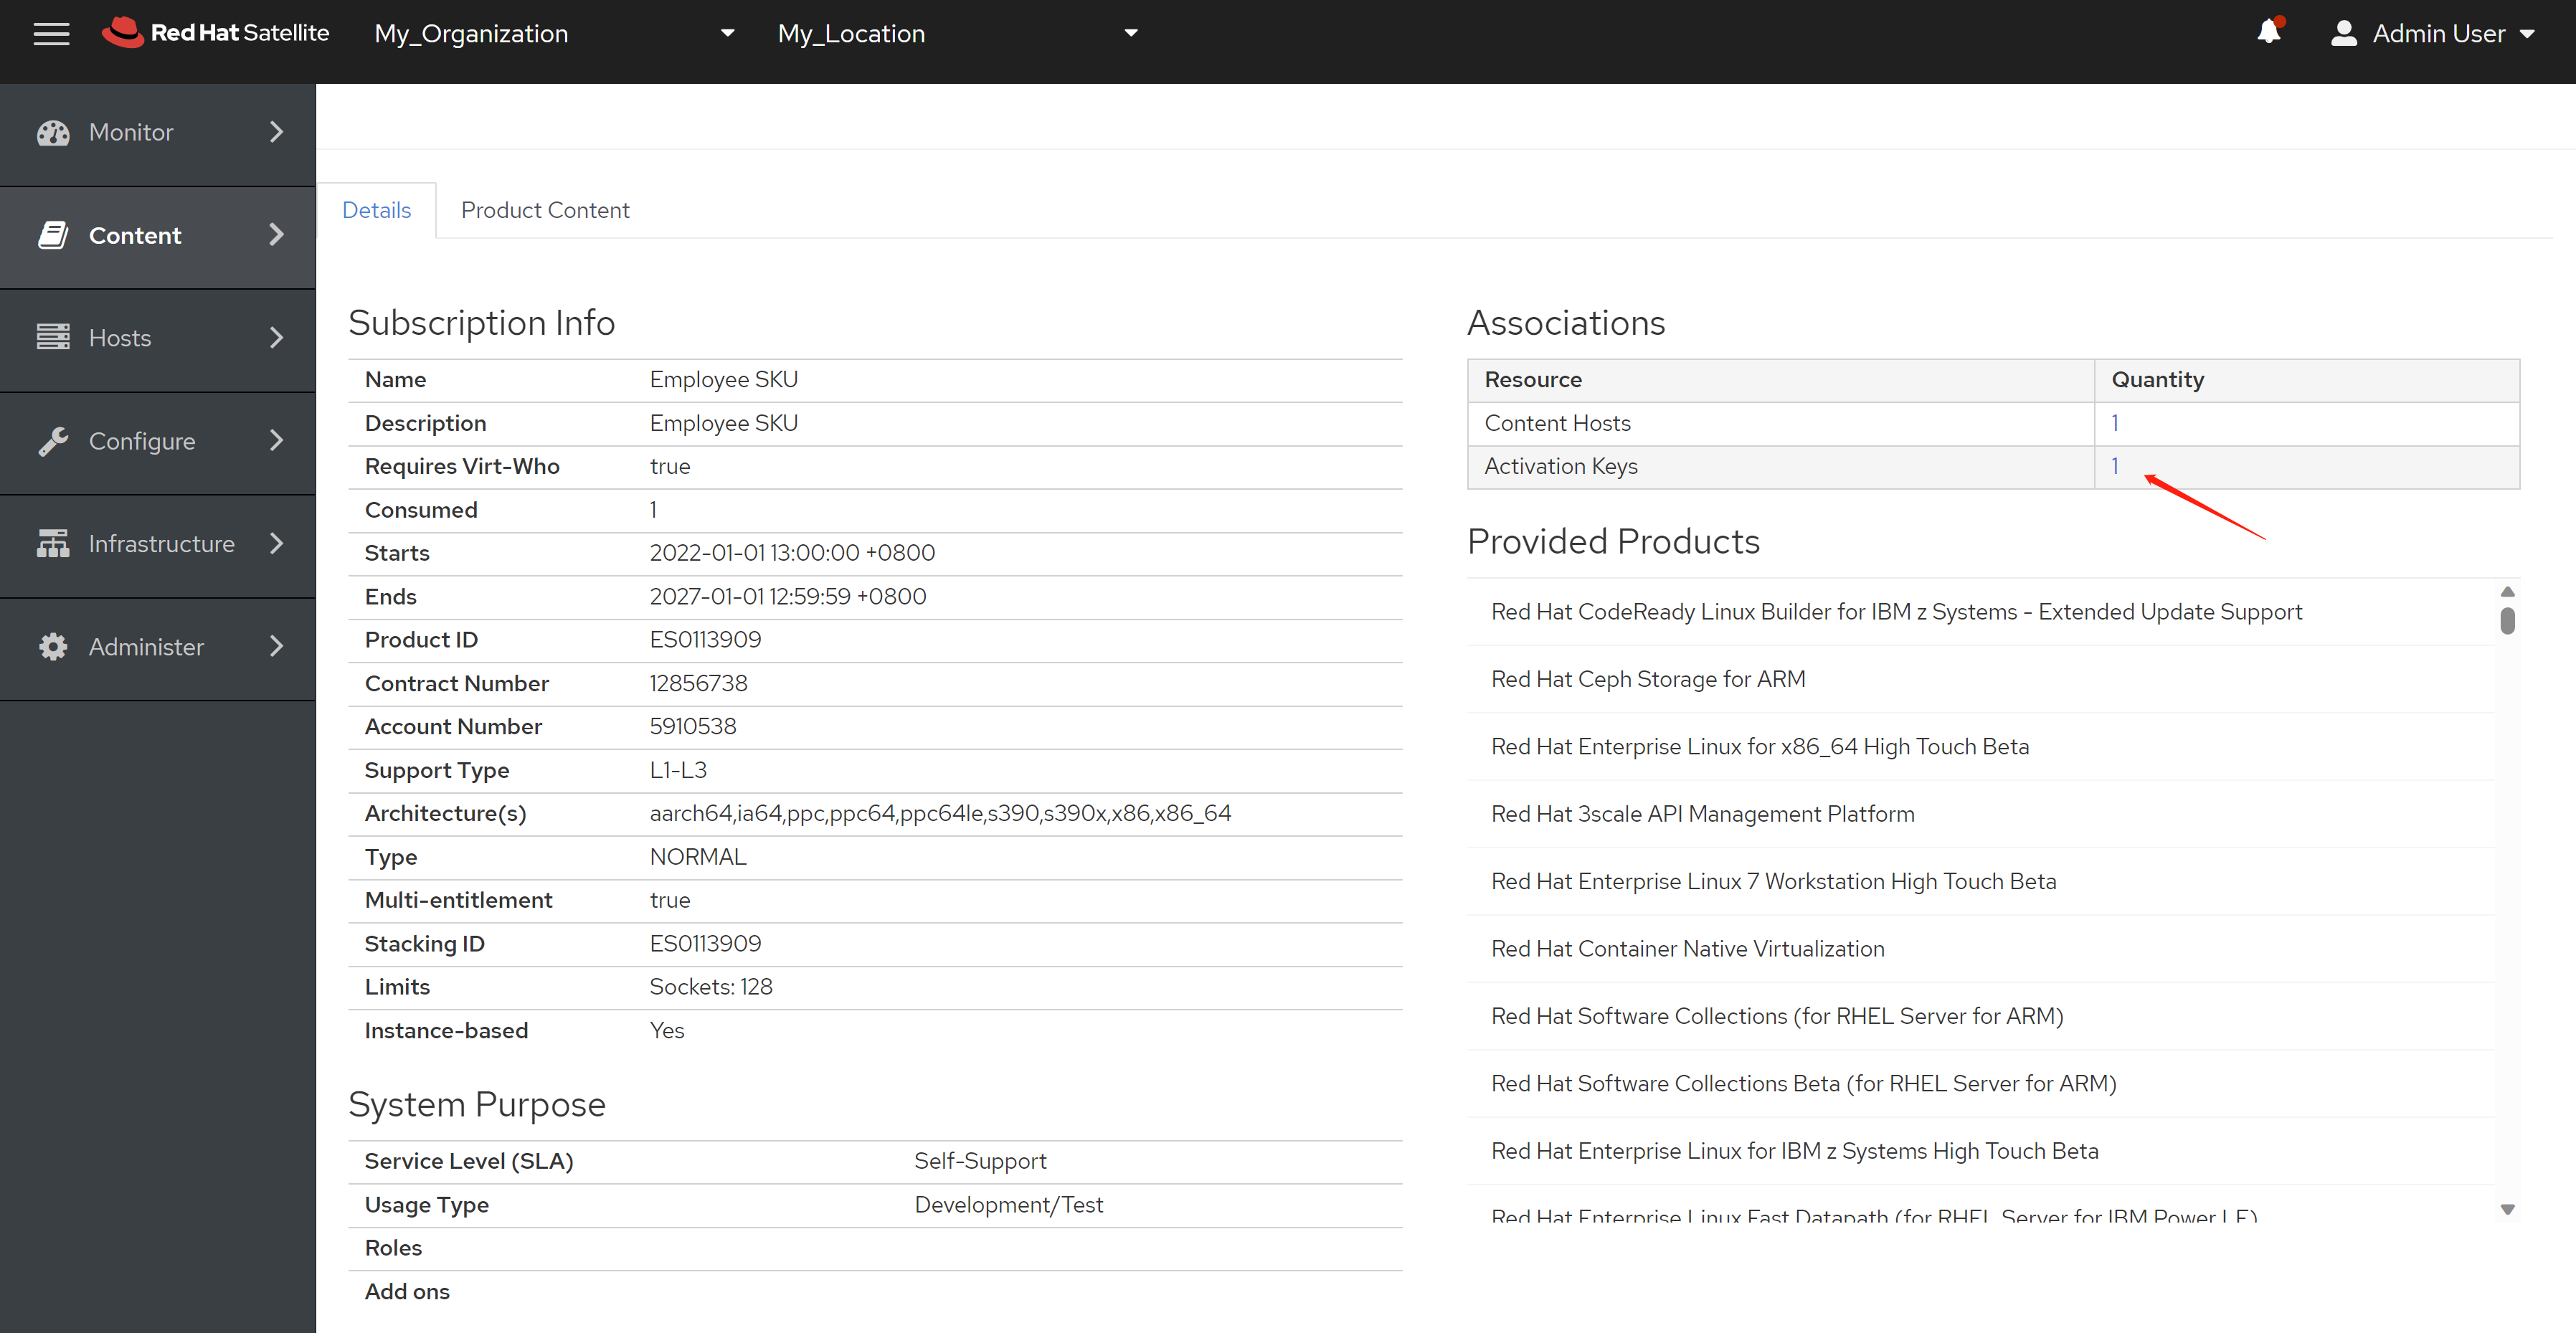
订阅包含的,使用的产品内容就是baseos, appstream

主机列表多了我们刚才激活的主机。

增加订阅数量
如果我们多买了一些订阅,怎么添加数量呢?这里,我们就模拟增加1个订阅的场景。
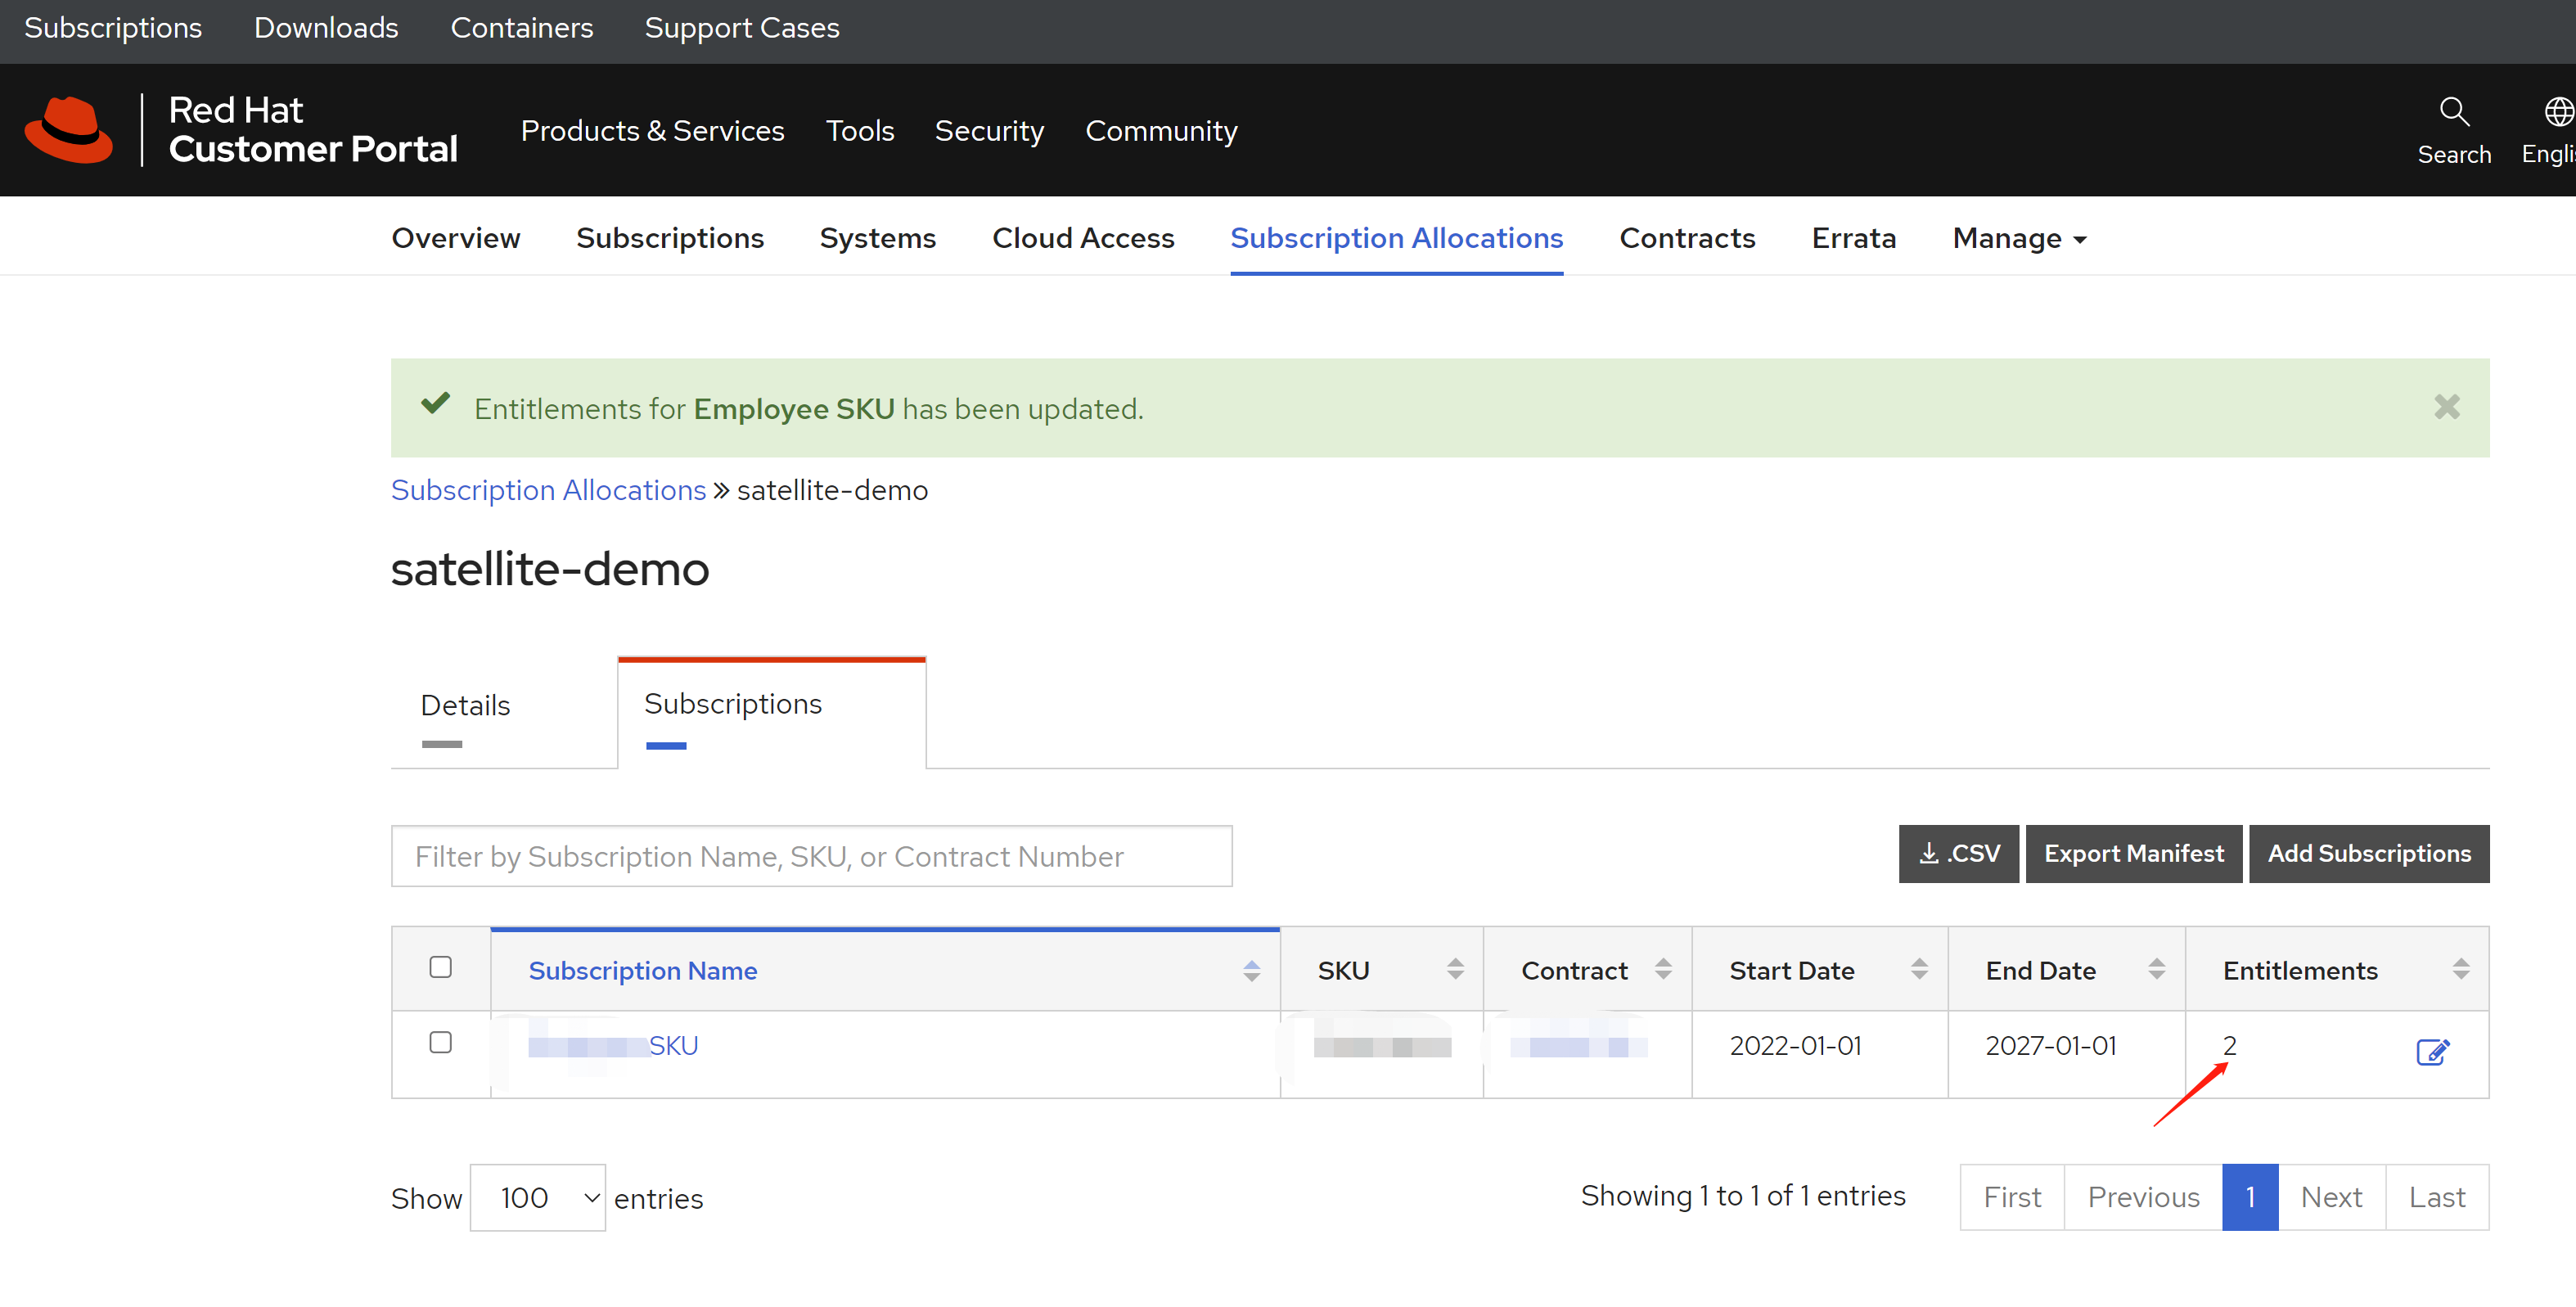
我们访问redhat portal,点击之前创建的订阅分配。
调整数量为 2
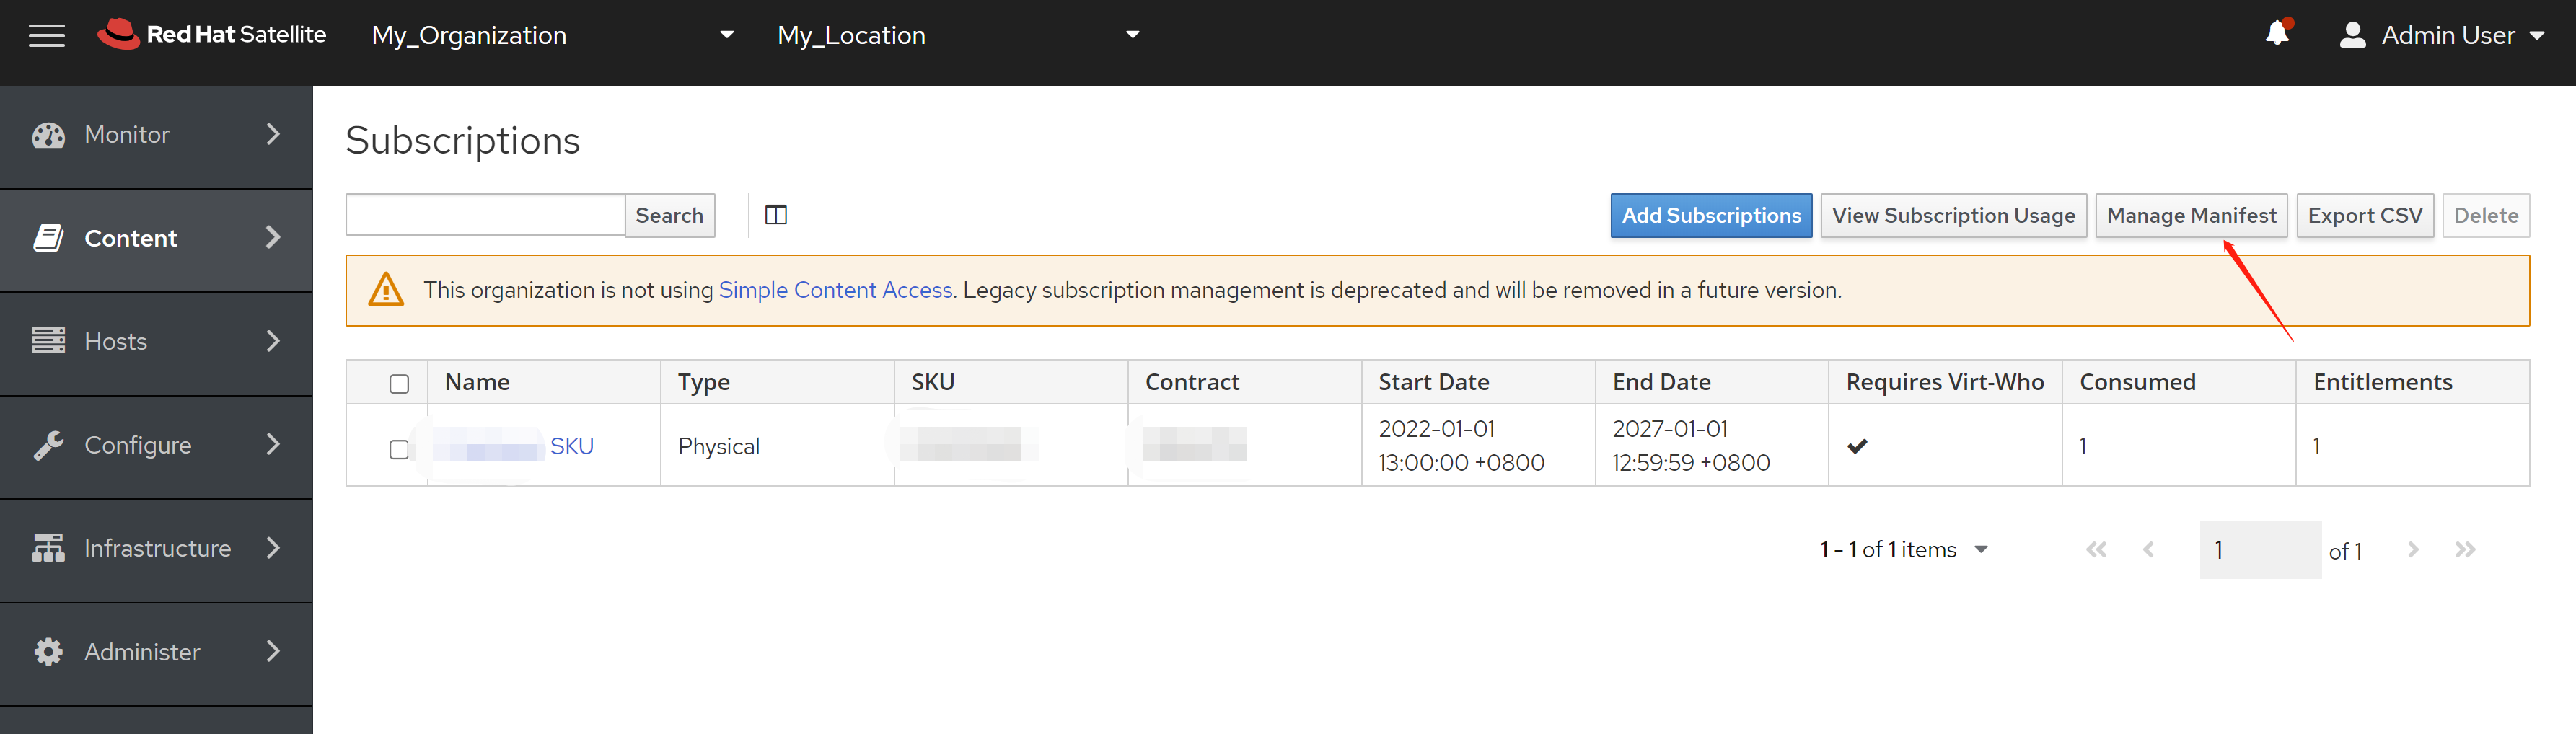
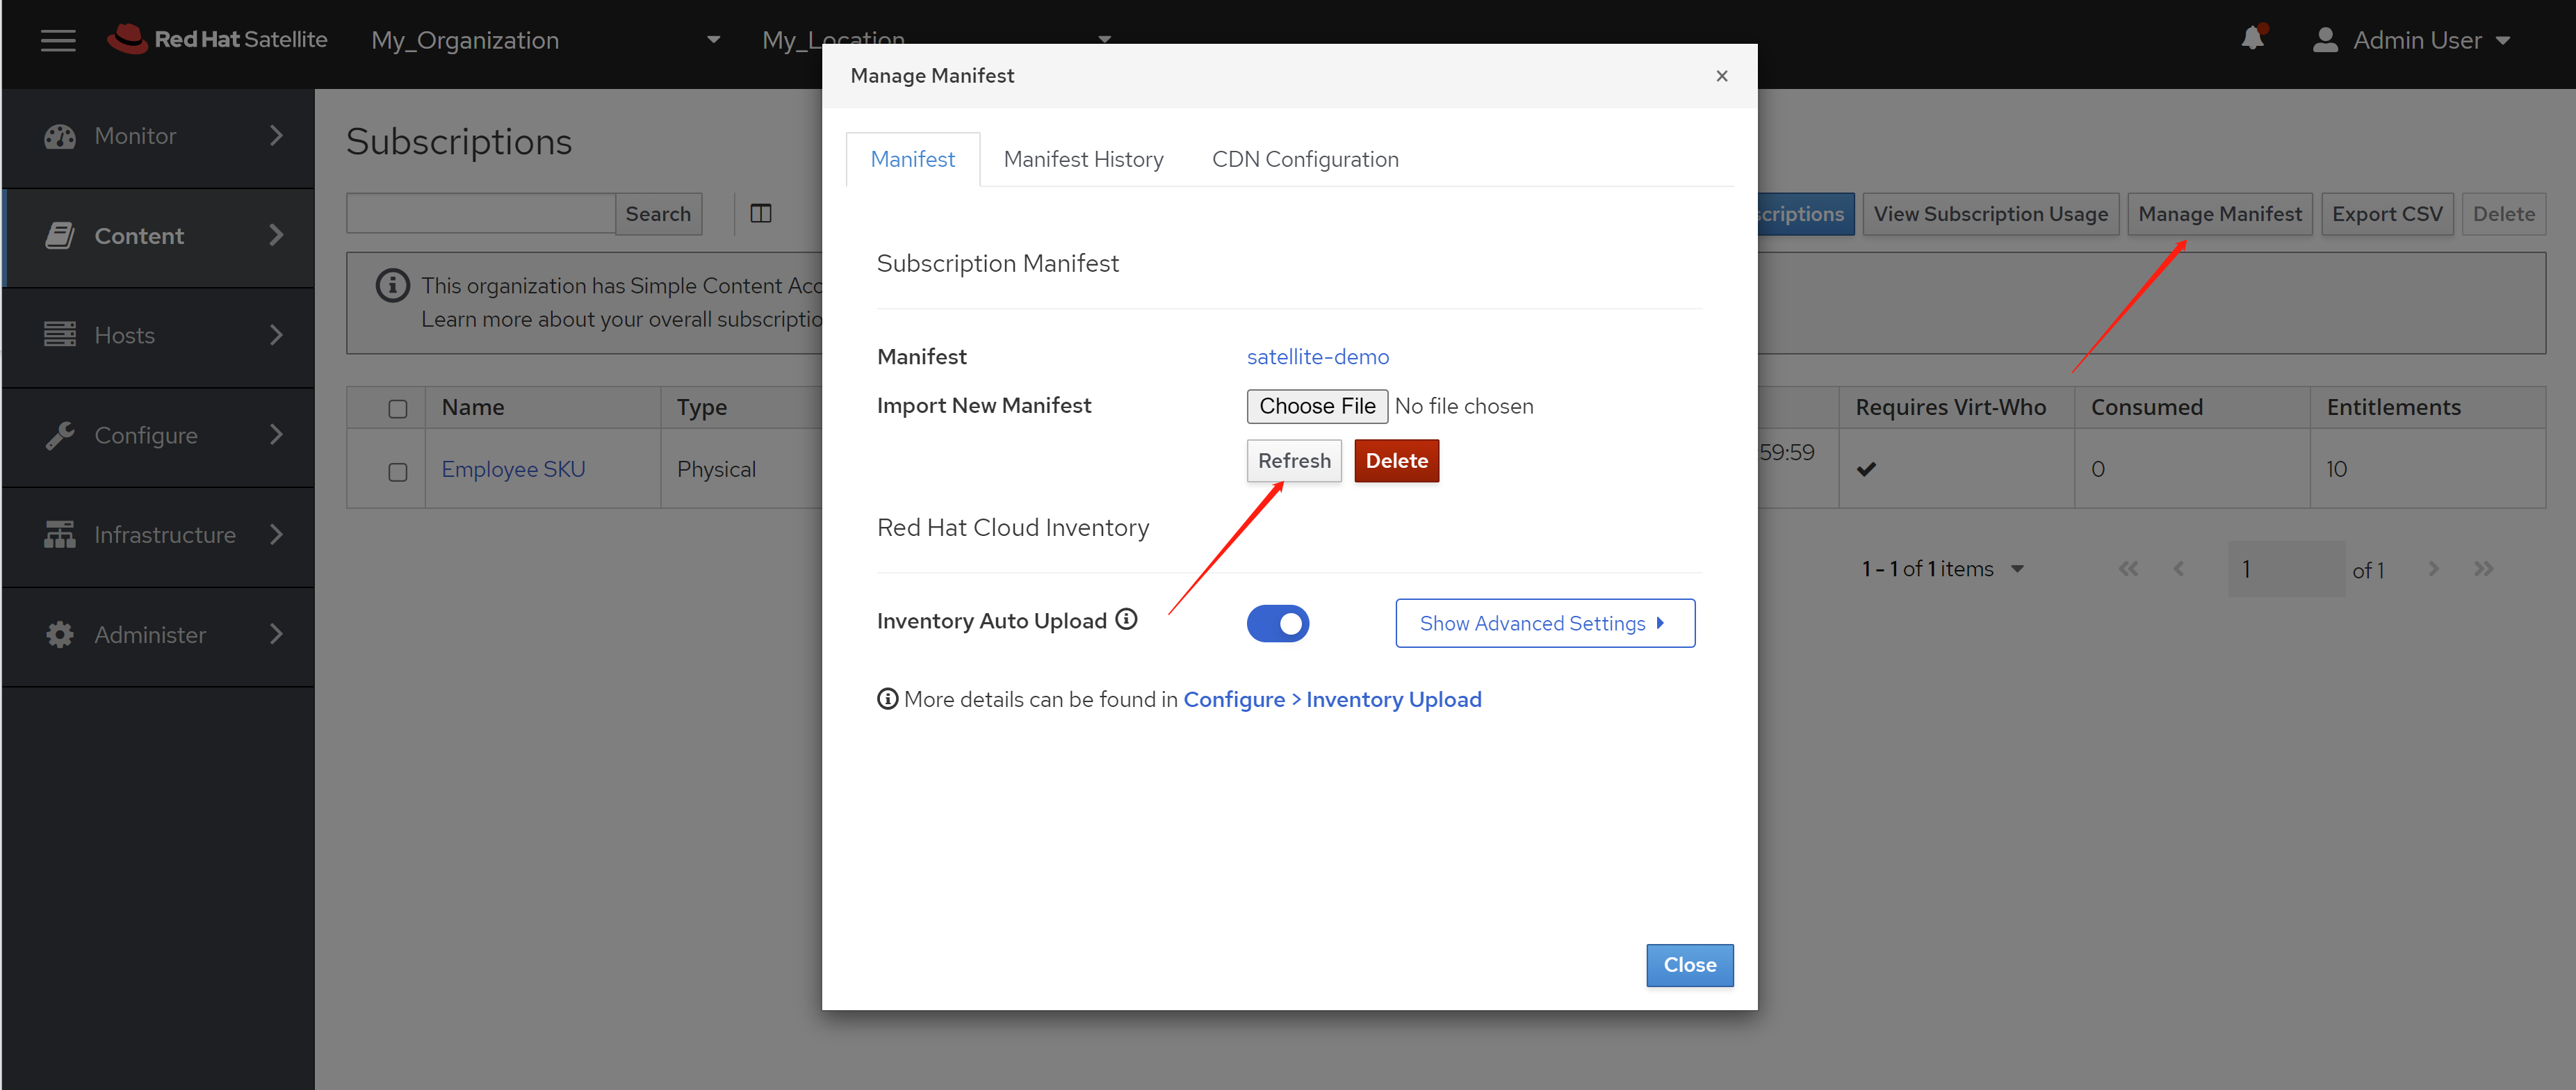
回到satellite里面,我们维护一下我们的manifect
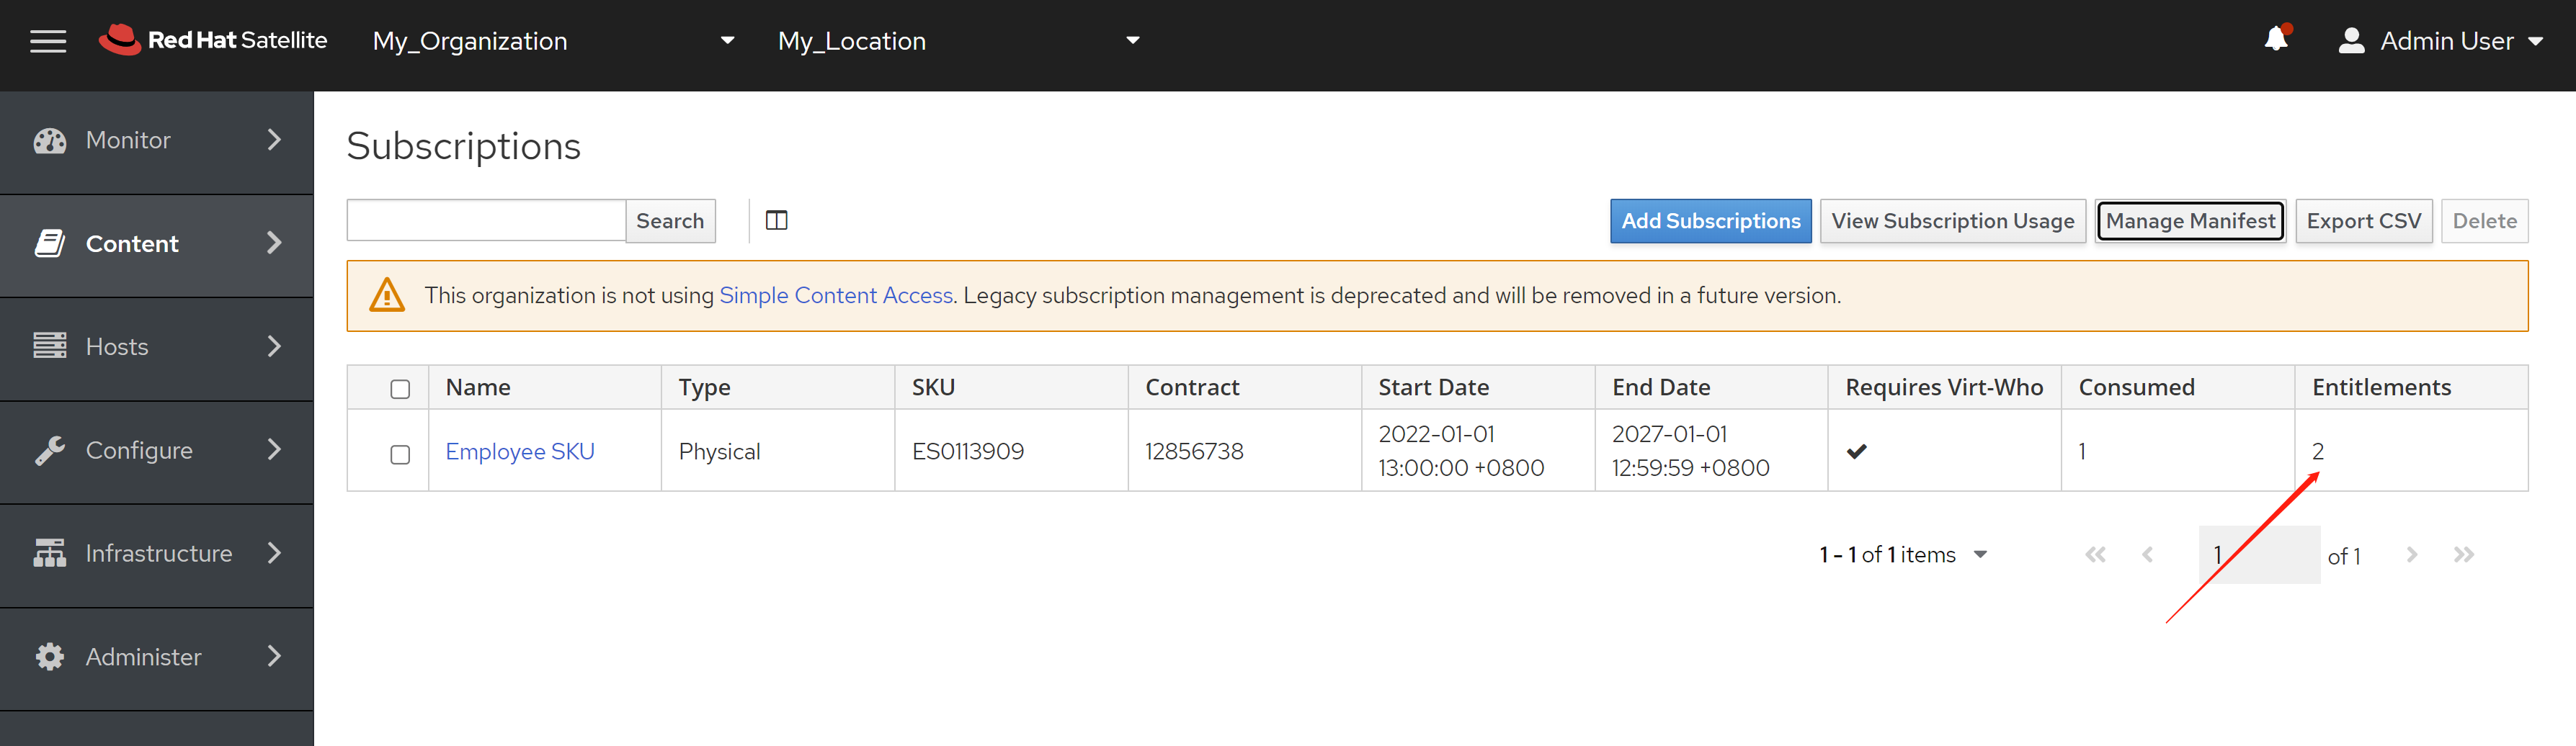
点击刷新,他会在线更新

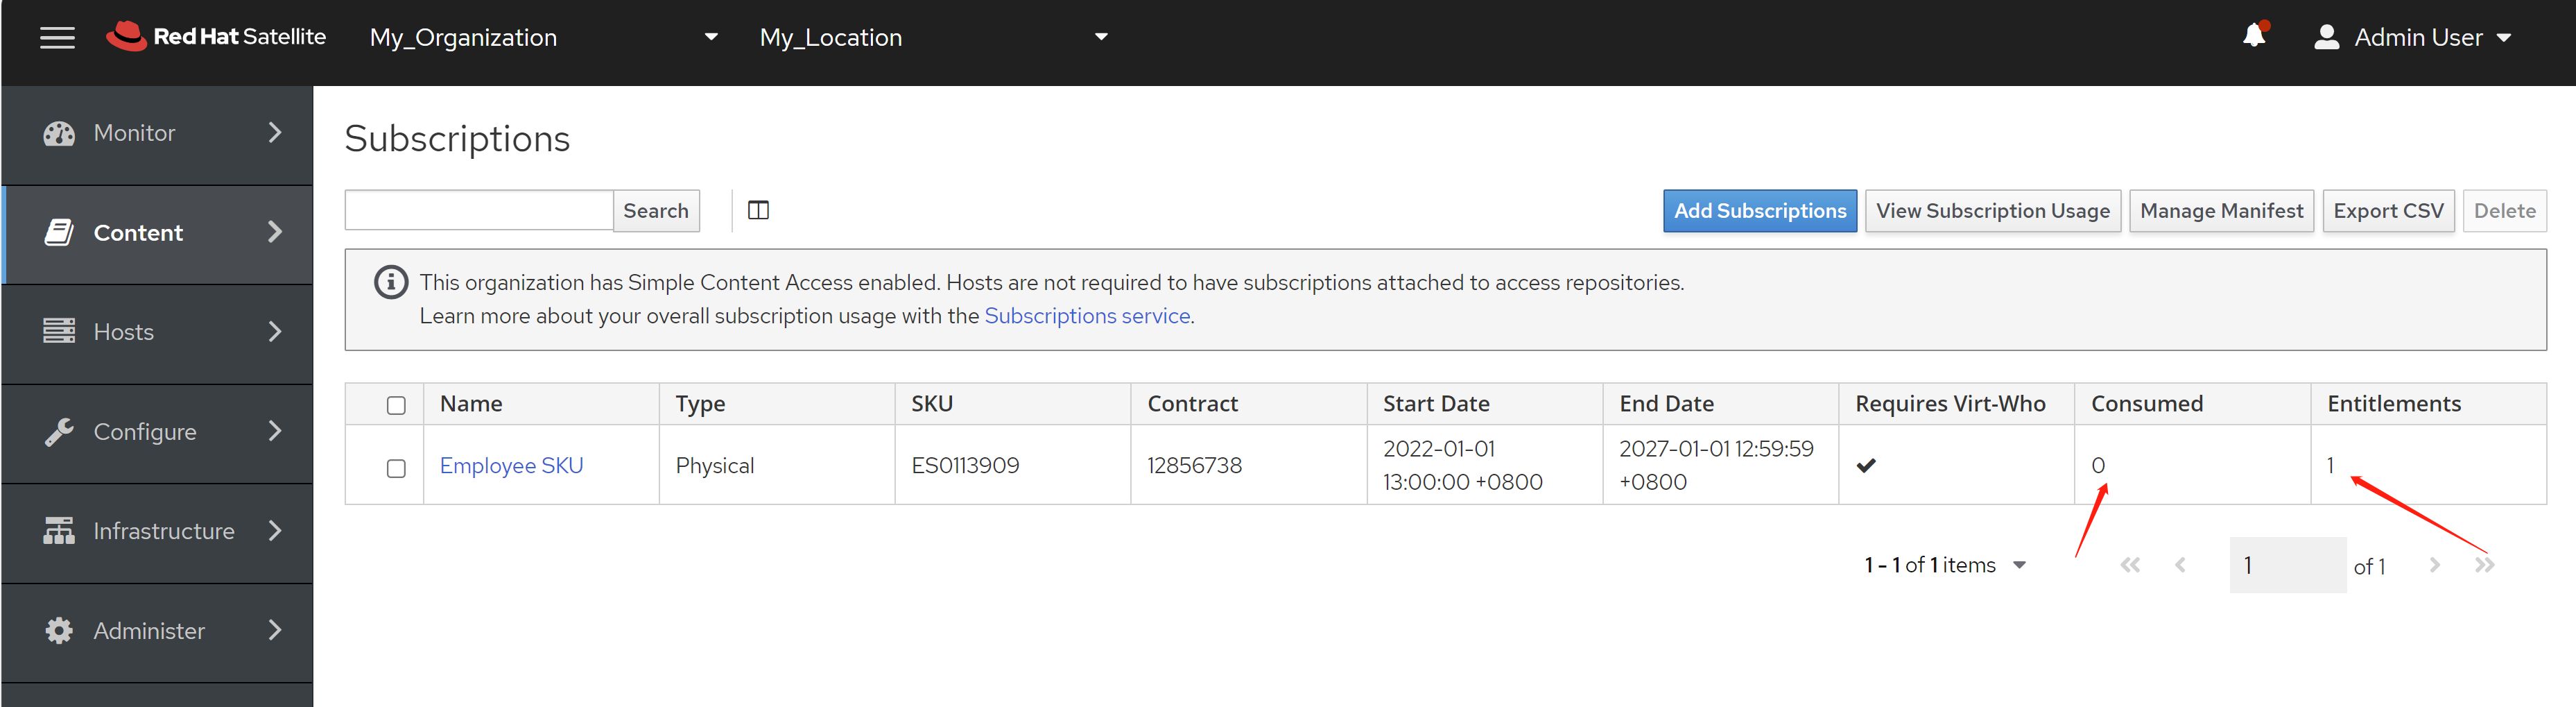
更新完成以后,数量就变成 2 了。
超用会发生什么
我们回复订阅分配为 1 ,然后在第二台主机上激活订阅,会发生什么呢?
# on client-02 , to try over use
curl -sS --insecure 'https://panlab-satellite-server.infra.wzhlab.top/register?activation_keys=demo-activate&location_id=2&organization_id=1&setup_insights=false&setup_remote_execution=false&setup_remote_execution_pull=false&update_packages=false' -H 'Authorization: Bearer eyJhbGciOiJIUzI1NiJ9.eyJ1c2VyX2lkIjo0LCJpYXQiOjE2ODQzMDU1MTYsImp0aSI6IjdiODBkNzdmMjVjYzY1MDZjODQ3OGI2Y2VjNzRkZWZjOGM2YjAyMDUxMDQ4YTcyYTJlMWE1YzRiNTgyMjE5NzAiLCJzY29wZSI6InJlZ2lzdHJhdGlvbiNnbG9iYWwgcmVnaXN0cmF0aW9uI2hvc3QifQ.EVXyW9gjWyAQIFYUxnwwdxAigrPmUo_XYWnqn-Wh1Fw' | bash
# #
# # Running registration
# #
# Updating Subscription Management repositories.
# Unable to read consumer identity

# This system is not registered with an entitlement server. You can use subscription-manager to register.

# Error: There are no enabled repositories in "/etc/yum.repos.d", "/etc/yum/repos.d", "/etc/distro.repos.d".
# The system has been registered with ID: 43e38f76-2416-49db-890f-1a3ad3973828
# The registered system name is: satellite-client-02
# Installed Product Current Status:
# Product Name: Red Hat Enterprise Linux for x86_64
# Status:       Not Subscribed

# Unable to find available subscriptions for all your installed products.

subscription-manager list --consumed
# No consumed subscription pools were found.

subscription-manager repos
# This system has no repositories available through subscriptions.

subscription-manager status
# +-------------------------------------------+
#    System Status Details
# +-------------------------------------------+
# Overall Status: Invalid

# Red Hat Enterprise Linux for x86_64:
# - Not supported by a valid subscription.

# System Purpose Status: Not Specified
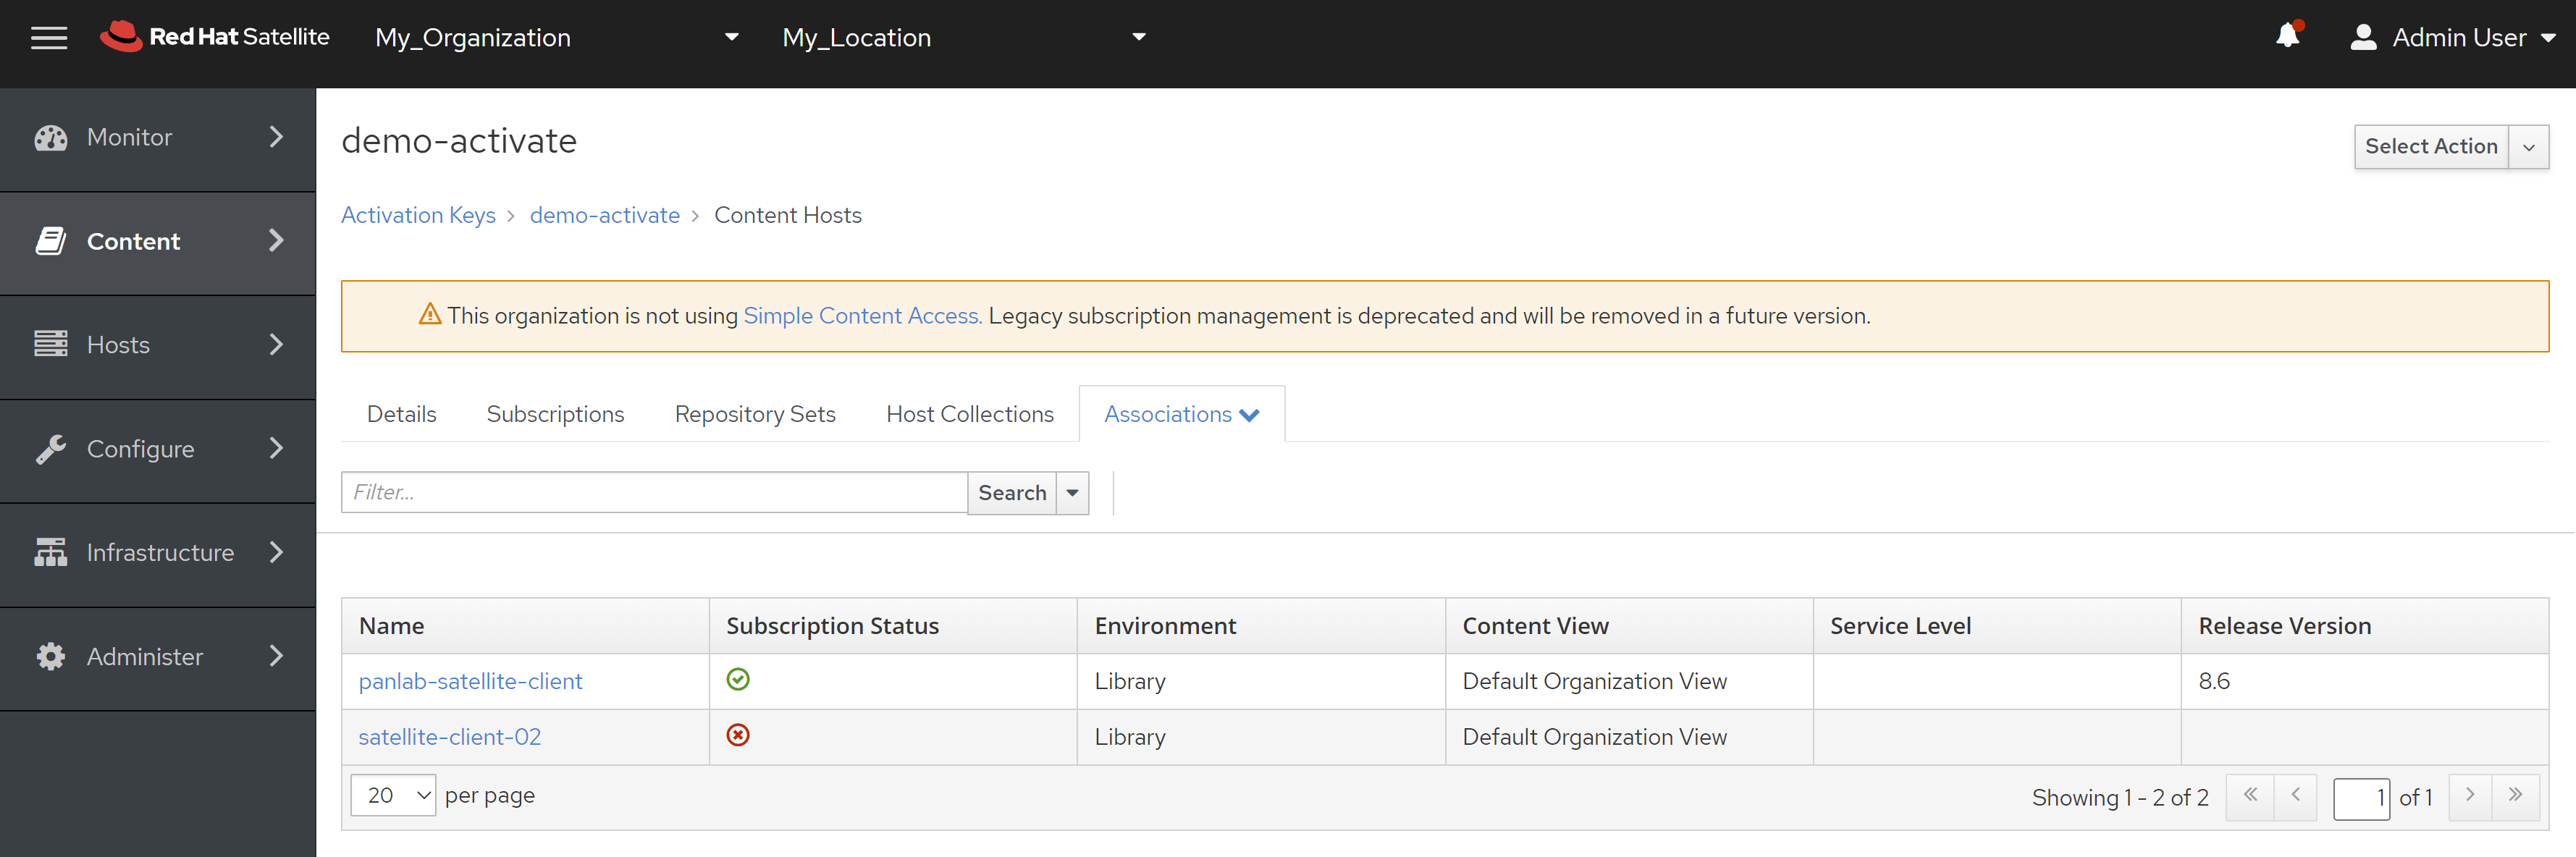
我们可以看到,订阅没有激活。我们确认一下,在订阅里面看,消耗量为 1
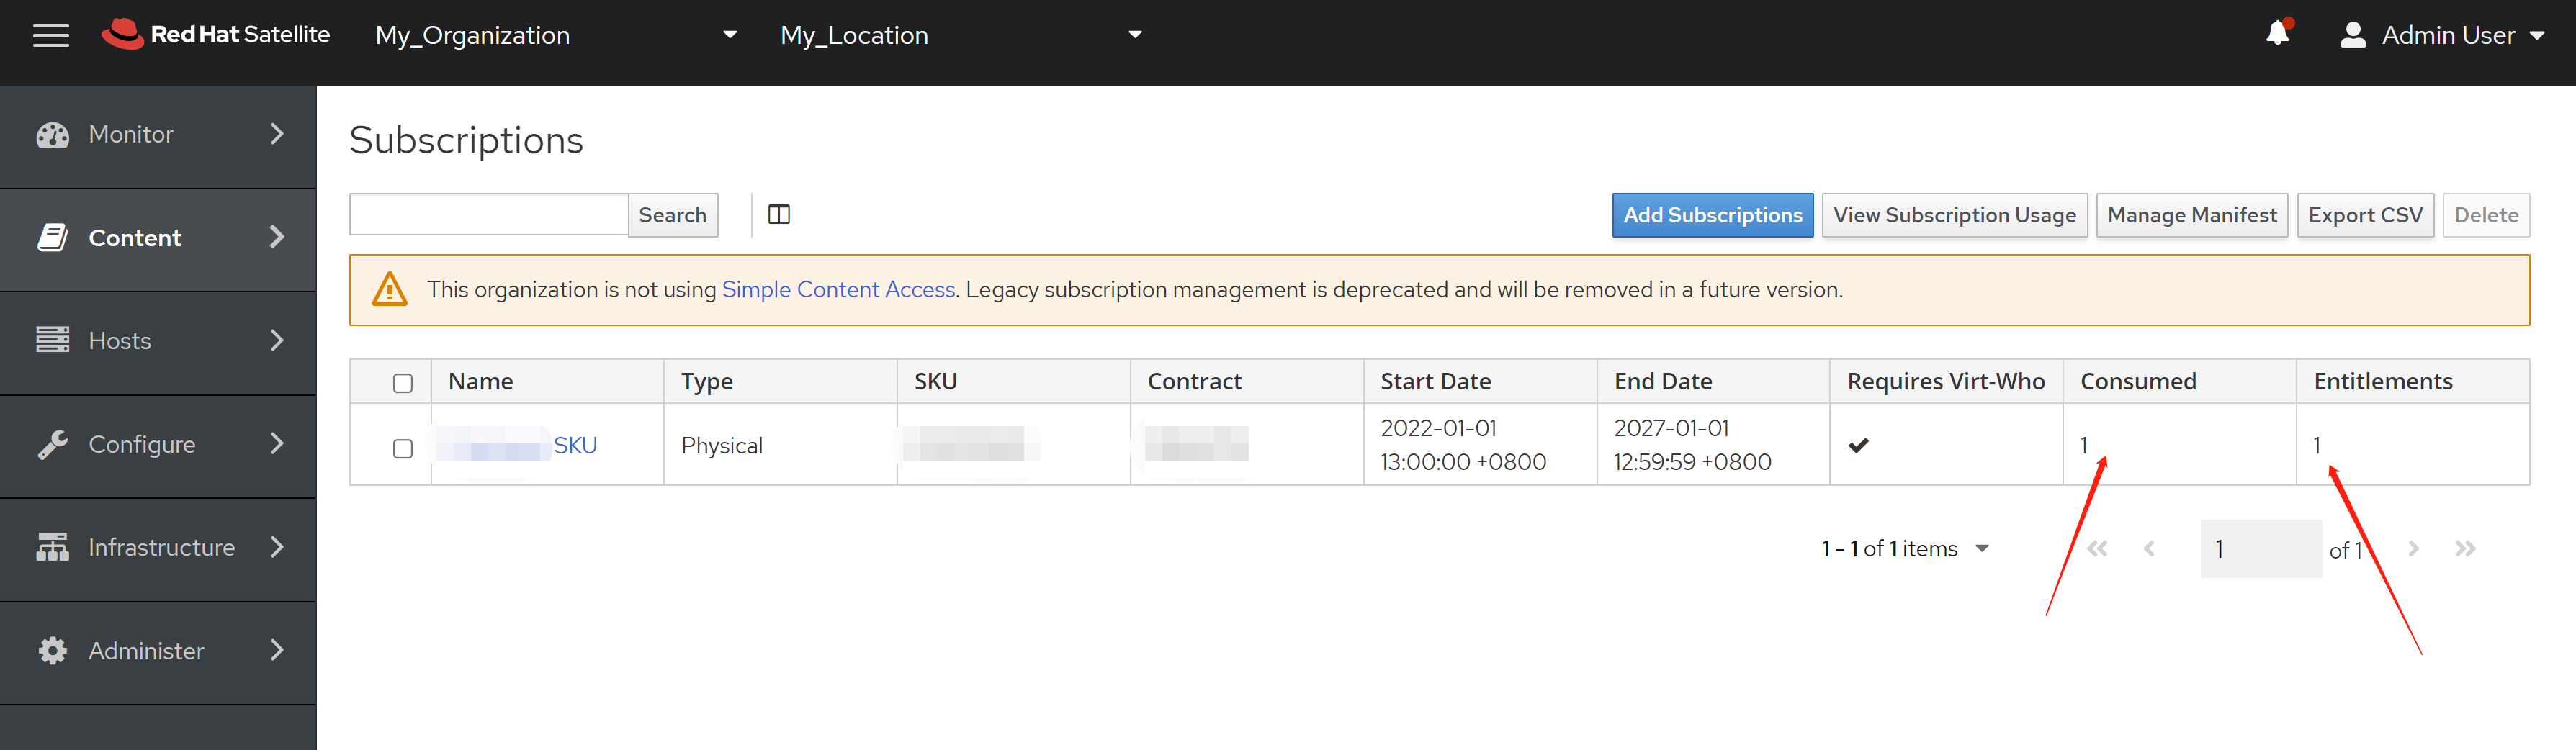
但是在activation key 里面,host 为2

不过,这个host list里面,有一个主机没有激活。
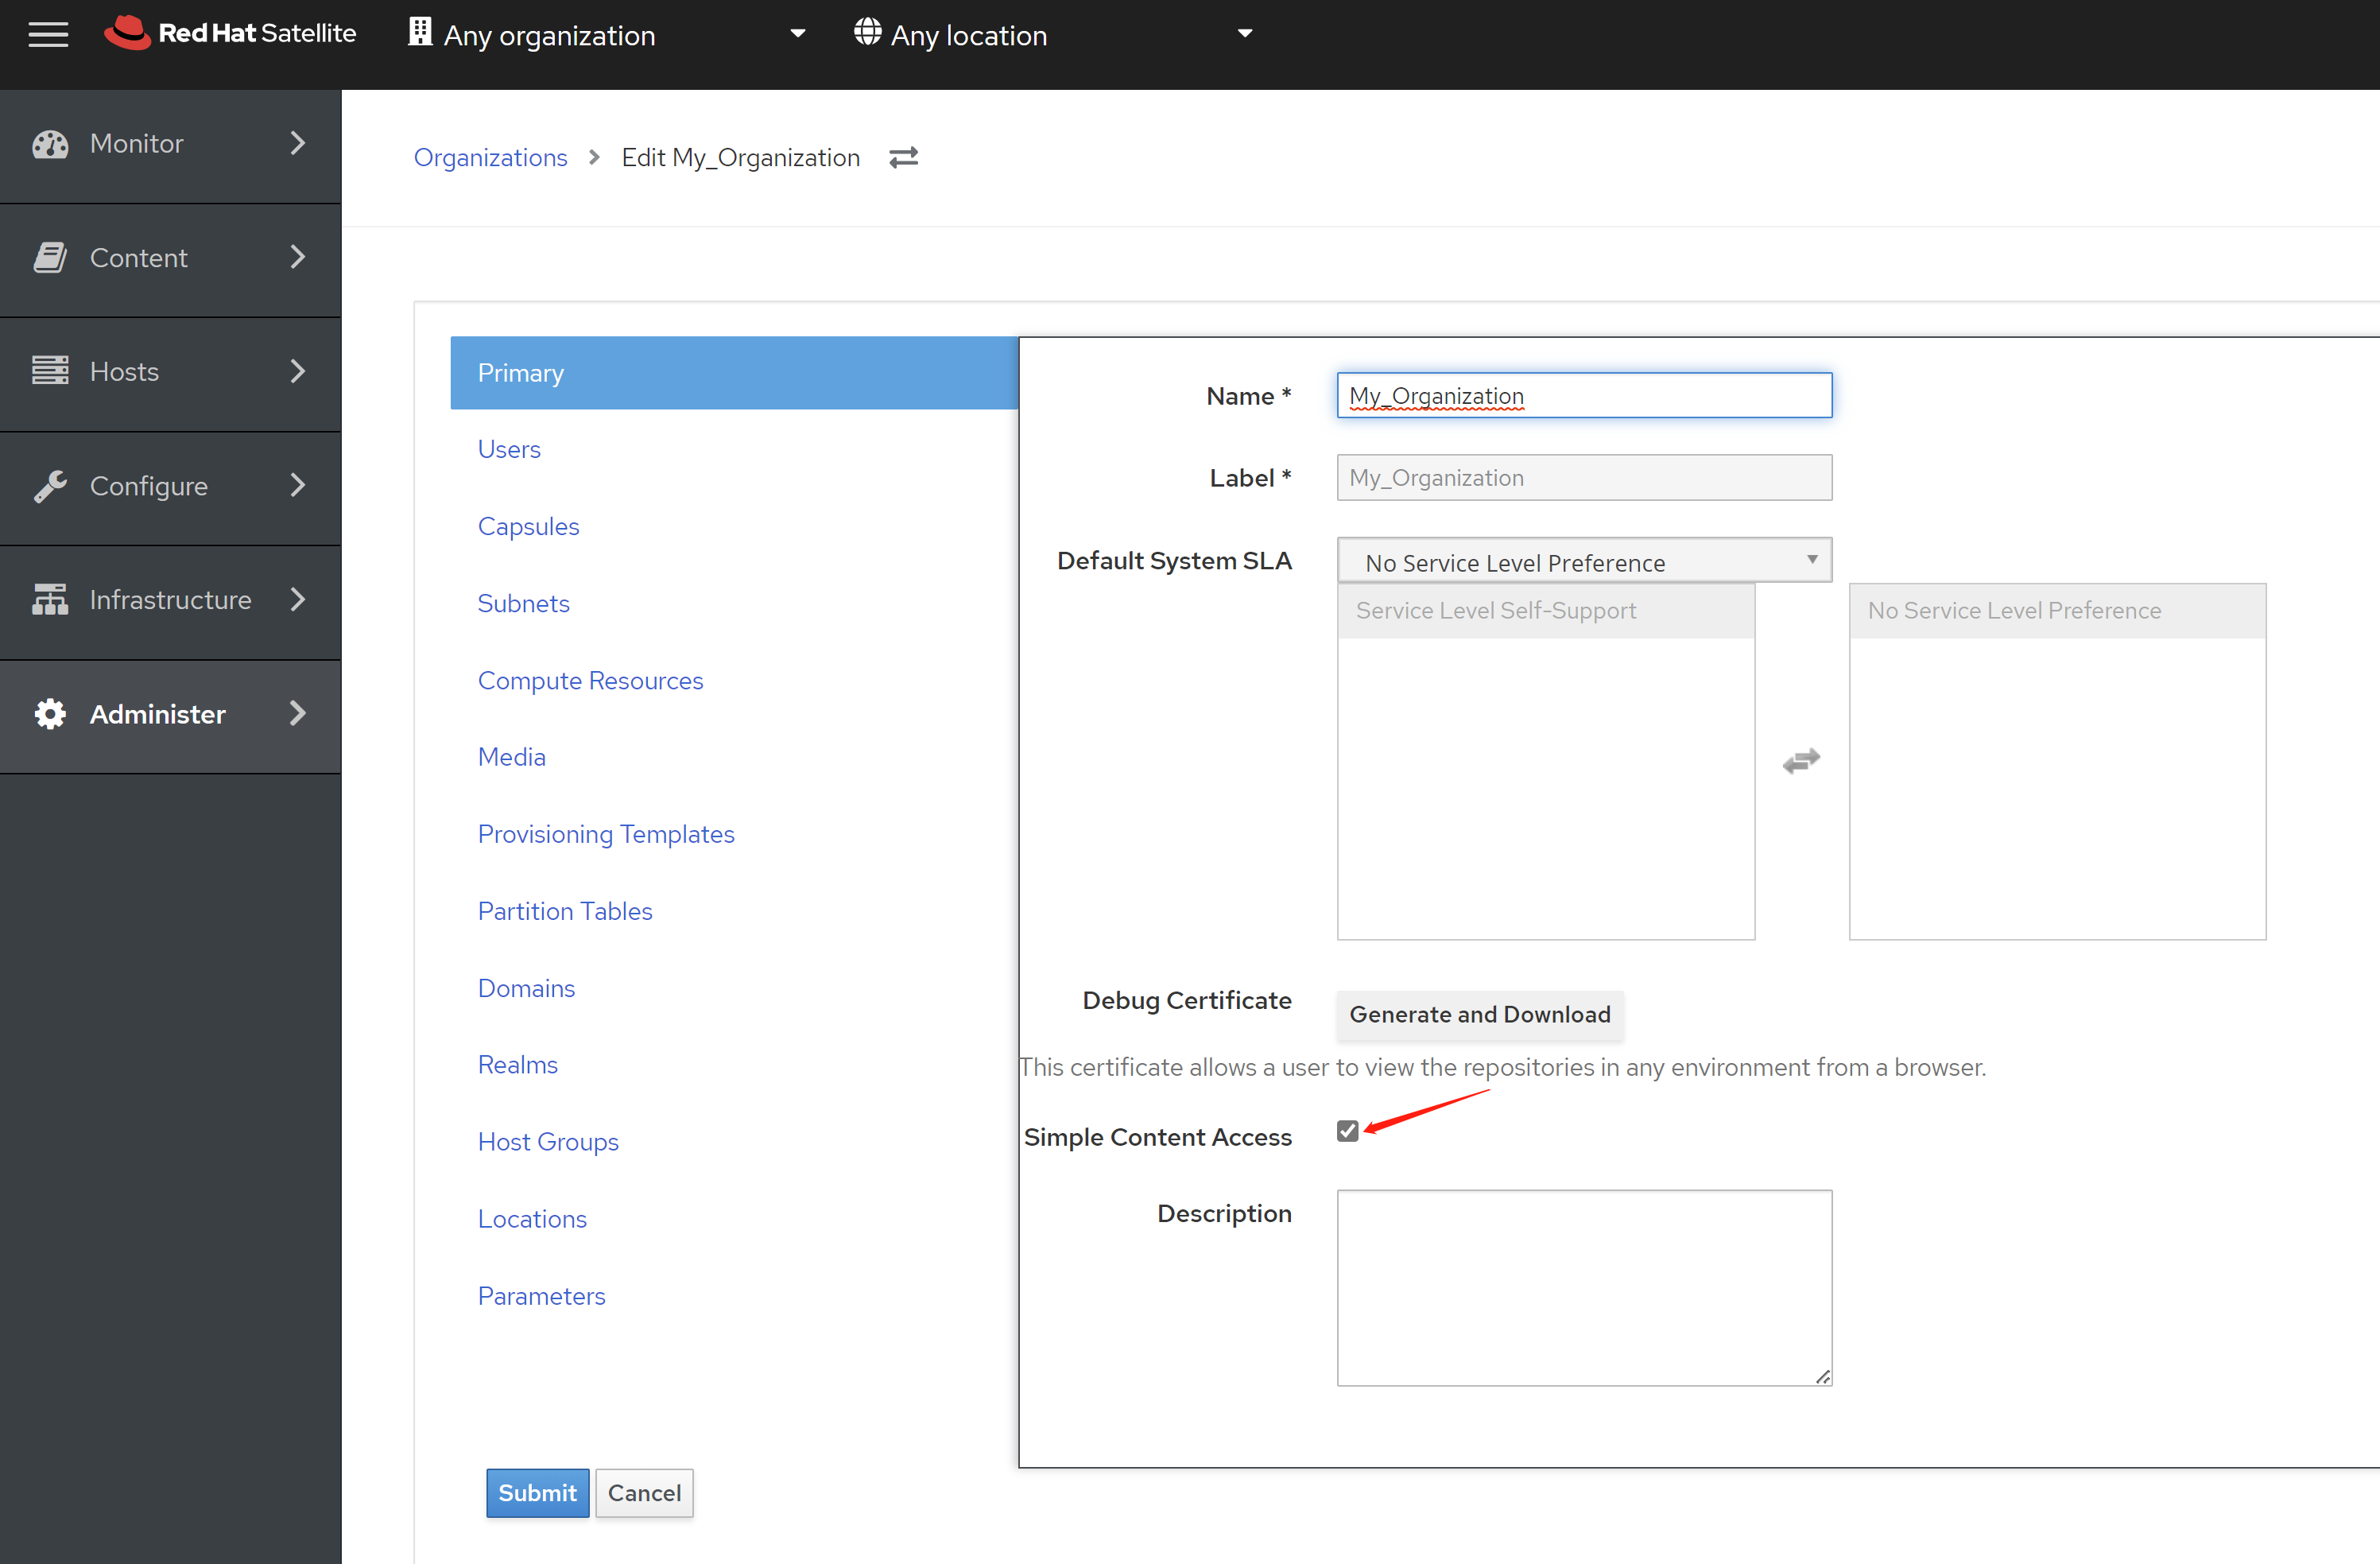
激活 Simple Content Access (SCA)
我们激活SCA,并限制 activation key 的 host 数量,用这种方法,来平衡使用方便和订阅不要超用。
激活 SCA
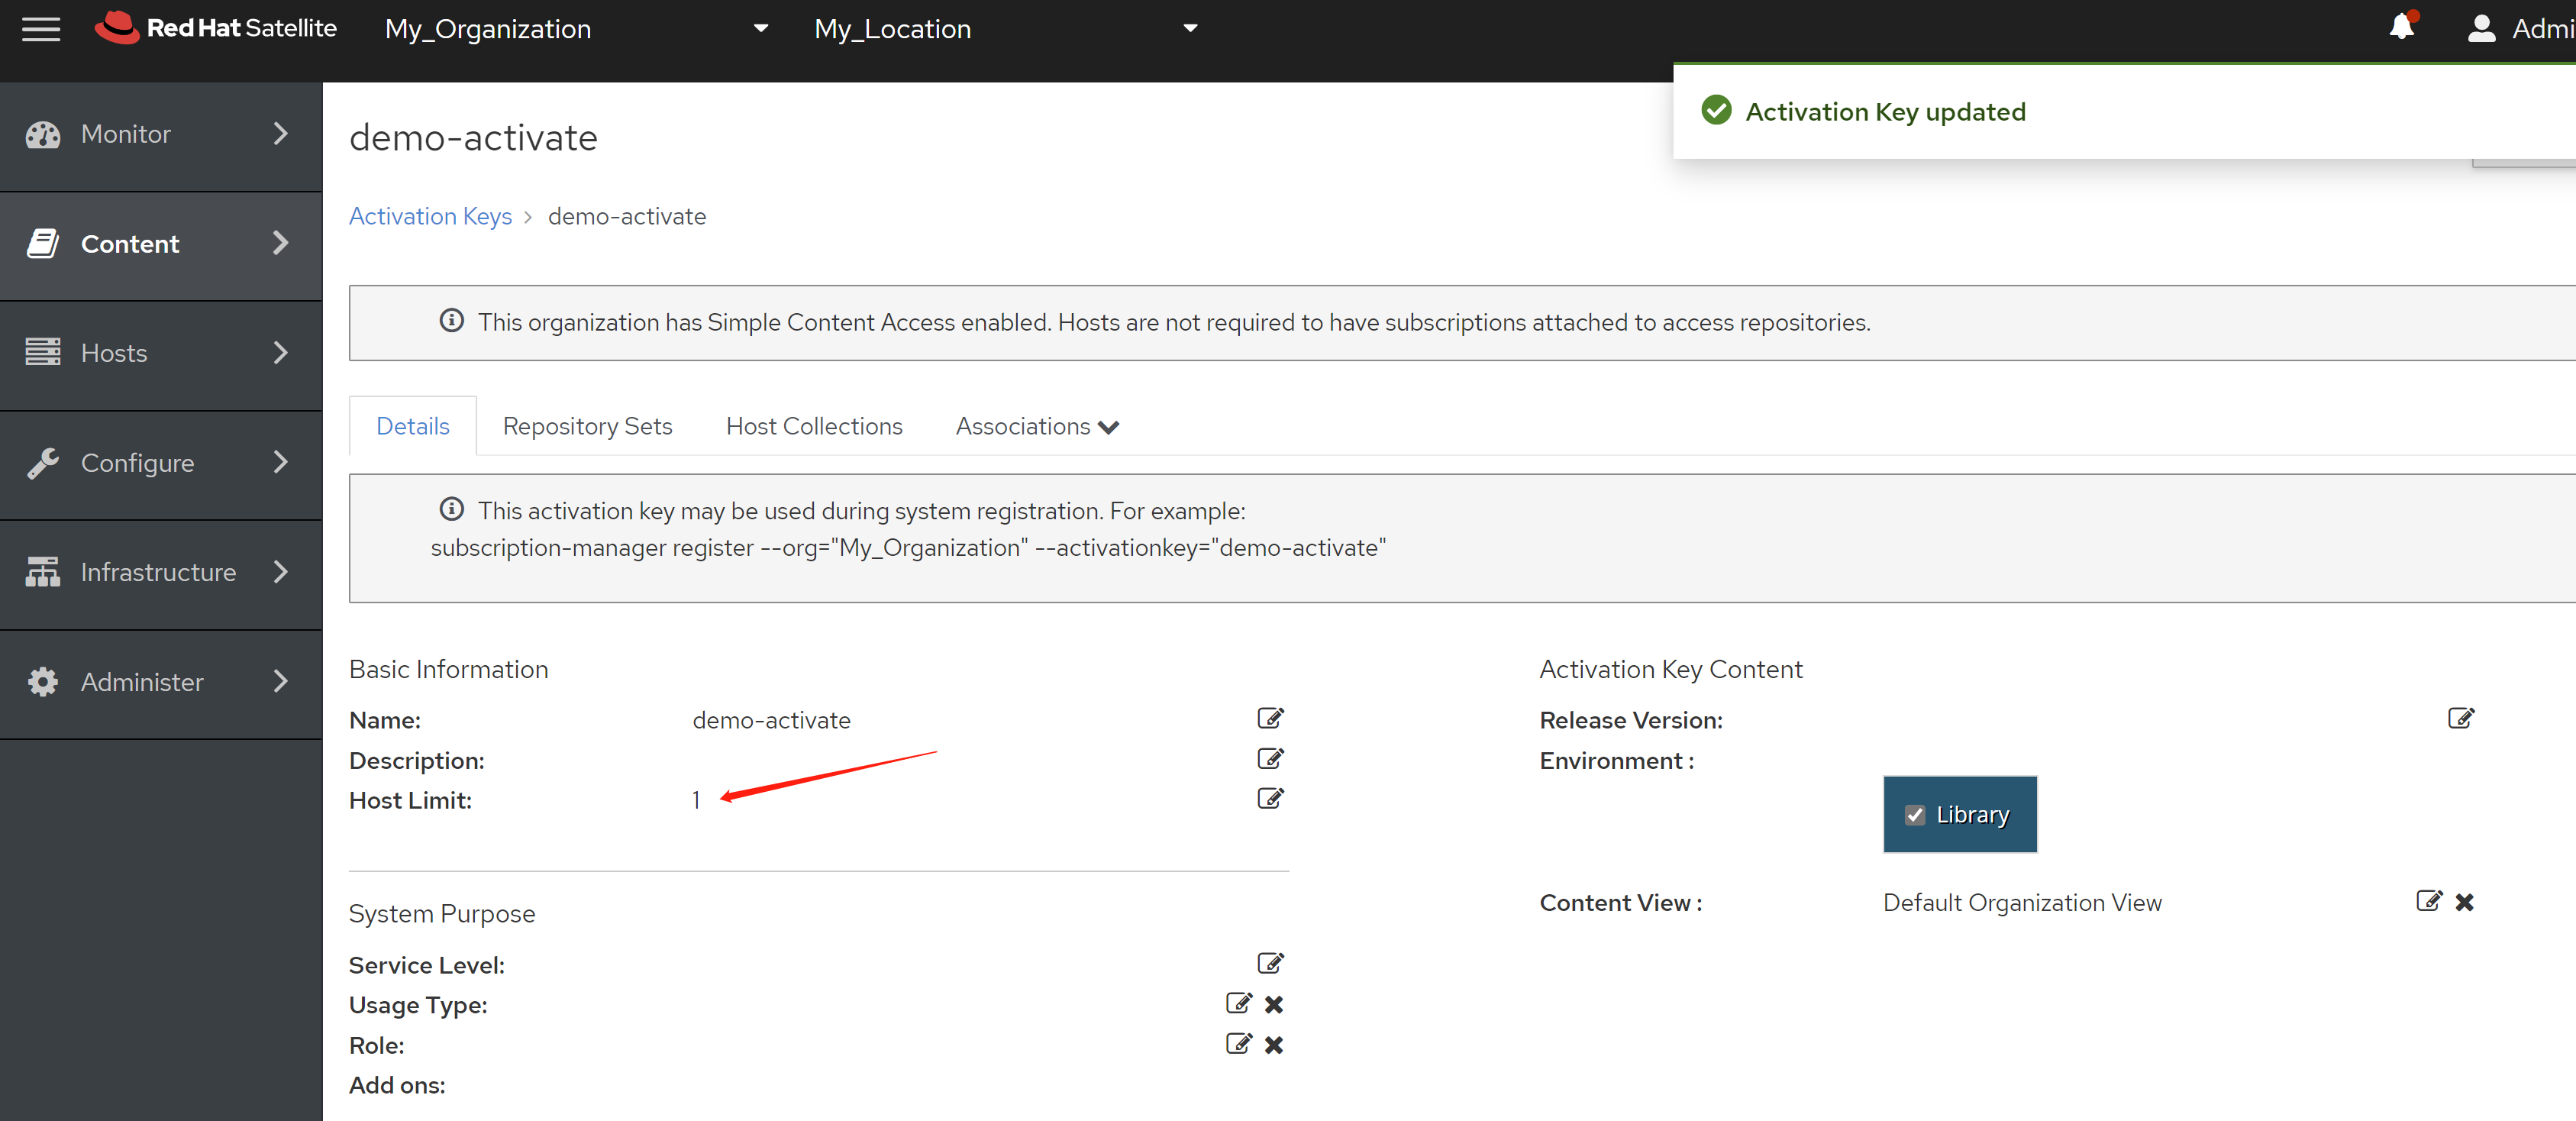
限制host 数量为1
我们在第二台主机上在激活试试
# on client-02 , to try over use
curl -sS --insecure 'https://panlab-satellite-server.infra.wzhlab.top/register?activation_keys=demo-activate&location_id=2&organization_id=1&setup_insights=false&setup_remote_execution=false&setup_remote_execution_pull=false&update_packages=false' -H 'Authorization: Bearer eyJhbGciOiJIUzI1NiJ9.eyJ1c2VyX2lkIjo0LCJpYXQiOjE2ODQzMDU1MTYsImp0aSI6IjdiODBkNzdmMjVjYzY1MDZjODQ3OGI2Y2VjNzRkZWZjOGM2YjAyMDUxMDQ4YTcyYTJlMWE1YzRiNTgyMjE5NzAiLCJzY29wZSI6InJlZ2lzdHJhdGlvbiNnbG9iYWwgcmVnaXN0cmF0aW9uI2hvc3QifQ.EVXyW9gjWyAQIFYUxnwwdxAigrPmUo_XYWnqn-Wh1Fw' | bash
# #
# # Running registration
# #
# Updating Subscription Management repositories.
# Unable to read consumer identity

# This system is not registered with an entitlement server. You can use subscription-manager to register.

# Error: There are no enabled repositories in "/etc/yum.repos.d", "/etc/yum/repos.d", "/etc/distro.repos.d".
# Max Hosts (1) reached for activation key 'demo-activate' (HTTP error code 409: Conflict)
激活失败。
超用情况
如果启用了SCA,但是不限制host数量,超用的情况下,能不能激活成功呢?我们做个实验。
先导入只有1个订阅的离线订阅文件。
然后,在active key里面,放开host limit限制。

接下来,我们在2个主机上,进行激活。
# on 172
# try to register
curl -sS --insecure 'https://panlab-satellite-server.infra.wzhlab.top:6443/register?activation_keys=demo-activate&location_id=2&organization_id=1&setup_insights=false&setup_remote_execution=false&update_packages=false' -H 'Authorization: Bearer eyJhbGciOiJIUzI1NiJ9.eyJ1c2VyX2lkIjo0LCJpYXQiOjE2OTM4ODg5NzIsImp0aSI6IjFlNzdkNDE1OWM4NmE3OGVjOWY5NjViMWQwODRlOWY5NThlN2ExZDBkNWZhZTJjZjY3NjMzMTQ1Nzk5NTRkNWEiLCJzY29wZSI6InJlZ2lzdHJhdGlvbiNnbG9iYWwgcmVnaXN0cmF0aW9uI2hvc3QifQ.aM6lKpNfBCH-FMHU0xkc6q4XaNeuS8JezLIQCf2faxI' | bash
# #
# # Running registration
# #
# Updating Subscription Management repositories.
# Unable to read consumer identity

# This system is not registered with an entitlement server. You can use subscription-manager to register.

# Error: There are no enabled repositories in "/etc/yum.repos.d", "/etc/yum/repos.d", "/etc/distro.repos.d".
# The system has been registered with ID: b853bd17-204a-4eeb-83c7-1d07f3dea7c6
# The registered system name is: client-0-changed
# # Running [client-0-changed] host initial configuration
# Refreshing subscription data
# All local data refreshed
# Host [client-0-changed] successfully configured.
# Successfully updated the system facts.


# on 173
# try to register
curl -sS --insecure 'https://panlab-satellite-server.infra.wzhlab.top:6443/register?activation_keys=demo-activate&location_id=2&organization_id=1&setup_insights=false&setup_remote_execution=false&update_packages=false' -H 'Authorization: Bearer eyJhbGciOiJIUzI1NiJ9.eyJ1c2VyX2lkIjo0LCJpYXQiOjE2OTM4ODg5NzIsImp0aSI6IjFlNzdkNDE1OWM4NmE3OGVjOWY5NjViMWQwODRlOWY5NThlN2ExZDBkNWZhZTJjZjY3NjMzMTQ1Nzk5NTRkNWEiLCJzY29wZSI6InJlZ2lzdHJhdGlvbiNnbG9iYWwgcmVnaXN0cmF0aW9uI2hvc3QifQ.aM6lKpNfBCH-FMHU0xkc6q4XaNeuS8JezLIQCf2faxI' | bash
# #
# # Running registration
# #
# Updating Subscription Management repositories.
# Unable to read consumer identity

# This system is not registered with an entitlement server. You can use subscription-manager to register.

# Error: There are no enabled repositories in "/etc/yum.repos.d", "/etc/yum/repos.d", "/etc/distro.repos.d".
# The system has been registered with ID: 4bba0a26-4f91-4bae-8752-4b073eeaee13
# The registered system name is: satellite-client-02
# # Running [satellite-client-02] host initial configuration
# Refreshing subscription data
# All local data refreshed
# Host [satellite-client-02] successfully configured.
# Successfully updated the system facts.

使用 API 来注销主机
一般情况下,主机注册以后就一直在satellite里面了,但是如果我们是一个云环境,主机需要频繁的注册和注销,那么我们需要一个自动的方法,让云平台来调用 satellite API,实现satellite里面的主机自动注销。
使用 hostname 来注销
satellite官方文档里面,已经提供了一个API,可以自动注销主机。

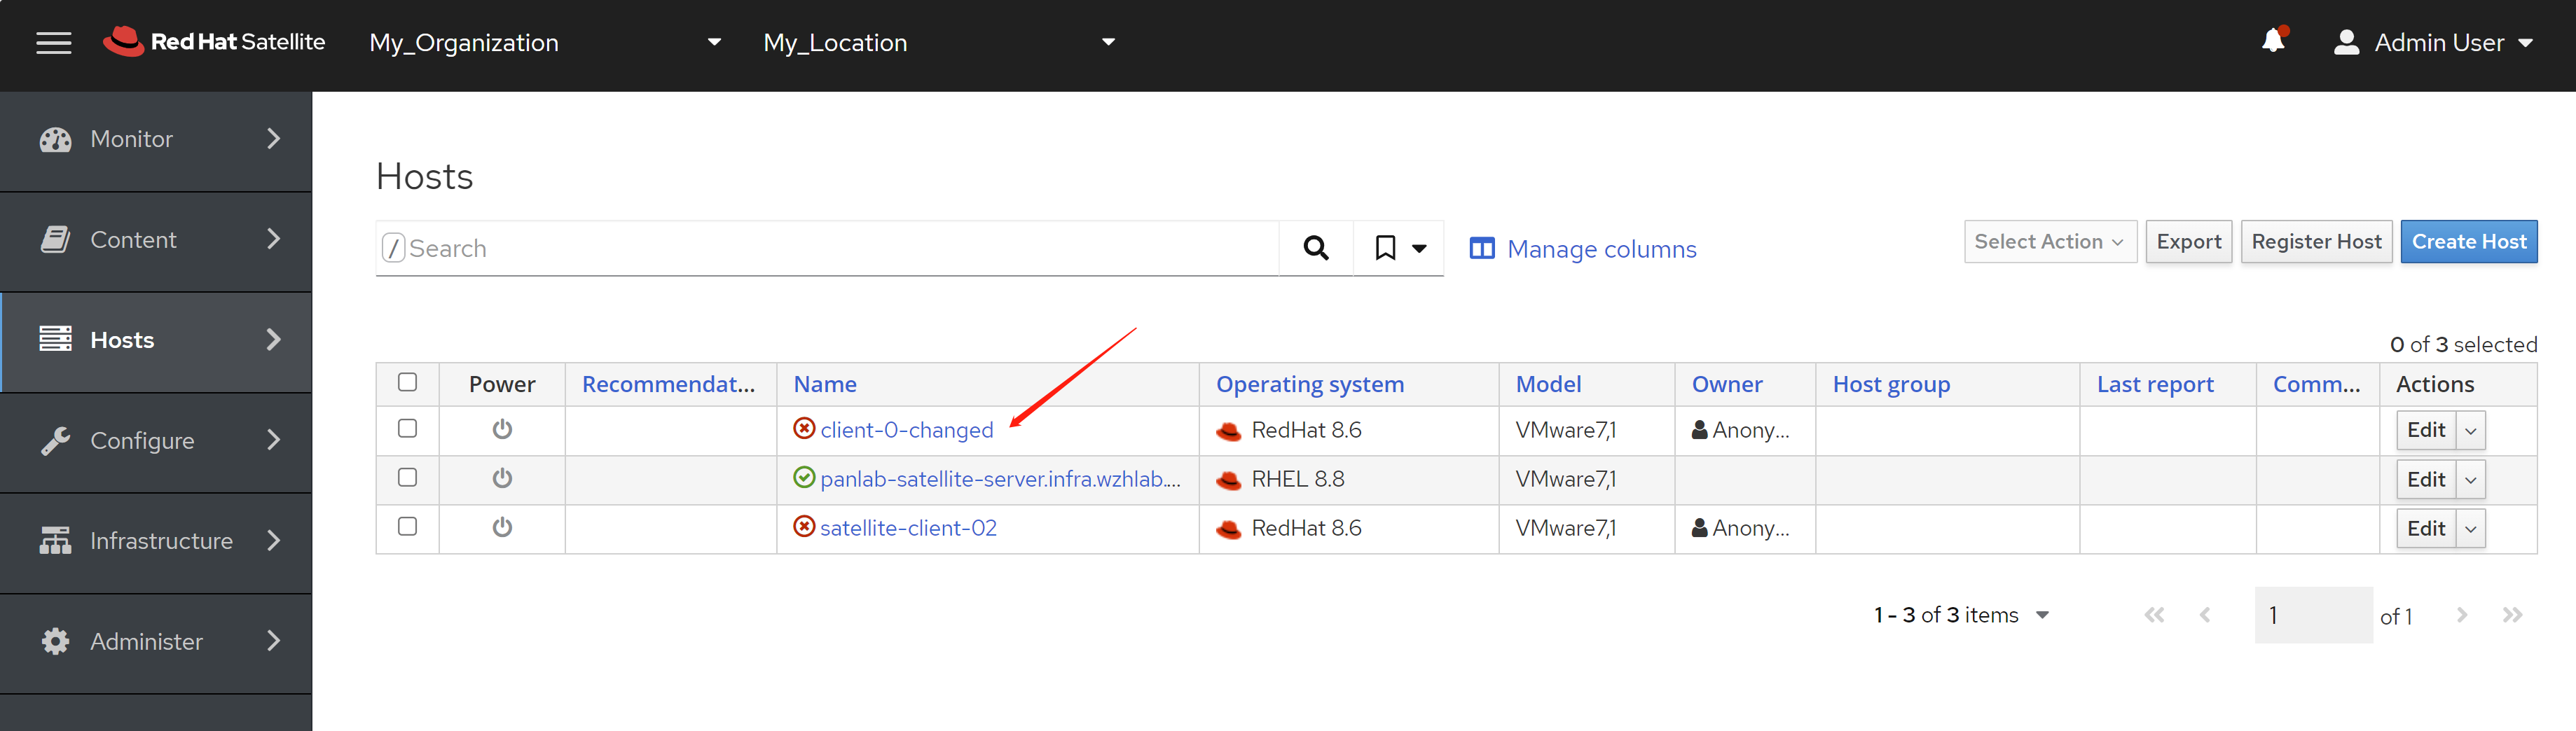
本次实验就试试把client-2给删掉。
curl -s --request DELETE --insecure --user admin:redhat \
https://panlab-satellite-server.infra.wzhlab.top/api/v2/hosts/satellite-client-02 | jq .
# {
#   "id": 3,
#   "name": "satellite-client-02",
#   "last_compile": "2023-05-17T10:21:24.000Z",
#   "last_report": null,
#   "updated_at": "2023-05-17T10:21:24.861Z",
#   "created_at": "2023-05-17T10:19:49.756Z",
#   "root_pass": null,
#   "architecture_id": 1,
#   "operatingsystem_id": 2,
#   "ptable_id": null,
#   "medium_id": null,
#   "build": false,
#   "comment": null,
#   "disk": null,
#   "installed_at": null,
#   "model_id": 1,
#   "hostgroup_id": null,
#   "owner_id": 1,
#   "owner_type": "User",
#   "enabled": true,
#   "puppet_ca_proxy_id": null,
#   "managed": false,
#   "use_image": null,
#   "image_file": "",
#   "uuid": null,
#   "compute_resource_id": null,
#   "puppet_proxy_id": null,
#   "certname": "satellite-client-02",
#   "image_id": null,
#   "organization_id": 1,
#   "location_id": 2,
#   "otp": null,
#   "realm_id": null,
#   "compute_profile_id": null,
#   "provision_method": "build",
#   "grub_pass": null,
#   "discovery_rule_id": null,
#   "global_status": 2,
#   "lookup_value_matcher": "fqdn=satellite-client-02",
#   "openscap_proxy_id": null,
#   "pxe_loader": null,
#   "initiated_at": null,
#   "build_errors": null,
#   "content_facet_attributes": {
#     "id": 2,
#     "host_id": 3,
#     "uuid": null,
#     "content_view_id": 1,
#     "lifecycle_environment_id": 1,
#     "kickstart_repository_id": null,
#     "content_source_id": null,
#     "installable_security_errata_count": 0,
#     "installable_enhancement_errata_count": 0,
#     "installable_bugfix_errata_count": 0,
#     "applicable_rpm_count": 0,
#     "upgradable_rpm_count": 0,
#     "applicable_module_stream_count": 0,
#     "upgradable_module_stream_count": 0,
#     "applicable_deb_count": 0,
#     "upgradable_deb_count": 0
#   }
# }
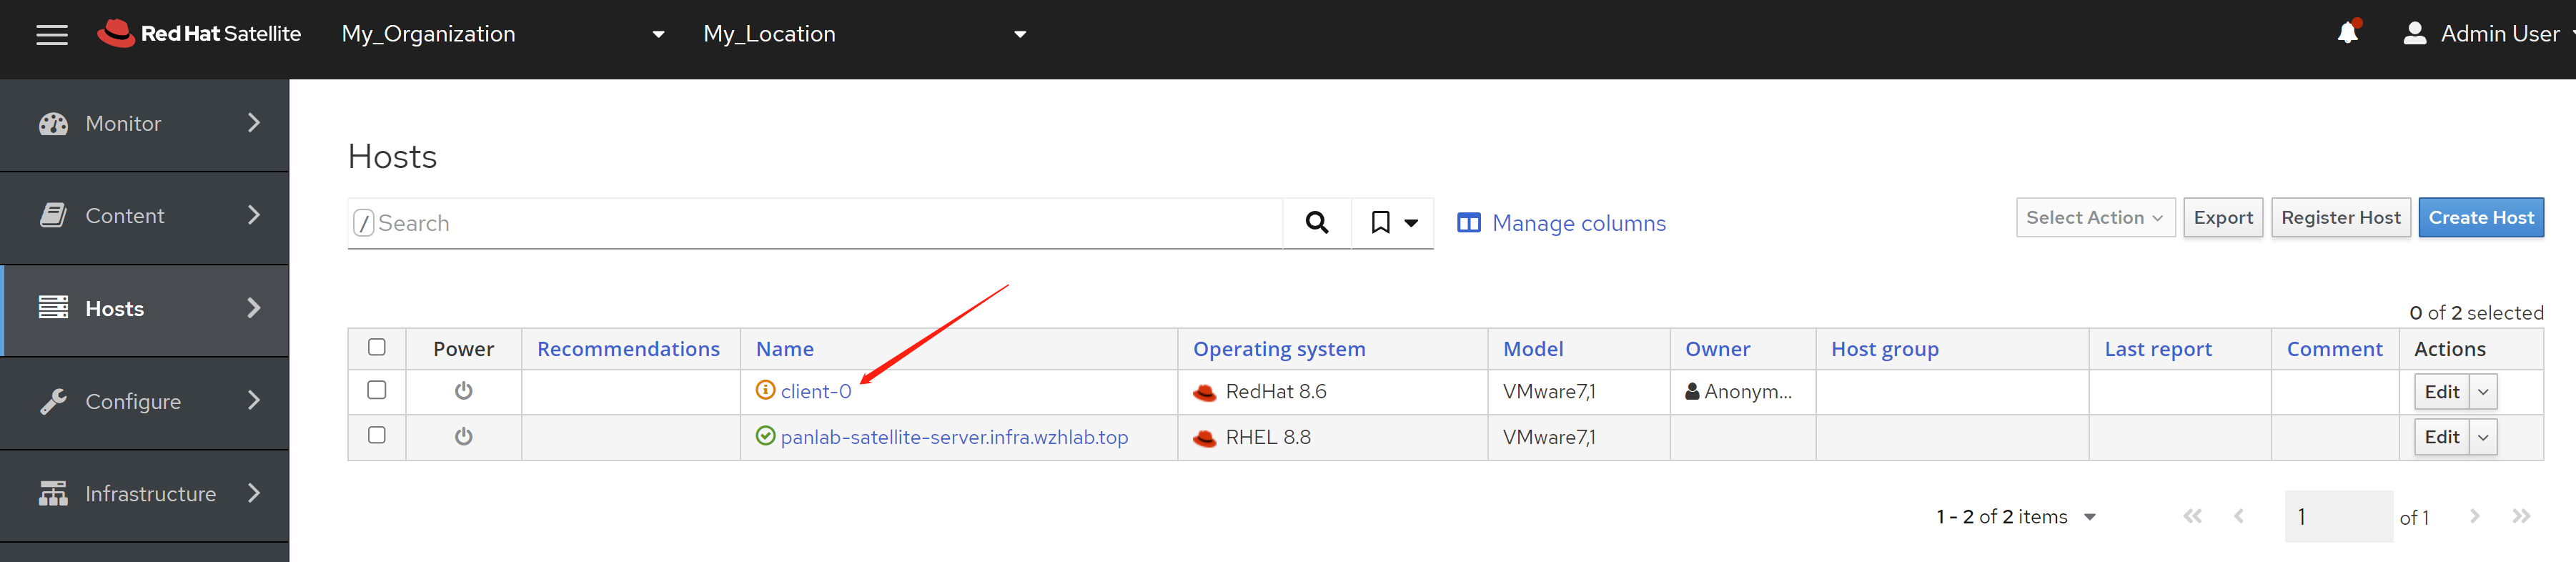
API 调用以后,我们就能看到 client-2 这个主机被注销了。
这个注销主机的方法,有一个潜在问题,就是这个主机名会不会改变,如果我们在主机上,把主机名给改了,satellite里面会自动改,还是不会变呢?我们继续实验看看。
我们先看看现在的主机名是什么
hostnamectl
  #  Static hostname: client-0
  #        Icon name: computer-vm
  #          Chassis: vm
  #       Machine ID: 75587495919e40b7a0d39f7168df895e
  #          Boot ID: a15f631019d0463395d12c332873eb52
  #   Virtualization: vmware
  # Operating System: Red Hat Enterprise Linux 8.6 (Ootpa)
  #      CPE OS Name: cpe:/o:redhat:enterprise_linux:8::baseos
  #           Kernel: Linux 4.18.0-372.32.1.el8_6.x86_64
  #     Architecture: x86-64
在satellite里面确认一下主机名
接着,我们修改主机名,并刷新
hostnamectl set-hostname client-0-changed

subscription-manager refresh
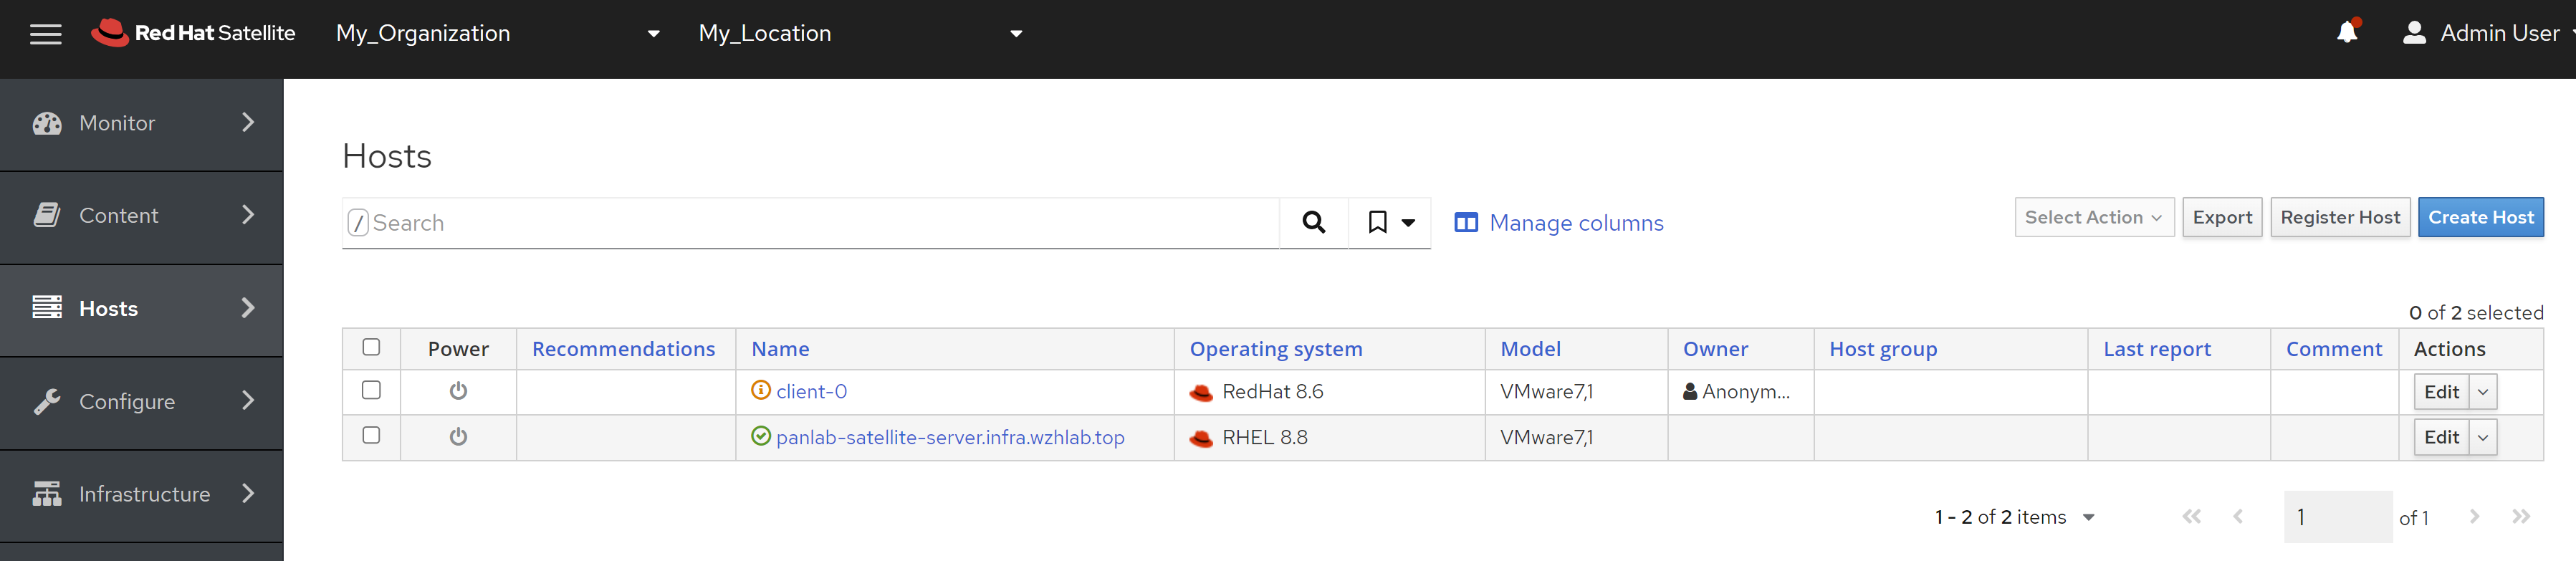
我们在satellite里面确认一下,主机名没有修改
那么,什么情况下,satellite里面的主机名会改变呢,通过笔者的实验,发现必须unregister以后,重新注册才可以。
使用 host id 来注销
# get host uuid on the managed host
subscription-manager facts | grep system.uuid
# dmi.system.uuid: 4C6B4D56-ACB7-585F-EB20-90FD676DEA4B

# check how many uuid you can find, from another host
subscription-manager facts | grep uuid
# dmi.system.uuid: 8DF84D56-895F-6163-962B-30EF44BDE122
# virt.uuid: 8DF84D56-895F-6163-962B-30EF44BDE122

# get host id from satellite by uuid
curl -s --request GET --insecure --user admin:redhat \
  https://panlab-satellite-server.infra.wzhlab.top/api/v2/hosts?search=facts.dmi::system::uuid=4C6B4D56-ACB7-585F-EB20-90FD676DEA4B | \
  jq .results[0].id
# 8

# get host id from satellite by name
curl -s --request GET --insecure --user admin:redhat \
https://panlab-satellite-server.infra.wzhlab.top/api/hosts/panlab-satellite-client | jq .id
# 2

# delete host using host id
curl -s --request DELETE --insecure --user admin:redhat \
https://panlab-satellite-server.infra.wzhlab.top/api/hosts/2 | jq .
# {
#   "id": 2,
#   "name": "panlab-satellite-client",
#   "last_compile": "2023-05-17T12:26:28.000Z",
#   "last_report": null,
#   "updated_at": "2023-05-17T12:26:28.289Z",
#   "created_at": "2023-05-17T06:43:46.628Z",
#   "root_pass": null,
#   "architecture_id": 1,
#   "operatingsystem_id": 2,
#   "ptable_id": null,
#   "medium_id": null,
#   "build": false,
#   "comment": null,
#   "disk": null,
#   "installed_at": "2023-05-17T06:44:01.221Z",
#   "model_id": 1,
#   "hostgroup_id": null,
#   "owner_id": 1,
#   "owner_type": "User",
#   "enabled": true,
#   "puppet_ca_proxy_id": null,
#   "managed": false,
#   "use_image": null,
#   "image_file": "",
#   "uuid": null,
#   "compute_resource_id": null,
#   "puppet_proxy_id": null,
#   "certname": "panlab-satellite-client",
#   "image_id": null,
#   "organization_id": 1,
#   "location_id": 2,
#   "otp": null,
#   "realm_id": null,
#   "compute_profile_id": null,
#   "provision_method": "build",
#   "grub_pass": null,
#   "discovery_rule_id": null,
#   "global_status": 0,
#   "lookup_value_matcher": "fqdn=panlab-satellite-client",
#   "openscap_proxy_id": null,
#   "pxe_loader": null,
#   "initiated_at": "2023-05-17T06:43:59.574Z",
#   "build_errors": null,
#   "content_facet_attributes": {
#     "id": 1,
#     "host_id": 2,
#     "uuid": "e9d03372-d3f4-4970-bb38-3a2282458e29",
#     "content_view_id": 1,
#     "lifecycle_environment_id": 1,
#     "kickstart_repository_id": null,
#     "content_source_id": null,
#     "installable_security_errata_count": 0,
#     "installable_enhancement_errata_count": 0,
#     "installable_bugfix_errata_count": 0,
#     "applicable_rpm_count": 0,
#     "upgradable_rpm_count": 0,
#     "applicable_module_stream_count": 0,
#     "upgradable_module_stream_count": 0,
#     "applicable_deb_count": 0,
#     "upgradable_deb_count": 0
#   },
#   "subscription_facet_attributes": {
#     "id": 1,
#     "host_id": 2,
#     "uuid": "e9d03372-d3f4-4970-bb38-3a2282458e29",
#     "last_checkin": "2023-06-26T03:27:43.457Z",
#     "service_level": "",
#     "release_version": "8.6",
#     "autoheal": true,
#     "registered_at": "2023-05-17T06:43:47.000Z",
#     "registered_through": "panlab-satellite-server.infra.wzhlab.top",
#     "user_id": null,
#     "hypervisor": false,
#     "hypervisor_host_id": null,
#     "purpose_usage": "",
#     "purpose_role": "",
#     "dmi_uuid": "4C6B4D56-ACB7-585F-EB20-90FD676DEA4B"
#   }
# }
调用了这个接口之后,我们就能看到这个主机被注销了。

网络防火墙端口
客户的网络有严格的限制,要访问公网,需要特定的开防火墙,那么satellite需要开什么防火墙策略呢?
根据以下的一些官方知识库
- How to access Red Hat Subscription Manager (RHSM) through a firewall or proxy
- Public CIDR Lists for Red Hat (IP Addresses for cdn.redhat.com)
- Downloading Packages via Red Hat Official Network is Slow in mainland China
- What is the IP address range for 'subscription.rhn.redhat.com' and 'subscription.rhsm.redhat.com'?
- How do I configure my firewall for api.access.redhat.com?
我们总结出了一些域名需要放开
- subscription.rhn.redhat.com:443 [https] AND subscription.rhsm.redhat.com:443 [https] (This is the new default address in newer versions of RHEL 7)
- cdn.redhat.com:443 [https]
- *.akamaiedge.net:443 [https] OR *.akamaitechnologies.com:443 [https]
- china.cdn.redhat.com:443 [https]
如果客户网络的防火墙,只支持ip,那么要放开如下的一系列网络段,不过根据作者实际测试,这个ip地址列表并不准确,或者说,更新的并不及时。
端口转发
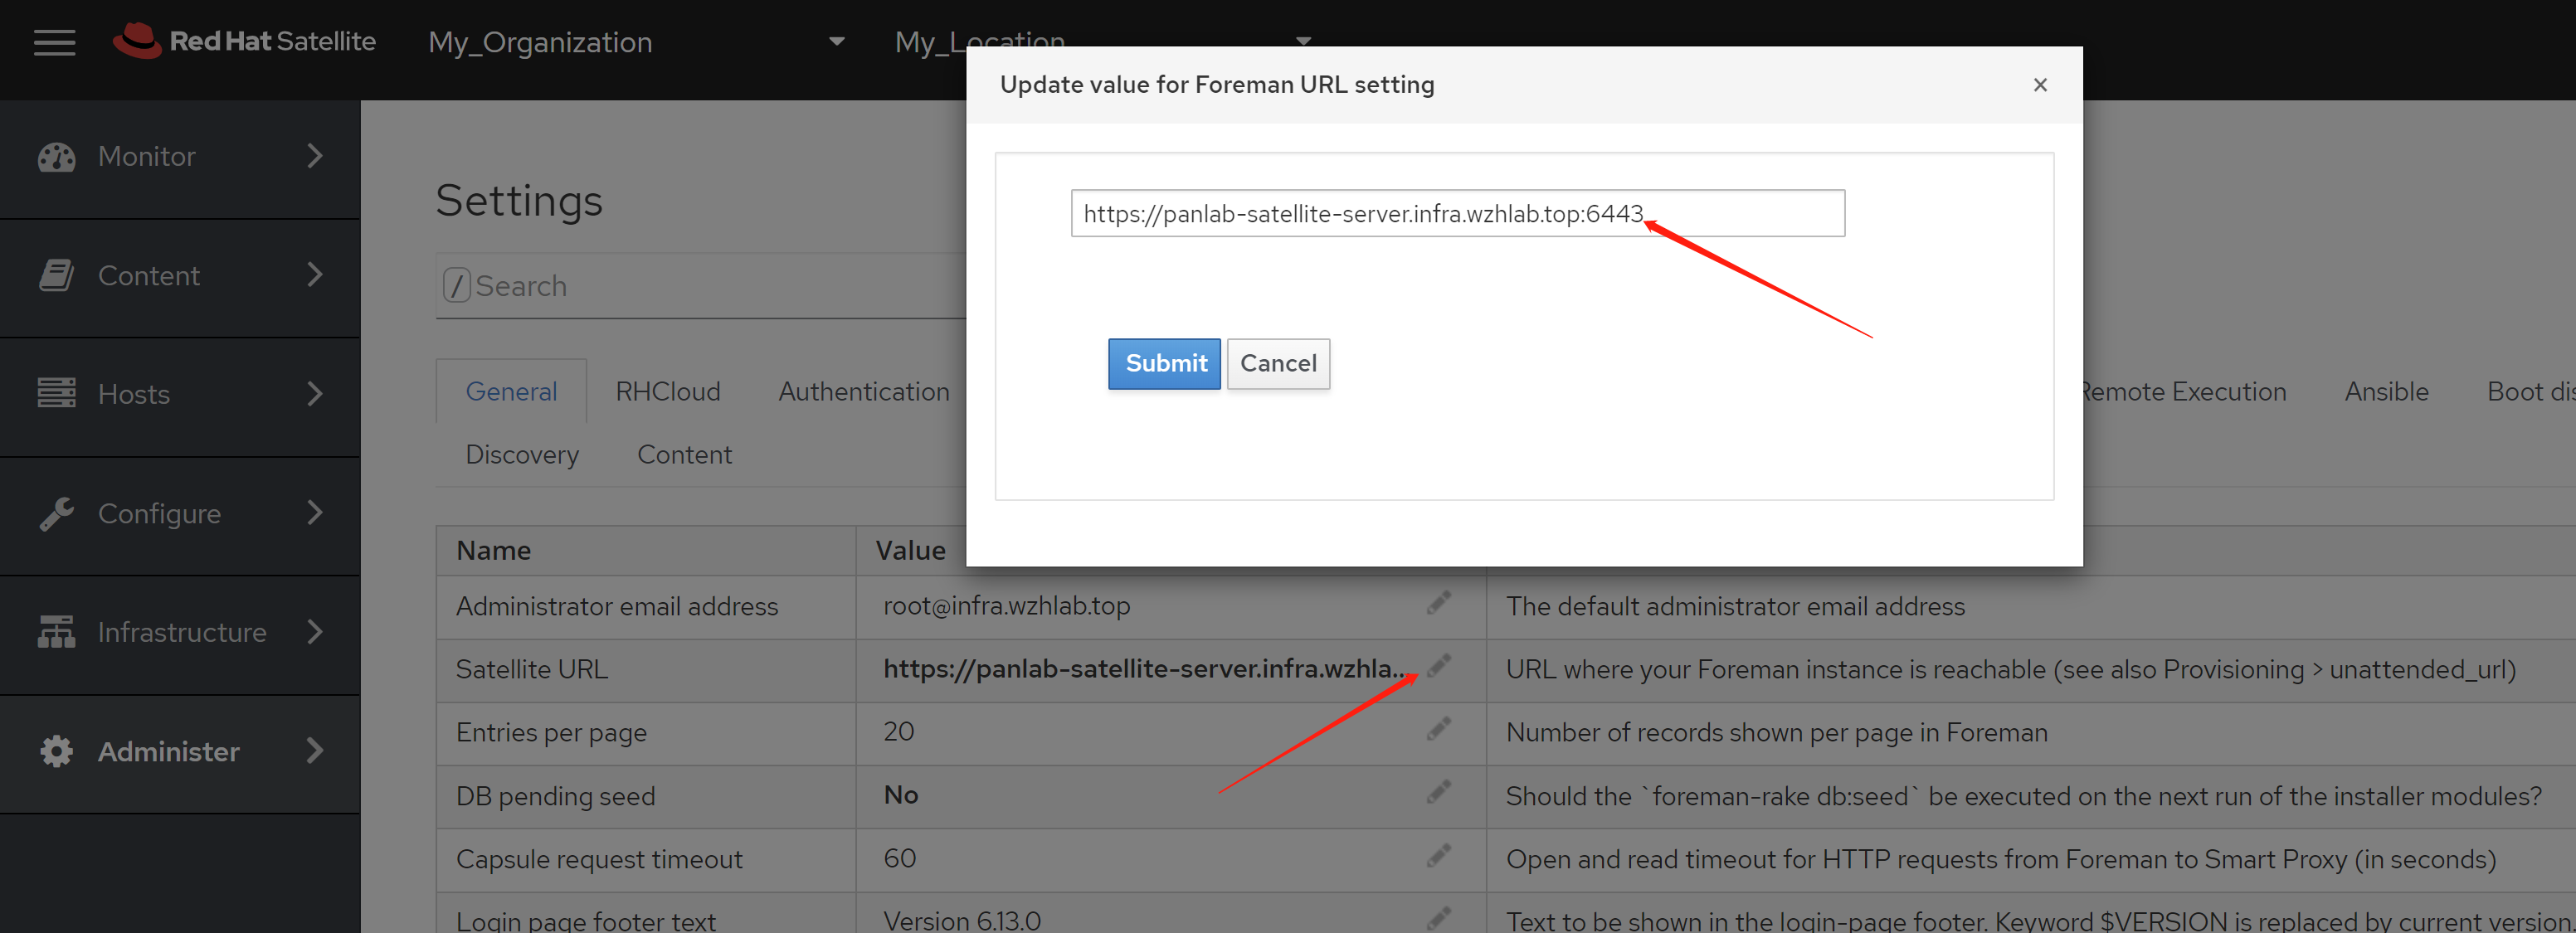
客户内网有严格的流量管理,不允许443端口通讯,需要把satellite的https 443端口,变成6443,那么我们来试试
先在web console上做一个配置
# on satellite server
# redirect 6443 to 443
iptables -t nat -A PREROUTING -p tcp --dport 6443 -j REDIRECT --to-port 443

# block 443 traffic REJECT
# iptables -A INPUT -p tcp --dport 443 -j DROP
# iptables -A INPUT -p tcp --dport 443 -j REJECT
# iptables -A INPUT -p tcp --dport 443 -j ACCEPT
# iptables -A INPUT -p tcp --dport 80 -j ACCEPT

# persistent
iptables-save > /etc/sysconfig/iptables

cat << EOF > /etc/systemd/system/iptables.service
[Unit]
Description=iptables Firewall Rules
After=network.target

[Service]
ExecStart=/sbin/iptables-restore /etc/sysconfig/iptables
Type=oneshot
RemainAfterExit=yes

[Install]
WantedBy=multi-user.target
EOF

systemctl enable --now iptables.service

# systemctl disable --now iptables.service

# sed -i "s/443/6443/g" /etc/httpd/conf/ports.conf

# semanage port -a -t http_port_t -p tcp 6443

# on client node
# to register
curl -sS --insecure 'https://panlab-satellite-server.infra.wzhlab.top:6443/register?activation_keys=demo-activate&location_id=2&organization_id=1&setup_insights=false&setup_remote_execution=false&update_packages=false' -H 'Authorization: Bearer eyJhbGciOiJIUzI1NiJ9.eyJ1c2VyX2lkIjo0LCJpYXQiOjE2ODk4MjMxNDksImp0aSI6IjUxNTNiZmFjMDIxMjNjYjEzZDdjZjM5NWRkMWIyZWEzMWQ3NzA3YTczNzgxNzRhOWI5MDMzMzdjOTA4MzBlY2UiLCJzY29wZSI6InJlZ2lzdHJhdGlvbiNnbG9iYWwgcmVnaXN0cmF0aW9uI2hvc3QifQ.idNFXNsi6mz0fKef42yn_XwVWvwdKD2R3FolAHsrRmo' > sub.sh

sed -i 's/--server.port="443"/--server.port="6443"/g' sub.sh

sed -i 's|https://panlab-satellite-server.infra.wzhlab.top/|https://panlab-satellite-server.infra.wzhlab.top:6443/|g' sub.sh

# manually modify the shell
# comment out 2 step at the end of the script
# 我们的场景简单,就不需要其他步骤了

#     #register_katello_host | bash
# 	echo 'skip step'
# else
#     #register_host | bash
# 	echo 'skip step'
# fi

bash sub.sh


subscription-manager release --list
# +-------------------------------------------+
#           Available Releases
# +-------------------------------------------+
# 8.6

subscription-manager release --set=8.6

subscription-manager config
# [server]
  #  hostname = panlab-satellite-server.infra.wzhlab.top
  #  insecure = [0]
  #  no_proxy = []
  #  port = 6443
# ......
# [rhsm]
#    auto_enable_yum_plugins = [1]
#    baseurl = https://panlab-satellite-server.infra.wzhlab.top:6443/pulp/content
# ......

subscription-manager list --installed
# +-------------------------------------------+
#     Installed Product Status
# +-------------------------------------------+
# Product Name: Red Hat Enterprise Linux for x86_64
# Product ID:   479
# Version:      8.6
# Arch:         x86_64

subscription-manager repos
# +----------------------------------------------------------+
#     Available Repositories in /etc/yum.repos.d/redhat.repo
# +----------------------------------------------------------+
# Repo ID:   rhel-8-for-x86_64-appstream-rpms
# Repo Name: Red Hat Enterprise Linux 8 for x86_64 - AppStream (RPMs)
# Repo URL:  https://panlab-satellite-server.infra.wzhlab.top:6443/pulp/content/My_Organization/Library/content/dist/rhel8/8.6/x86_64/appstream/os
# Enabled:   1

# Repo ID:   rhel-8-for-x86_64-baseos-rpms
# Repo Name: Red Hat Enterprise Linux 8 for x86_64 - BaseOS (RPMs)
# Repo URL:  https://panlab-satellite-server.infra.wzhlab.top:6443/pulp/content/My_Organization/Library/content/dist/rhel8/8.6/x86_64/baseos/os
# Enabled:   1

# try to unregister using satellite API
# get host id from satellite
# do not run below command on satellite server, you will face iptable redirect rule failure
curl -s --request GET --insecure --user admin:redhat \
https://panlab-satellite-server.infra.wzhlab.top:6443/api/hosts/client-0-changed | jq .id
# 6

# delete host using host id
curl -s --request DELETE --insecure --user admin:redhat \
https://panlab-satellite-server.infra.wzhlab.top:6443/api/hosts/6 | jq .
# {
#   "id": 6,
#   "name": "client-0-changed",
#   "last_compile": "2023-07-20T04:02:48.000Z",
#   "last_report": null,
#   "updated_at": "2023-07-20T04:02:48.132Z",
#   "created_at": "2023-07-20T03:19:39.676Z",
#   "root_pass": null,
#   "architecture_id": 1,
#   "operatingsystem_id": 2,
#   "ptable_id": null,
#   "medium_id": null,
#   "build": false,
#   "comment": null,
#   "disk": null,
#   "installed_at": "2023-07-20T03:20:28.857Z",
#   "model_id": 1,
#   "hostgroup_id": null,
#   "owner_id": 1,
#   "owner_type": "User",
#   "enabled": true,
#   "puppet_ca_proxy_id": null,
#   "managed": false,
#   "use_image": null,
#   "image_file": "",
#   "uuid": null,
#   "compute_resource_id": null,
#   "puppet_proxy_id": null,
#   "certname": "client-0-changed",
#   "image_id": null,
#   "organization_id": 1,
#   "location_id": 2,
#   "otp": null,
#   "realm_id": null,
#   "compute_profile_id": null,
#   "provision_method": "build",
#   "grub_pass": null,
#   "discovery_rule_id": null,
#   "global_status": 0,
#   "lookup_value_matcher": "fqdn=client-0-changed",
#   "openscap_proxy_id": null,
#   "pxe_loader": null,
#   "initiated_at": "2023-07-20T03:20:27.055Z",
#   "build_errors": null,
#   "content_facet_attributes": {
#     "id": 5,
#     "host_id": 6,
#     "uuid": "e91e4f8d-6ace-4a7a-8af0-dd7311786042",
#     "content_view_id": 1,
#     "lifecycle_environment_id": 1,
#     "kickstart_repository_id": null,
#     "content_source_id": null,
#     "installable_security_errata_count": 0,
#     "installable_enhancement_errata_count": 0,
#     "installable_bugfix_errata_count": 0,
#     "applicable_rpm_count": 0,
#     "upgradable_rpm_count": 0,
#     "applicable_module_stream_count": 0,
#     "upgradable_module_stream_count": 0,
#     "applicable_deb_count": 0,
#     "upgradable_deb_count": 0
#   },
#   "subscription_facet_attributes": {
#     "id": 9,
#     "host_id": 6,
#     "uuid": "e91e4f8d-6ace-4a7a-8af0-dd7311786042",
#     "last_checkin": "2023-07-20T04:02:46.801Z",
#     "service_level": "",
#     "release_version": "8.6",
#     "autoheal": true,
#     "registered_at": "2023-07-20T03:20:16.000Z",
#     "registered_through": "panlab-satellite-server.infra.wzhlab.top",
#     "user_id": null,
#     "hypervisor": false,
#     "hypervisor_host_id": null,
#     "purpose_usage": "",
#     "purpose_role": "",
#     "dmi_uuid": "4C6B4D56-ACB7-585F-EB20-90FD676DEA4B"
#   }
# }
从上面的操作,可以看到,客户的需求非常简单,那么我们是可以把端口从443变成6443的。大致的过程,是在web console上配置一下入口url,然后在主机上配置iptables,做端口转发。然后,在被管理节点上,把下发的shell脚本,做个定制,就可以了。
但是,需要注意,更改443端口,是红帽官方不支持的定制化,所以只能用于需求非常简单的场景中。
中国区加速
satellite默认会从cdn.redhat.com上下载rpm,但是在客户网络里面很慢,从china.cdn.redhat.com下载比较快,那么我们怎么配置,来用中国区的镜像呢?
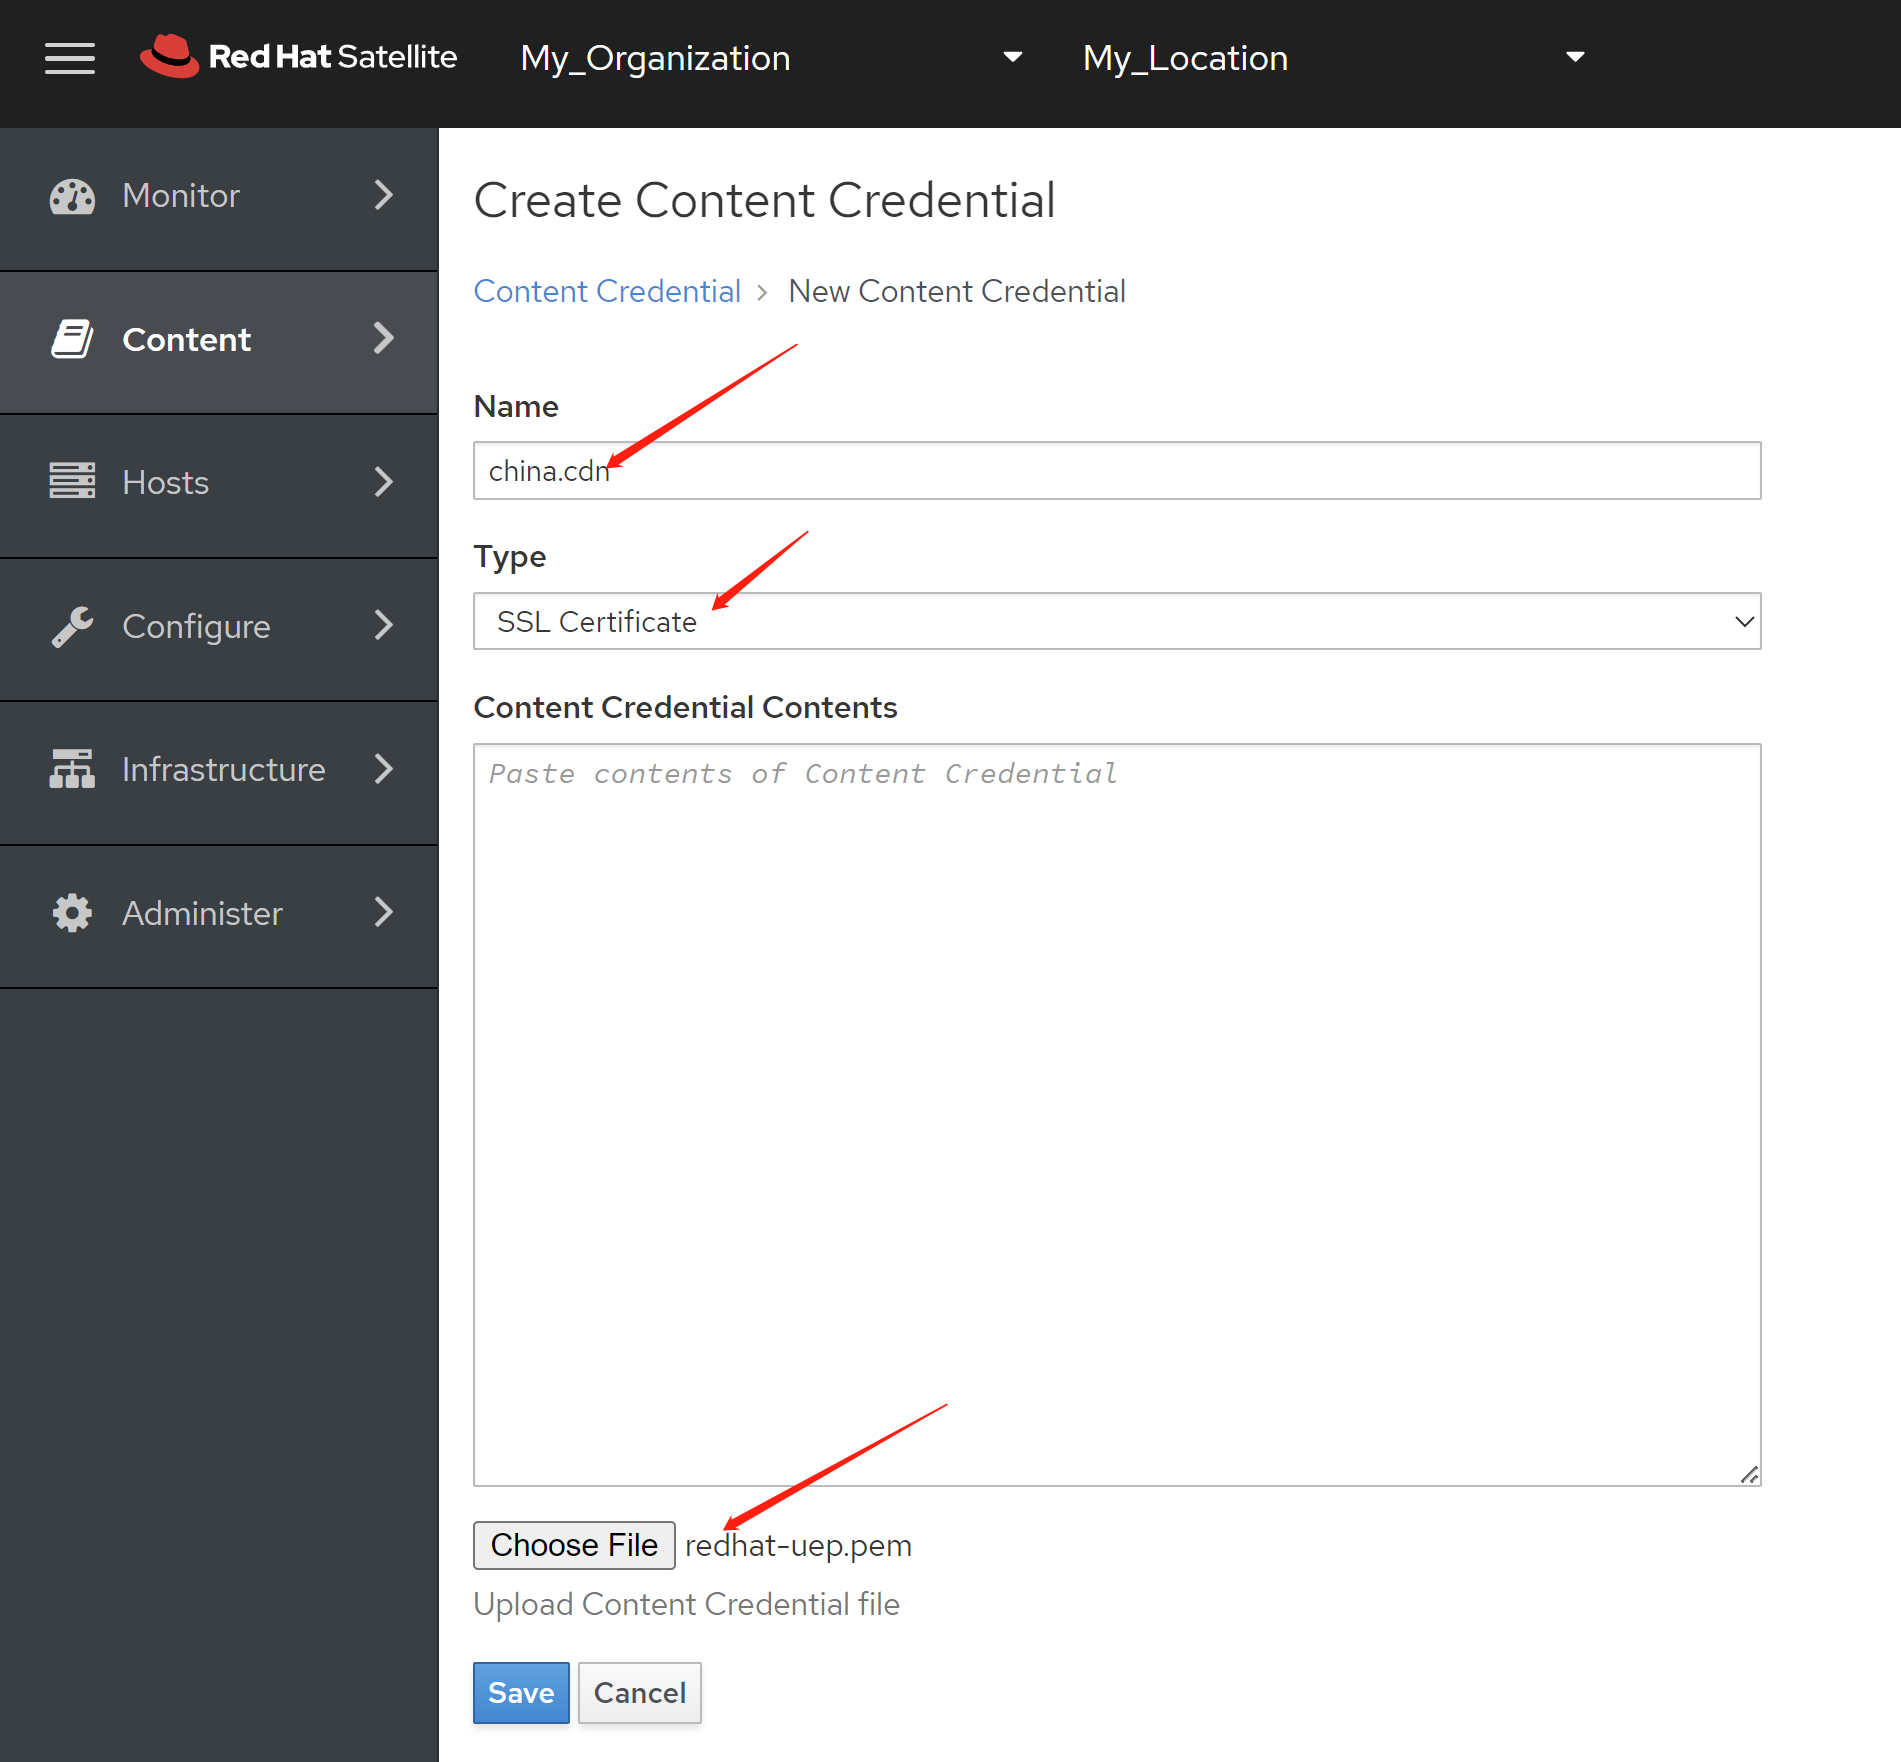
第一步,配置一个 Content Credentials,注意,这里面的文件,是/etc/rhsm/ca/redhat-uep.pem,你可以下载到本地上传,也可以复制内容进去。
第二步,是配置一个 "Custom CDN",注意这里面要配置 SSL CA Content Credential ,用我们第一步配置的就好。

第三步,是刷新一下
到这里,我们就配置成功,可以同步啦。
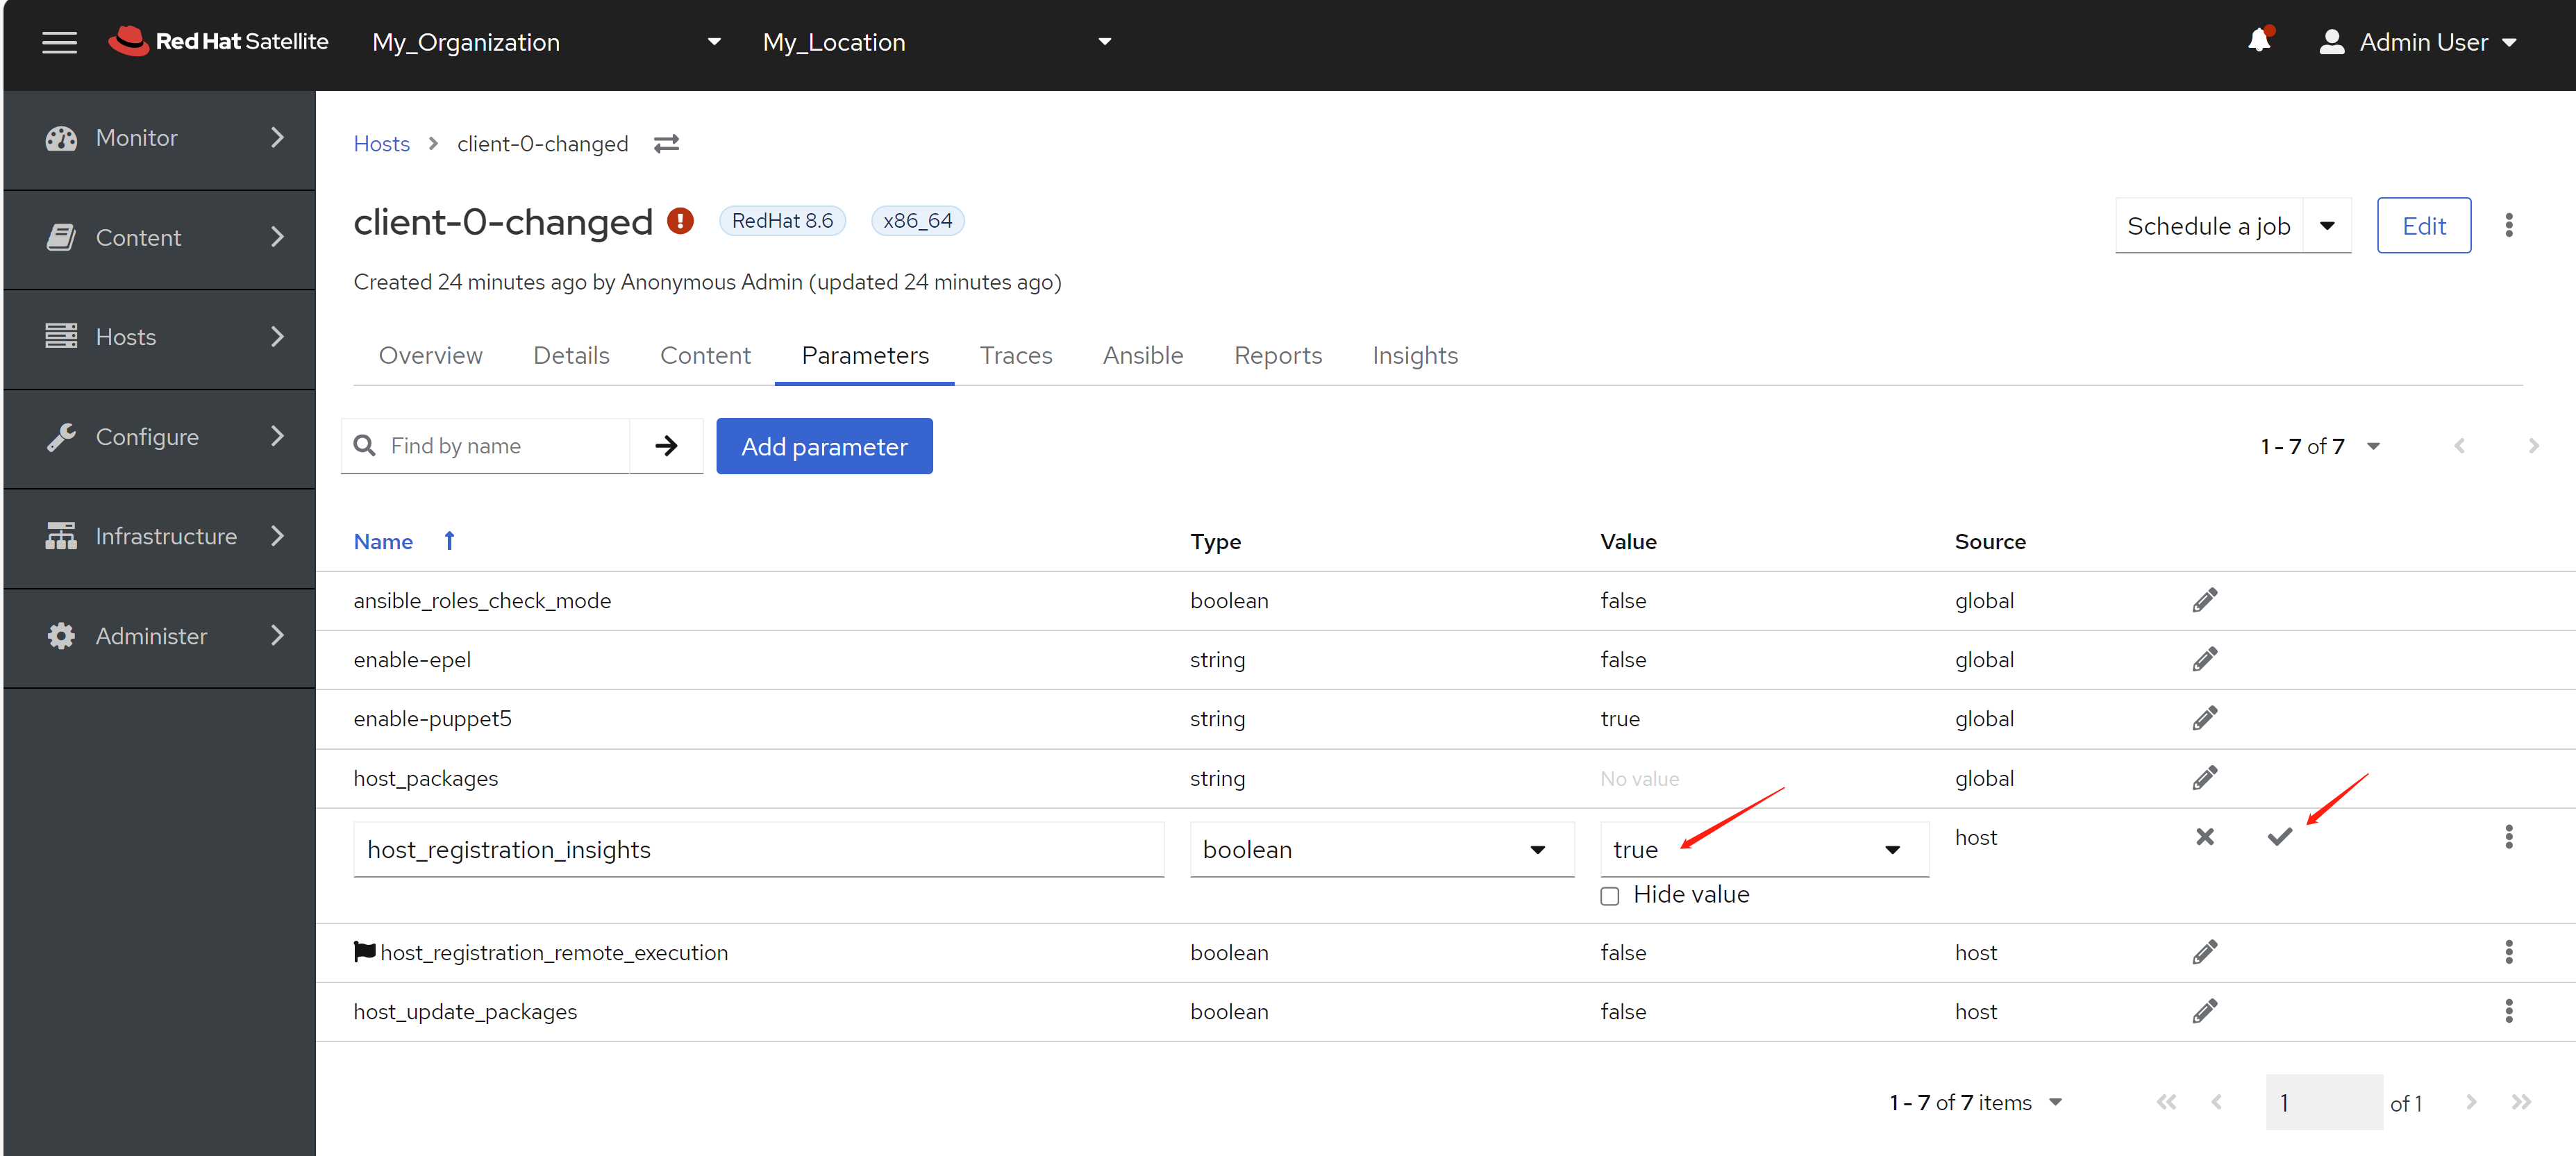
安装 insight 插件
satellite也可以作为insight的proxy来使用,尝试之前,参考以下官方知识库,把对应的insight开关打开。
对应到实验环境,我们需要去目标主机上,单独打开insight开关
默认是关上的(false)
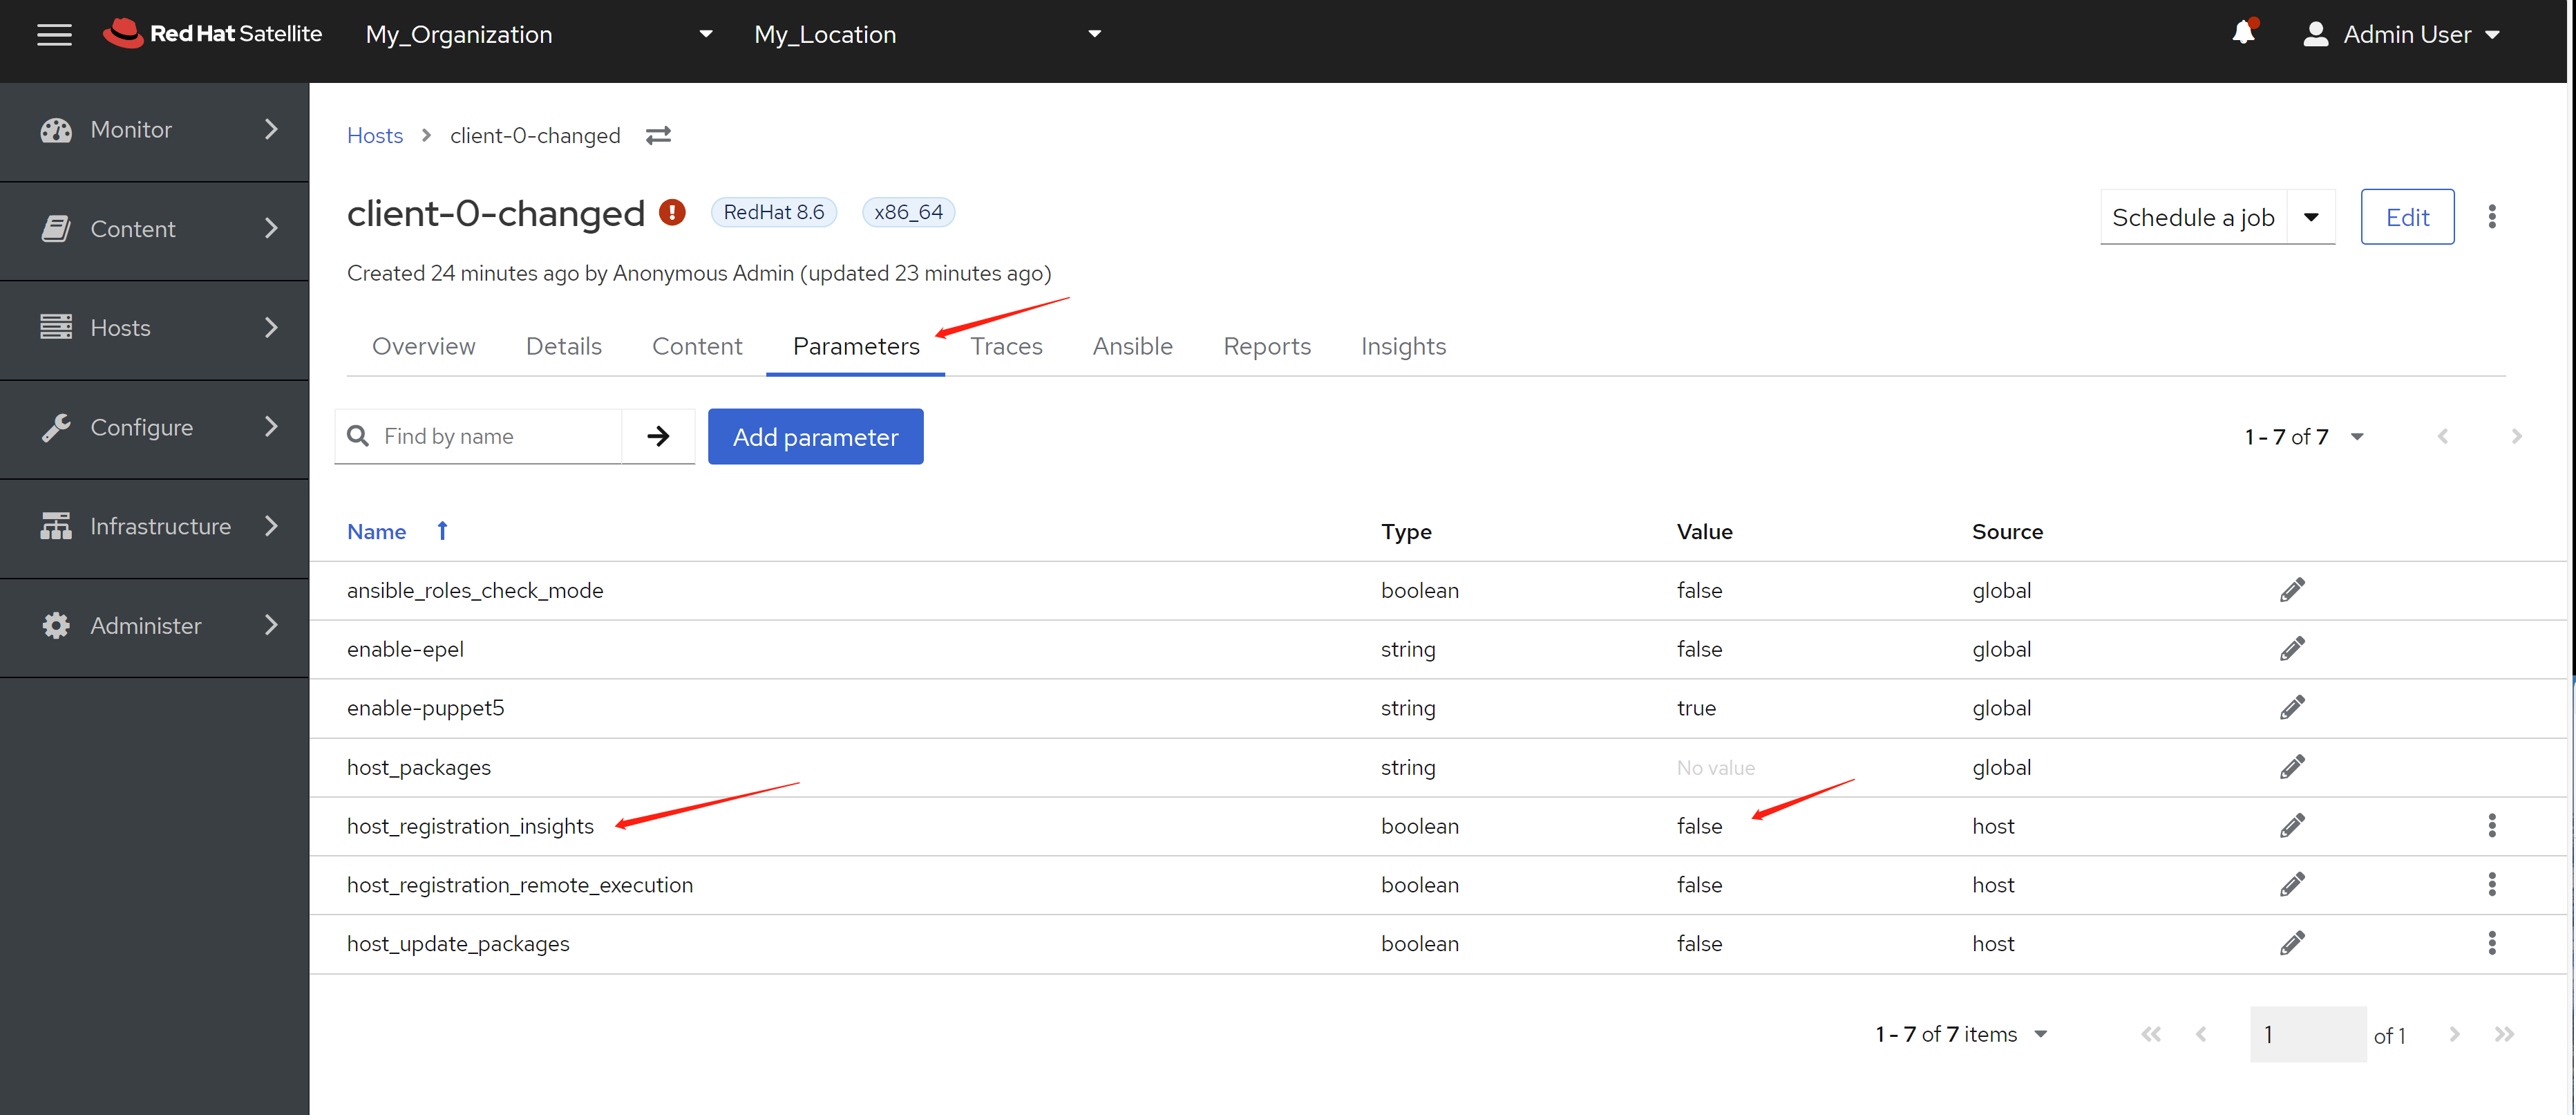
我们打开它。
然后,我们去目标主机,进行操作。我们先模拟离线环境,做iptables规则,关闭所有出流量,只留下satellite。
# block traffic to outside
# except to satellite

iptables -A OUTPUT -p tcp -d 172.21.6.171 -j ACCEPT
iptables -A OUTPUT -p tcp --sport 22 -j ACCEPT
iptables -A OUTPUT -p tcp -j REJECT


# try to register on insight
insights-client --register
# Successfully registered host client-0-changed
# Automatic scheduling for Insights has been enabled.
# Starting to collect Insights data for client-0-changed
# Uploading Insights data.
# Successfully uploaded report from client-0-changed to account 5910538.
# View the Red Hat Insights console at https://console.redhat.com/insights/

insights-client --check-results

insights-client --show-results
# [
#  {
#   "rule": {
#    "rule_id": "generate_vmcore_failed_during_makedumpfile|GENERATE_VMCORE_FAILED_DURING_MAKEDUMPFILE",
#    "created_at": "2023-02-08T08:31:18.561333Z",
#    "updated_at": "2023-03-05T08:31:21.314917Z",
#    "description": "The vmcore generation fails in RHEL 8.6 when \"cgroup_disable=memory\" is configured due to a known bug in the kernel",
#    "active": true,
#    "category": {
#     "id": 1,
#     "name": "Availability"
#    },
#    "impact": {
#     "name": "Kernel Panic",
#     "impact": 4
#    },
#    "likelihood": 3,
#    "node_id": "6969010",
#    "tags": "kdump kernel panic",
#    "reboot_required": true,
#    "publish_date": "2023-03-05T03:26:00Z",
#    "summary": "The vmcore generation fails in RHEL 8.6 when \"cgroup_disable=memory\" is configured due to a known bug in the kernel.\n",
#    "generic": "The vmcore generation fails in RHEL 8.6 when \"cgroup_disable=memory\" is configured due to a known bug in the kernel.\n",
#    "reason": "This host is running **RHEL 8.6** with **kernel-{{=pydata.rhel_version}}** and \n**\"cgroup_disable=memory\"** is appended to the **KDUMP_COMMANDLINE_APPEND** in\nthe `/etc/sysconfig/kdump`:\n~~~\nKDUMP_COMMANDLINE_APPEND=\"{{=pydata.kdump_data_append}}\"\n~~~\n\nHowever, due to a known bug in the kernel versions prior to **4.18.0-372.40.1.el8_6**, \nthe vmcore generation fails when **\"cgroup_disable=memory\"** is appended to \n**KDUMP_COMMANDLINE_APPEND** in the `/etc/sysconfig/kdump`.\n",
#    "more_info": "",
#    "resolution_set": [
#     {
#      "system_type": 105,
#      "resolution": "Red Hat recommends that you perform the following steps:\n\n{{?pydata.cur_lock && pydata.rcm_locks}}\n* Unset the release lock.\n  ~~~\n  # subscription-manager release --unset\n  ~~~\n{{?}}\n\n{{?pydata.no_base &&\n  (pydata.cur_lock==null || (pydata.cur_lock && pydata.rcm_locks))}}\n* Enable the RHEL base repo:\n  ~~~\n  # subscription-manager repos --enable={{=pydata.no_base}}\n  ~~~\n  Note: To fix the issue in the base channel, you have to enable the base channel at first.\n{{?}}\n\n{{?pydata.cur_lock && pydata.req_repos && pydata.rcm_locks==null}}\n* {{?Object.keys(pydata.req_repos).length > 1}}Enable one of the following channels{{??}}Enable the following channel{{?}}:\n  ~~~\n  {{~pydata.req_repos:e}}# subscription-manager repos --enable={{=e}}\n  {{~}}\n  ~~~\n  Note: Red Hat only provides the resolution in the required channel{{?Object.keys(pydata.req_repos).length > 1}}s{{?}}. \n{{?}}\n* Update the `kernel` package:\n  ~~~\n  # yum update kernel\n  ~~~\n* Reboot the system with the new kernel:\n  ~~~\n  # reboot\n  ~~~\n{{?pydata.cur_lock && pydata.rcm_locks}}\n**Alternatively**, if unsetting the release lock is not an option, fix this issue by re-setting the release lock to {{?Object.keys(pydata.rcm_locks).length > 1}}one of the RHEL releases ``{{~pydata.rcm_locks:e}}{{=e}}, {{~}}``{{??}}the RHEL release ``{{=pydata.rcm_locks[0]}}``{{?}} and updating the package.{{?}}\n\n\nAfter applying the remediation, refresh the results of Advisor analysis by running the `insights-client` command on the system. \n~~~ \n# insights-client \n~~~ \n",
#      "resolution_risk": {
#       "name": "Upgrade Kernel",
#       "risk": 3
#      },
#      "has_playbook": true
#     }
#    ],
#    "total_risk": 3
#   },
#   "details": {
#    "type": "rule",
#    "error_key": "GENERATE_VMCORE_FAILED_DURING_MAKEDUMPFILE",
#    "rhel_version": "4.18.0-372.32.1.el8_6.x86_64",
#    "kdump_data_append": "irqpoll nr_cpus=1 reset_devices cgroup_disable=memory mce=off numa=off udev.children-max=2 panic=10 rootflags=nofail acpi_no_memhotplug transparent_hugepage=never nokaslr novmcoredd hest_disable"
#   },
#   "resolution": {
#    "system_type": 105,
#    "resolution": "Red Hat recommends that you perform the following steps:\n\n{{?pydata.cur_lock && pydata.rcm_locks}}\n* Unset the release lock.\n  ~~~\n  # subscription-manager release --unset\n  ~~~\n{{?}}\n\n{{?pydata.no_base &&\n  (pydata.cur_lock==null || (pydata.cur_lock && pydata.rcm_locks))}}\n* Enable the RHEL base repo:\n  ~~~\n  # subscription-manager repos --enable={{=pydata.no_base}}\n  ~~~\n  Note: To fix the issue in the base channel, you have to enable the base channel at first.\n{{?}}\n\n{{?pydata.cur_lock && pydata.req_repos && pydata.rcm_locks==null}}\n* {{?Object.keys(pydata.req_repos).length > 1}}Enable one of the following channels{{??}}Enable the following channel{{?}}:\n  ~~~\n  {{~pydata.req_repos:e}}# subscription-manager repos --enable={{=e}}\n  {{~}}\n  ~~~\n  Note: Red Hat only provides the resolution in the required channel{{?Object.keys(pydata.req_repos).length > 1}}s{{?}}. \n{{?}}\n* Update the `kernel` package:\n  ~~~\n  # yum update kernel\n  ~~~\n* Reboot the system with the new kernel:\n  ~~~\n  # reboot\n  ~~~\n{{?pydata.cur_lock && pydata.rcm_locks}}\n**Alternatively**, if unsetting the release lock is not an option, fix this issue by re-setting the release lock to {{?Object.keys(pydata.rcm_locks).length > 1}}one of the RHEL releases ``{{~pydata.rcm_locks:e}}{{=e}}, {{~}}``{{??}}the RHEL release ``{{=pydata.rcm_locks[0]}}``{{?}} and updating the package.{{?}}\n\n\nAfter applying the remediation, refresh the results of Advisor analysis by running the `insights-client` command on the system. \n~~~ \n# insights-client \n~~~ \n",
#    "resolution_risk": {
#     "name": "Upgrade Kernel",
#     "risk": 3
#    },
#    "has_playbook": true
#   },
#   "impacted_date": "2023-09-05T05:09:54.945795Z"
#  },
#  {
#   "rule": {
#    "rule_id": "el8_to_el9_upgrade|RHEL8_TO_RHEL9_UPGRADE_AVAILABLE_V1",
#    "created_at": "2023-07-18T08:45:10.136263Z",
#    "updated_at": "2023-09-04T20:32:26.551599Z",
#    "description": "RHEL 8 system is eligible for an in-place upgrade to RHEL 9 using the Leapp utility",
#    "active": true,
#    "category": {
#     "id": 4,
#     "name": "Performance"
#    },
#    "impact": {
#     "name": "Best Practice",
#     "impact": 1
#    },
#    "likelihood": 1,
#    "node_id": "6955478",
#    "tags": "autoack kernel leapp",
#    "reboot_required": true,
#    "publish_date": "2023-08-11T08:32:29Z",
#    "summary": "Red Hat provides `leapp` utility to support upgrade from **RHEL 8** to **RHEL 9**. The current **RHEL 8** version is eligible for upgrade to **RHEL 9** via `leapp` utility. Red Hat recommends that you install `leapp` packages.\n\nOne way to install `leapp` is during execution of **RHEL preupgrade analysis utility** in *Automation Toolkit -> Tasks* service. Run this task to understand the impact of an upgrade on your fleet and make a remediation plan before your maintenance window begins.\n",
#    "generic": "Red Hat provides `leapp` utility to support upgrade from **RHEL 8** to **RHEL 9**. The current **RHEL 8** version is eligible for upgrade to **RHEL 9** via `leapp` utility. Red Hat recommends that you install `leapp` packages.\n\nOne way to install `leapp` is during execution of **RHEL preupgrade analysis utility** in *Automation Toolkit -> Tasks* service. Run this task to understand the impact of an upgrade on your fleet and make a remediation plan before your maintenance window begins.\n",
#    "reason": "{{? pydata.error_key == \"RHEL8_TO_RHEL9_UPGRADE_AVAILABLE\"}}\nThe current **RHEL** version **{{=pydata.supported_path[0]}}** is eligible for upgrade to **RHEL** version {{? pydata.supported_path.length > 2}}**{{=pydata.supported_path[2]}}** (default) or **{{=pydata.supported_path[1]}}**{{??}}**{{=pydata.supported_path[1]}}**{{?}} via the Leapp utility.\n{{?}}\n\n{{? pydata.error_key == \"RHEL8_TO_RHEL9_UPGRADE_AVAILABLE_RPMS\"}}\nThe Leapp utility is available on this system. The current **RHEL** version **{{=pydata.supported_path[0]}}** is eligible for upgrade to **RHEL** version {{? pydata.supported_path.length > 2}}**{{=pydata.supported_path[2]}}** (default) or **{{=pydata.supported_path[1]}}**{{??}}**{{=pydata.supported_path[1]}}**{{?}} via the Leapp utility.\n{{?}}\n",
#    "more_info": "One way to install `leapp` is during execution of **RHEL preupgrade analysis utility** in [Automation Toolkit -> Tasks](https://console.redhat.com/insights/tasks) service. Run this task to understand the impact of an upgrade on your fleet and make a remediation plan before your maintenance window begins.\n",
#    "resolution_set": [
#     {
#      "system_type": 105,
#      "resolution": "Red Hat recommends that you upgrade to **RHEL9** with the following steps:\n\n{{? pydata.error_key == \"RHEL8_TO_RHEL9_UPGRADE_AVAILABLE\"}}\n1. Planning an upgrade according to these [points](https://access.redhat.com/documentation/en-us/red_hat_enterprise_linux/9/html/upgrading_from_rhel_8_to_rhel_9/planning-an-upgrade_upgrading-from-rhel-8-to-rhel-9)\n1. Preparing a RHEL 8 system for the upgrade according to this [procedure](https://access.redhat.com/documentation/en-us/red_hat_enterprise_linux/9/html/upgrading_from_rhel_8_to_rhel_9/assembly_preparing-for-the-upgrade_upgrading-from-rhel-8-to-rhel-9).\n\n1. Install `leapp` utility.\n   ~~~\n   # dnf install leapp-upgrade\n   ~~~\n1. Identify potential upgrade problems before upgrade.\n   ~~~\n   # leapp preupgrade --target {{? pydata.supported_path.length > 2}}{{=pydata.supported_path[2]}}{{??}}{{=pydata.supported_path[1]}}{{?}}\n   ~~~\n   **Note**: Check `/var/log/leapp/leapp-report.txt` or web console for any pre-check failure and refer to [Reviewing the pre-upgrade report](https://access.redhat.com/documentation/en-us/red_hat_enterprise_linux/9/html/upgrading_from_rhel_8_to_rhel_9/reviewing-the-pre-upgrade-report_upgrading-from-rhel-8-to-rhel-9) for more details. \n1. Start the upgrade.\n   ~~~\n   # leapp upgrade --target {{? pydata.supported_path.length > 2}}{{=pydata.supported_path[2]}}{{??}}{{=pydata.supported_path[1]}}{{?}}\n   ~~~\n1. Reboot system.\n   ~~~\n   # reboot\n   ~~~\n{{?}}\n\n{{? pydata.error_key == \"RHEL8_TO_RHEL9_UPGRADE_AVAILABLE_RPMS\"}}\n1. Planning an upgrade according to these [points](https://access.redhat.com/documentation/en-us/red_hat_enterprise_linux/9/html/upgrading_from_rhel_8_to_rhel_9/planning-an-upgrade_upgrading-from-rhel-8-to-rhel-9)\n1. Preparing a RHEL 8 system for the upgrade according to this [procedure](https://access.redhat.com/documentation/en-us/red_hat_enterprise_linux/9/html/upgrading_from_rhel_8_to_rhel_9/assembly_preparing-for-the-upgrade_upgrading-from-rhel-8-to-rhel-9).\n\n1. Identify potential upgrade problems before upgrade.\n   ~~~\n   # leapp preupgrade --target {{? pydata.supported_path.length > 2}}{{=pydata.supported_path[2]}}{{??}}{{=pydata.supported_path[1]}}{{?}}\n   ~~~\n1. Start the upgrade.\n   ~~~\n   # leapp upgrade --target {{? pydata.supported_path.length > 2}}{{=pydata.supported_path[2]}}{{??}}{{=pydata.supported_path[1]}}{{?}}\n   ~~~\n   **Note**: Check `/var/log/leapp/leapp-report.txt` or web console for any pre-check failure and refer to [Reviewing the pre-upgrade report](https://access.redhat.com/documentation/en-us/red_hat_enterprise_linux/9/html/upgrading_from_rhel_8_to_rhel_9/reviewing-the-pre-upgrade-report_upgrading-from-rhel-8-to-rhel-9) for more details.\n1. Reboot system.\n   ~~~\n   # reboot\n   ~~~\n{{?}}\nFor more details about upgrading, refer to [Upgrading to RHEL9](https://access.redhat.com/documentation/en-us/red_hat_enterprise_linux/9/html/upgrading_from_rhel_8_to_rhel_9/index).\n\n\nAfter applying the remediation, refresh the results of Advisor analysis by running the `insights-client` command on the system. \n~~~ \n# insights-client \n~~~ \n",
#      "resolution_risk": {
#       "name": "Upgrade RHEL",
#       "risk": 3
#      },
#      "has_playbook": false
#     }
#    ],
#    "total_risk": 1
#   },
#   "details": {
#    "type": "rule",
#    "error_key": "RHEL8_TO_RHEL9_UPGRADE_AVAILABLE_V1",
#    "supported_path": [
#     "8.6",
#     "9.0"
#    ]
#   },
#   "resolution": {
#    "system_type": 105,
#    "resolution": "Red Hat recommends that you upgrade to **RHEL9** with the following steps:\n\n{{? pydata.error_key == \"RHEL8_TO_RHEL9_UPGRADE_AVAILABLE\"}}\n1. Planning an upgrade according to these [points](https://access.redhat.com/documentation/en-us/red_hat_enterprise_linux/9/html/upgrading_from_rhel_8_to_rhel_9/planning-an-upgrade_upgrading-from-rhel-8-to-rhel-9)\n1. Preparing a RHEL 8 system for the upgrade according to this [procedure](https://access.redhat.com/documentation/en-us/red_hat_enterprise_linux/9/html/upgrading_from_rhel_8_to_rhel_9/assembly_preparing-for-the-upgrade_upgrading-from-rhel-8-to-rhel-9).\n\n1. Install `leapp` utility.\n   ~~~\n   # dnf install leapp-upgrade\n   ~~~\n1. Identify potential upgrade problems before upgrade.\n   ~~~\n   # leapp preupgrade --target {{? pydata.supported_path.length > 2}}{{=pydata.supported_path[2]}}{{??}}{{=pydata.supported_path[1]}}{{?}}\n   ~~~\n   **Note**: Check `/var/log/leapp/leapp-report.txt` or web console for any pre-check failure and refer to [Reviewing the pre-upgrade report](https://access.redhat.com/documentation/en-us/red_hat_enterprise_linux/9/html/upgrading_from_rhel_8_to_rhel_9/reviewing-the-pre-upgrade-report_upgrading-from-rhel-8-to-rhel-9) for more details. \n1. Start the upgrade.\n   ~~~\n   # leapp upgrade --target {{? pydata.supported_path.length > 2}}{{=pydata.supported_path[2]}}{{??}}{{=pydata.supported_path[1]}}{{?}}\n   ~~~\n1. Reboot system.\n   ~~~\n   # reboot\n   ~~~\n{{?}}\n\n{{? pydata.error_key == \"RHEL8_TO_RHEL9_UPGRADE_AVAILABLE_RPMS\"}}\n1. Planning an upgrade according to these [points](https://access.redhat.com/documentation/en-us/red_hat_enterprise_linux/9/html/upgrading_from_rhel_8_to_rhel_9/planning-an-upgrade_upgrading-from-rhel-8-to-rhel-9)\n1. Preparing a RHEL 8 system for the upgrade according to this [procedure](https://access.redhat.com/documentation/en-us/red_hat_enterprise_linux/9/html/upgrading_from_rhel_8_to_rhel_9/assembly_preparing-for-the-upgrade_upgrading-from-rhel-8-to-rhel-9).\n\n1. Identify potential upgrade problems before upgrade.\n   ~~~\n   # leapp preupgrade --target {{? pydata.supported_path.length > 2}}{{=pydata.supported_path[2]}}{{??}}{{=pydata.supported_path[1]}}{{?}}\n   ~~~\n1. Start the upgrade.\n   ~~~\n   # leapp upgrade --target {{? pydata.supported_path.length > 2}}{{=pydata.supported_path[2]}}{{??}}{{=pydata.supported_path[1]}}{{?}}\n   ~~~\n   **Note**: Check `/var/log/leapp/leapp-report.txt` or web console for any pre-check failure and refer to [Reviewing the pre-upgrade report](https://access.redhat.com/documentation/en-us/red_hat_enterprise_linux/9/html/upgrading_from_rhel_8_to_rhel_9/reviewing-the-pre-upgrade-report_upgrading-from-rhel-8-to-rhel-9) for more details.\n1. Reboot system.\n   ~~~\n   # reboot\n   ~~~\n{{?}}\nFor more details about upgrading, refer to [Upgrading to RHEL9](https://access.redhat.com/documentation/en-us/red_hat_enterprise_linux/9/html/upgrading_from_rhel_8_to_rhel_9/index).\n\n\nAfter applying the remediation, refresh the results of Advisor analysis by running the `insights-client` command on the system. \n~~~ \n# insights-client \n~~~ \n",
#    "resolution_risk": {
#     "name": "Upgrade RHEL",
#     "risk": 3
#    },
#    "has_playbook": false
#   },
#   "impacted_date": "2023-09-05T05:09:54.945795Z"
#  }
# ]
最后,我们能在公网的insight console上,看到我们的主机。
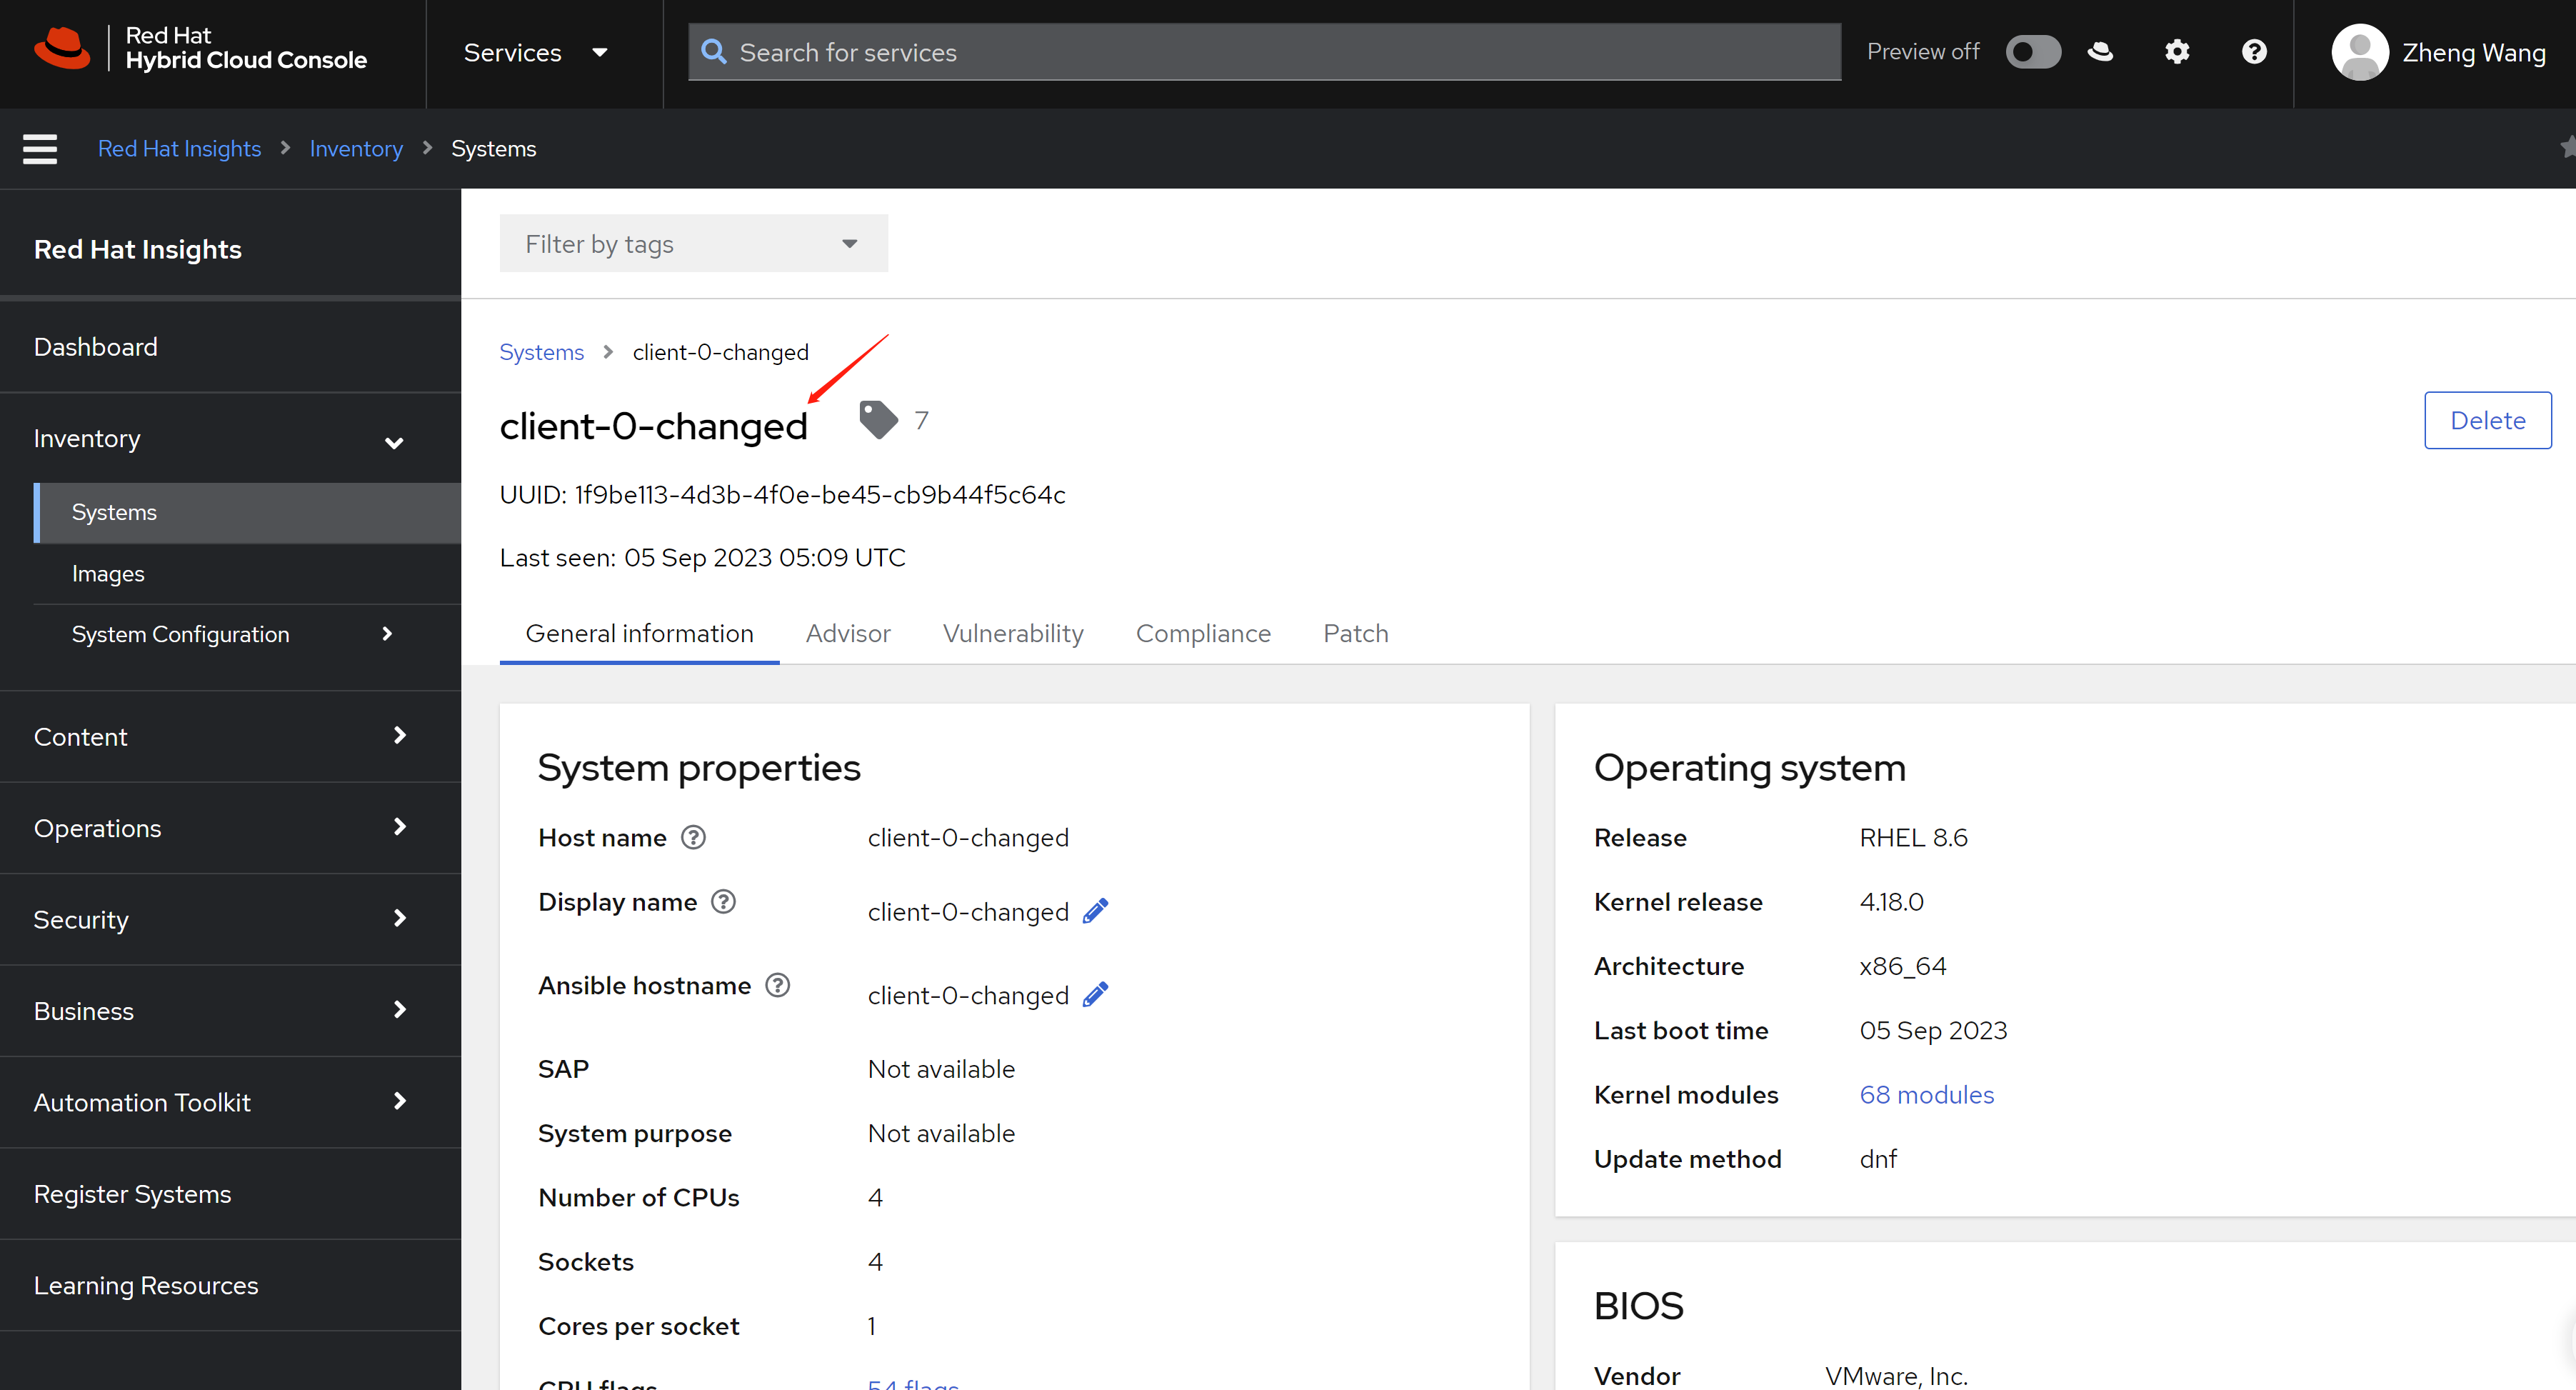
同时,我们注意到,虽然在公网的insight上,能看到这个主机,但是在access.redhat.com的订阅管理中,是看不到这个被管主机的。
总结以下,satellite可以作为insight的proxy使用,但是在实验过程中,我发现insight的结果,只能在主机自己,和insight公网console上展现,而satellite上面,虽然有insight结果展示的入口页面,但是页面是空的,也许有别的配置吧。
重装os
客户有一个特殊场景,如果rhel重装了,那么satellite上面,原来的信息要怎么处理?是否可以不删除satellite上面的信息,直接在rhel上面注册,复用之前的注册信息呢?我们试试
我们重装实验环境中的一台主机
# before reinstall, we check the uuid
subscription-manager facts | grep uuid
# dmi.system.uuid: 8DF84D56-895F-6163-962B-30EF44BDE122
# virt.uuid: 8DF84D56-895F-6163-962B-30EF44BDE122

# after reinstall os
# we can see the uuid is the same
subscription-manager facts | grep uuid
# dmi.system.uuid: 8DF84D56-895F-6163-962B-30EF44BDE122
# virt.uuid: 8DF84D56-895F-6163-962B-30EF44BDE122

# try to register again
curl -sS --insecure 'https://panlab-satellite-server.infra.wzhlab.top/register?activation_keys=demo-activate&location_id=2&organization_id=1&setup_insights=false&setup_remote_execution=false&setup_remote_execution_pull=false&update_packages=false' -H 'Authorization: Bearer eyJhbGciOiJIUzI1NiJ9.eyJ1c2VyX2lkIjo0LCJpYXQiOjE2ODQzMDU1MTYsImp0aSI6IjdiODBkNzdmMjVjYzY1MDZjODQ3OGI2Y2VjNzRkZWZjOGM2YjAyMDUxMDQ4YTcyYTJlMWE1YzRiNTgyMjE5NzAiLCJzY29wZSI6InJlZ2lzdHJhdGlvbiNnbG9iYWwgcmVnaXN0cmF0aW9uI2hvc3QifQ.EVXyW9gjWyAQIFYUxnwwdxAigrPmUo_XYWnqn-Wh1Fw' | bash
# ......
# The DMI UUID of this host (8DF84D56-895F-6163-962B-30EF44BDE122) matches other registered hosts: satellite-client-02 (HTTP error code 422: Unprocessable Entity)
好了,我们看到了结论,satellite发现,已经有一个相同的uuid主机存在,不能再注册了。我们能做的,就是先在satellite里面,把现在已经存在的这个主机给删掉。
change uuid
我们知道了,uuid是注册satellite的一个key,但是,如果我们的环境特殊,uuid就是重复的,那么怎么办呢?官方有解决方案
[root@client ~]# vi /etc/rhsm/facts/uuid.facts
{"dmi.system.uuid": "customuuid"}

* customuuid = hostname which is unique for every machine.
监控 subscription / 订阅
客户想自动化的监控订阅的过期时间,好及时的更新订阅。虽然我们可以在红帽的portal上面方便的看到订阅的状态,但是,如果我们是运维组,没有访问红帽portal的权限(内部沟通协调问题,你懂的),还是需要一个监控的工具来做这件事情。
那么我们就用 satellite 的 API 来做这件事情。
# you can get the org_id by search a host, the result json contain org_id
curl -s --request GET --insecure --user admin:redhat \
  https://panlab-satellite-server.infra.wzhlab.top:6443//katello/api/subscriptions?organization_id=1 | \
  jq -r '["Name","End Date"], (.results[] | [.name, .end_date] ) | @tsv '
# Name    End Date
# Employee SKU    2027-01-01 04:59:59 UTC
从上面的例子,我们可以看到,从 satellite API 里面,能直接拿到订阅的过期时间。方便运维组监控。